
原文作者:Sarathlal Saseendran
原文链接:https://www.c-sharpcorner.com/article/jwt-authentication-and-authorization-in-net-6-0-with-identity-framework/
翻译:沙漠尽头的狼(谷歌翻译加持)
介绍
微软于 2021 年 11 月发布了 .NET 6.0。我已经在 C# Corner 上写了几篇关于 JWT 身份认证的文章。由于 .NET 6.0 进行了一些重大更改,因此我决定写一篇关于使用 .NET 6.0 版本进行 JWT 身份认证的文章。我们将使用微软 Identity 框架来存储用户和角色信息。
Authentication(身份认证)是验证用户凭据的过程,而Authorization(授权)是检查用户访问应用程序中特定模块的权限的过程。在本文中,我们将了解如何通过实现 JWT 身份认证来保护 ASP.NET Core Web API 应用程序。我们还将了解如何在 ASP.NET Core 中使用授权来提供对应用程序各种功能的访问。我们将用户凭据存储在 SQL Server 数据库中(注:您可以使用 MySQL、PostgreSQL 等其他关系型数据库),我们将使用 EF Core 框架和 Identity 框架进行数据库操作。
JSON Web Token (JWT) 是一个开放标准 (RFC 7519),它定义了一种紧凑且自包含的方式,使用 JSON 对象用于在各方之间安全地传输信息。此信息可以验证和信任,因为它是数字签名的。JWT 可以使用密钥(使用HMAC算法)或使用RSA或ECDSA的公钥/私钥对进行签名。
在其紧凑的形式中,JSON Web Tokens 由三部分组成,由点 (.) 分隔,它们是:
- Header(标题 )
- Payload(有效载荷 )
- Signature(签名 )
因此,JWT 格式通常如下所示:
xxxx.yyyy.zzzz
有关 JSON Web token的更多详细信息,请参阅下面的链接。
使用 Visual Studio 2022 创建 ASP.NET Core Web API
我们需要 Visual Studio 2022 来创建 .NET 6.0 应用程序。我们可以从 Visual Studio 2022 中选择 ASP.NET Core Web API 模板。

我们可以为我们的项目起一个合适的名称并选择 .NET 6.0 框架。

我们的新项目将在随后创建。
我们必须将以下 4 个库安装到新项目中。
- Microsoft.EntityFrameworkCore.SqlServer
- Microsoft.EntityFrameworkCore.Tools
- Microsoft.AspNetCore.Identity.EntityFrameworkCore
- Microsoft.AspNetCore.Authentication.JwtBearer
您可以使用 NuGet 包管理器来安装上述包。
我们可以使用以下值更改 appsettings.json。它具有用于 JWT 身份认证的数据库连接详细信息和其他详细信息。
appsettings.json
{
  "Logging": {
    "LogLevel": {
      "Default": "Information",
      "Microsoft.AspNetCore": "Warning"
    }
  },
  "AllowedHosts": "*",
  "ConnectionStrings": {
    "ConnStr": "Data Source=(localdb)\\MSSQLLocalDB;Initial Catalog=JWTAuthDB;Integrated Security=True;ApplicationIntent=ReadWrite;MultiSubnetFailover=False"
  },
  "JWT": {
    "ValidAudience": "http://localhost:4200",
    "ValidIssuer": "http://localhost:5000",
    "Secret": "JWTAuthenticationHIGHsecuredPasswordVVVp1OH7Xzyr"
  }
}
我们可以创建一个新文件夹 Auth 并在 Auth 文件夹下创建 ApplicationDbContext 类并添加以下代码。我们将在 Auth 文件夹下添加所有与身份认证相关的类。
ApplicationDbContext.cs
using Microsoft.AspNetCore.Identity.EntityFrameworkCore;
using Microsoft.AspNetCore.Identity;
using Microsoft.EntityFrameworkCore;

namespace IdentityDemo.Auth
{
    public class ApplicationDbContext : IdentityDbContext<IdentityUser>
    {
        public ApplicationDbContext(DbContextOptions<ApplicationDbContext> options) : base(options)
        {
        }

        protected override void OnModelCreating(ModelBuilder builder)
        {
            base.OnModelCreating(builder);
        }
    }
}
创建一个静态类 UserRoles 并添加以下值。
UserRoles.cs
namespace IdentityDemo.Auth
{
    public static class UserRoles
    {
        public const string Admin = "Admin";
        public const string User = "User";
    }
}
我们添加了两个常量值 Admin 和 User 作为角色。您可以根据需要添加任意数量的角色。
创建类 RegisterModel, 新用户注册时使用。
RegisterModel.cs
using System.ComponentModel.DataAnnotations;

namespace IdentityDemo.Auth
{
    public class RegisterModel
    {
        [Required(ErrorMessage = "用户名不能为空")] public string? Username { get; set; }

        [EmailAddress]
        [Required(ErrorMessage = "邮件不能为空")]
        public string? Email { get; set; }

        [Required(ErrorMessage = "密码不能为空")] public string? Password { get; set; }
    }
}
创建类 LoginModel 用于用户登录。
LoginModel.cs
using System.ComponentModel.DataAnnotations;

namespace IdentityDemo.Auth
{
    public class LoginModel
    {
        [Required(ErrorMessage = "用户名不能为空")] public string? Username { get; set; }

        [Required(ErrorMessage = "密码不能为空")] public string? Password { get; set; }
    }
}
我们可以创建一个 Response 类,用于在用户注册和用户登录后返回响应值。如果请求失败,它也会返回错误消息。
Response.cs
namespace IdentityDemo.Auth
{
    public class Response
    {
        public string? Status { get; set; }
        public string? Message { get; set; }
    }
}
我们可以在 Controllers 文件夹中创建一个 API 控制器 AuthenticateController 并添加以下代码。
AuthenticateController.cs
using IdentityDemo.Auth;
using Microsoft.AspNetCore.Identity;
using Microsoft.AspNetCore.Mvc;
using Microsoft.IdentityModel.Tokens;
using System.IdentityModel.Tokens.Jwt;
using System.Security.Claims;
using System.Text;

namespace IdentityDemo.Controllers
{
    [Route("api/[controller]")]
    [ApiController]
    public class AuthenticateController : ControllerBase
    {
        private readonly UserManager<IdentityUser> _userManager;
        private readonly RoleManager<IdentityRole> _roleManager;
        private readonly IConfiguration _configuration;

        public AuthenticateController(
            UserManager<IdentityUser> userManager,
            RoleManager<IdentityRole> roleManager,
            IConfiguration configuration)
        {
            _userManager = userManager;
            _roleManager = roleManager;
            _configuration = configuration;
        }

        [HttpPost]
        [Route("login")]
        public async Task<IActionResult> Login([FromBody] LoginModel model)
        {
            var user = await _userManager.FindByNameAsync(model.Username);
            if (user != null && await _userManager.CheckPasswordAsync(user, model.Password))
            {
                var userRoles = await _userManager.GetRolesAsync(user);

                var authClaims = new List<Claim>
                {
                    new Claim(ClaimTypes.Name, user.UserName),
                    new Claim(JwtRegisteredClaimNames.Jti, Guid.NewGuid().ToString()),
                };

                foreach (var userRole in userRoles)
                {
                    authClaims.Add(new Claim(ClaimTypes.Role, userRole));
                }

                var token = GetToken(authClaims);

                return Ok(new
                {
                    token = new JwtSecurityTokenHandler().WriteToken(token),
                    expiration = token.ValidTo
                });
            }

            return Unauthorized();
        }

        [HttpPost]
        [Route("register")]
        public async Task<IActionResult> Register([FromBody] RegisterModel model)
        {
            var userExists = await _userManager.FindByNameAsync(model.Username);
            if (userExists != null)
                return StatusCode(StatusCodes.Status500InternalServerError,
                    new Response { Status = "Error", Message = "用户已经存在!" });

            IdentityUser user = new()
            {
                Email = model.Email,
                SecurityStamp = Guid.NewGuid().ToString(),
                UserName = model.Username
            };
            var result = await _userManager.CreateAsync(user, model.Password);
            if (!result.Succeeded)
                return StatusCode(StatusCodes.Status500InternalServerError,
                    new Response
                    {
                        Status = "Error", Message = "创建用户失败!请检查后再重试。"
                    });

            return Ok(new Response { Status = "Success", Message = "新增用户成功!" });
        }

        [HttpPost]
        [Route("register-admin")]
        public async Task<IActionResult> RegisterAdmin([FromBody] RegisterModel model)
        {
            var userExists = await _userManager.FindByNameAsync(model.Username);
            if (userExists != null)
                return StatusCode(StatusCodes.Status500InternalServerError,
                    new Response { Status = "Error", Message = "用户已经存在!" });

            IdentityUser user = new()
            {
                Email = model.Email,
                SecurityStamp = Guid.NewGuid().ToString(),
                UserName = model.Username
            };
            var result = await _userManager.CreateAsync(user, model.Password);
            if (!result.Succeeded)
                return StatusCode(StatusCodes.Status500InternalServerError,
                    new Response
                    {
                        Status = "Error", Message = "创建用户失败!请检查后再重试。"
                    });

            if (!await _roleManager.RoleExistsAsync(UserRoles.Admin))
                await _roleManager.CreateAsync(new IdentityRole(UserRoles.Admin));
            if (!await _roleManager.RoleExistsAsync(UserRoles.User))
                await _roleManager.CreateAsync(new IdentityRole(UserRoles.User));

            if (await _roleManager.RoleExistsAsync(UserRoles.Admin))
            {
                await _userManager.AddToRoleAsync(user, UserRoles.Admin);
            }

            if (await _roleManager.RoleExistsAsync(UserRoles.User))
            {
                await _userManager.AddToRoleAsync(user, UserRoles.User);
            }

            return Ok(new Response { Status = "Success", Message = "新增用户成功!" });
        }

        private JwtSecurityToken GetToken(List<Claim> authClaims)
        {
            var authSigningKey = new SymmetricSecurityKey(Encoding.UTF8.GetBytes(_configuration["JWT:Secret"]));

            var token = new JwtSecurityToken(
                issuer: _configuration["JWT:ValidIssuer"],
                audience: _configuration["JWT:ValidAudience"],
                expires: DateTime.Now.AddHours(3),
                claims: authClaims,
                signingCredentials: new SigningCredentials(authSigningKey, SecurityAlgorithms.HmacSha256)
            );

            return token;
        }
    }
}
我们在控制器类中添加了三个方法 login、register 和 register-admin``。register 和 register-admin 几乎相同,但 register-admin 方法将用于创建具有 Admin 角色的用户。在 login 方法中,我们在成功登录后返回了一个 JWT token。
在 .NET 6.0 中,微软删除了 Startup 类(注:您可以恢复继续使用这种方式),只保留了 Program 类。我们必须在 Program 类中定义所有依赖注入和其他配置。
Program.cs
using IdentityDemo.Auth;
using Microsoft.AspNetCore.Authentication.JwtBearer;
using Microsoft.AspNetCore.Identity;
using Microsoft.EntityFrameworkCore;
using Microsoft.IdentityModel.Tokens;
using System.Text;

var builder = WebApplication.CreateBuilder(args);
ConfigurationManager configuration = builder.Configuration;

// Add services to the container.

// For Entity Framework
builder.Services.AddDbContext<ApplicationDbContext>(options => options.UseSqlServer(configuration.GetConnectionString("ConnStr")));

// For Identity
builder.Services.AddIdentity<IdentityUser, IdentityRole>()
    .AddEntityFrameworkStores<ApplicationDbContext>()
    .AddDefaultTokenProviders();

// Adding Authentication
builder.Services.AddAuthentication(options =>
{
    options.DefaultAuthenticateScheme = JwtBearerDefaults.AuthenticationScheme;
    options.DefaultChallengeScheme = JwtBearerDefaults.AuthenticationScheme;
    options.DefaultScheme = JwtBearerDefaults.AuthenticationScheme;
})

// Adding Jwt Bearer
.AddJwtBearer(options =>
{
    options.SaveToken = true;
    options.RequireHttpsMetadata = false;
    options.TokenValidationParameters = new TokenValidationParameters()
    {
        ValidateIssuer = true,
        ValidateAudience = true,
        ValidAudience = configuration["JWT:ValidAudience"],
        ValidIssuer = configuration["JWT:ValidIssuer"],
        IssuerSigningKey = new SymmetricSecurityKey(Encoding.UTF8.GetBytes(configuration["JWT:Secret"]))
    };
});

builder.Services.AddControllers();
// Learn more about configuring Swagger/OpenAPI at https://aka.ms/aspnetcore/swashbuckle
builder.Services.AddEndpointsApiExplorer();
builder.Services.AddSwaggerGen();

var app = builder.Build();

// Configure the HTTP request pipeline.
if (app.Environment.IsDevelopment())
{
    app.UseSwagger();
    app.UseSwaggerUI();
}

app.UseHttpsRedirection();

// Authentication & Authorization
app.UseAuthentication();
app.UseAuthorization();

app.MapControllers();

app.Run();
我们必须在运行应用程序之前创建所需的数据库和表。由于我们使用的是实体框架(EF Core),我们可以使用下面的数据库迁移命令和包管理器控制台来创建一个迁移脚本:
add-migration Initial

使用以下命令创建数据库和表:
update-database
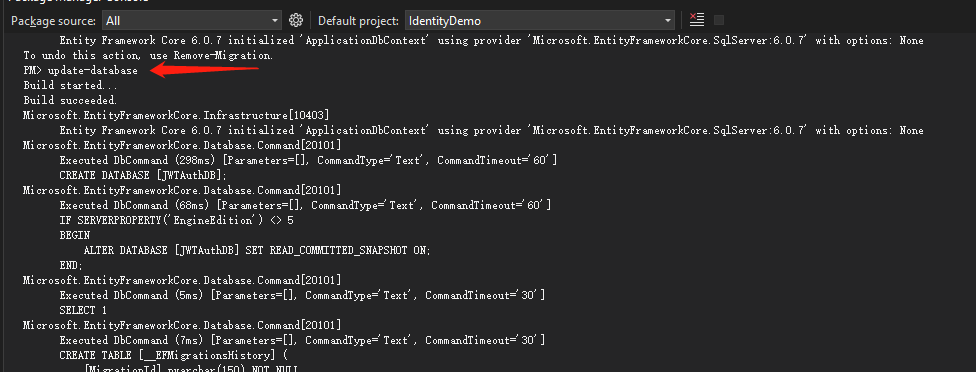
如果您使用 SQL Server 对象资源管理器检查数据库,您可以看到在数据库内部创建了以下数据库表:
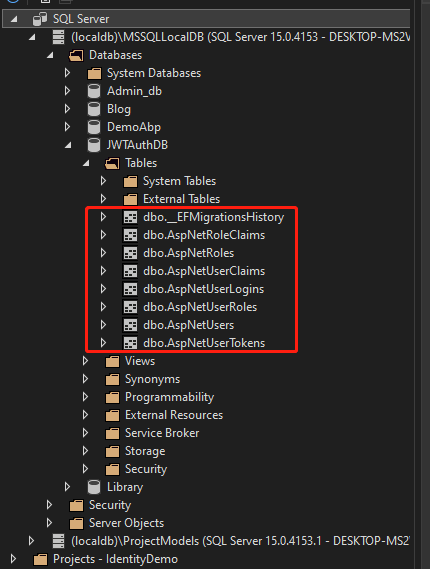
在数据库迁移过程中,为 User、Role 和 Claims 创建了 7 张表。这是用于 Identity框架。
ASP.NET Core Identity 是一个会员系统,允许您向应用程序添加登录功能。用户可以创建账户并使用用户名和密码登录,也可以使用外部登录提供程序,例如 Facebook、Google、Microsoft Account、Twitter 等。
您可以将 ASP.NET Core Identity 配置为使用 SQL Server 数据库来存储用户名、密码和配置文件数据。或者,你可以使用自己的持久化存储将数据存储在另一个其他持久化存储中,例如 Azure 表存储。
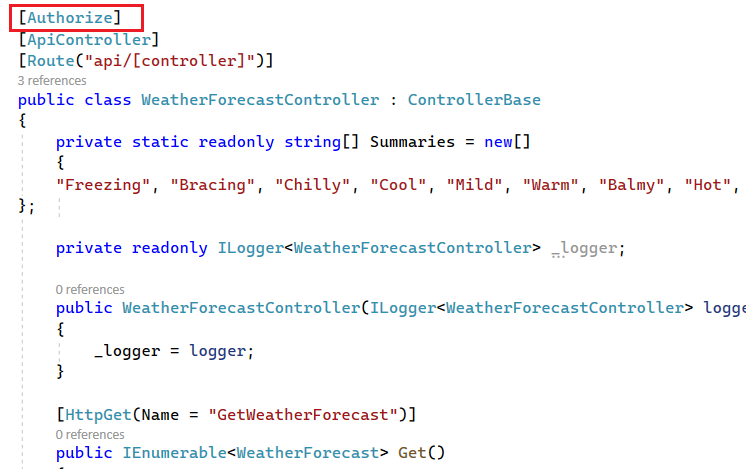
我们可以在 WeatherForecast 控制器中添加 Authorize 属性。
我们可以运行应用程序并尝试从 Postman 工具访问WeatherForecastController中的 get 方法。

我们收到了 401 未经授权的错误。因为,我们已经为整个控制器添加了 Authorize 属性。我们必须通过请求头提供一个有效的token来访问这个控制器和控制器内的方法。
我们可以在AuthenticateController中使用注册方法创建一个新用户。
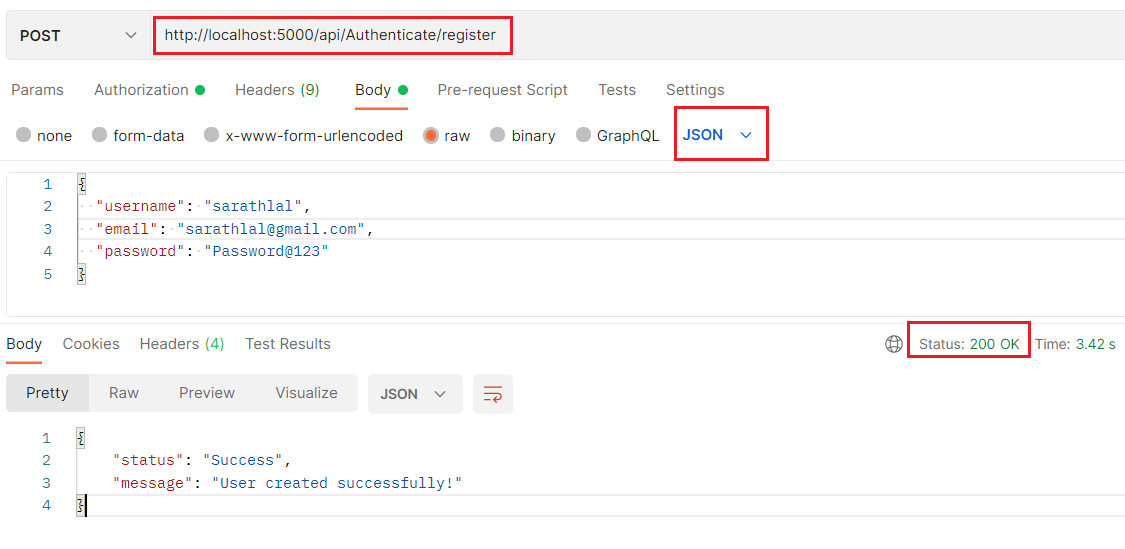
我们以原始 JSON 格式提供了输入数据。
我们可以使用上述用户凭据登录并获取有效的 JWT token。
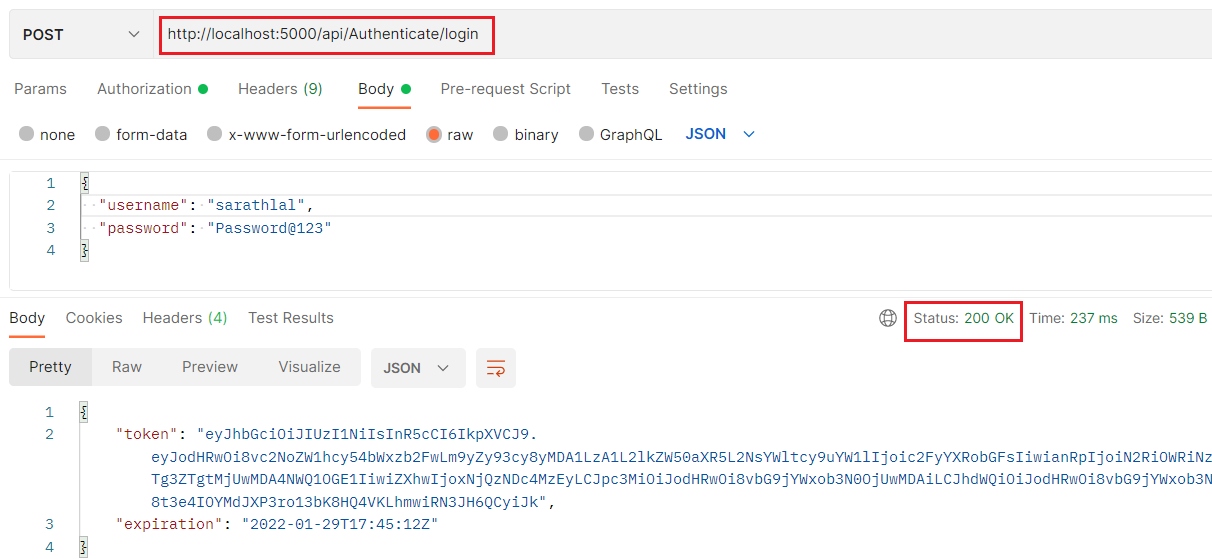
使用上述凭据成功登录后,我们收到了一个token。
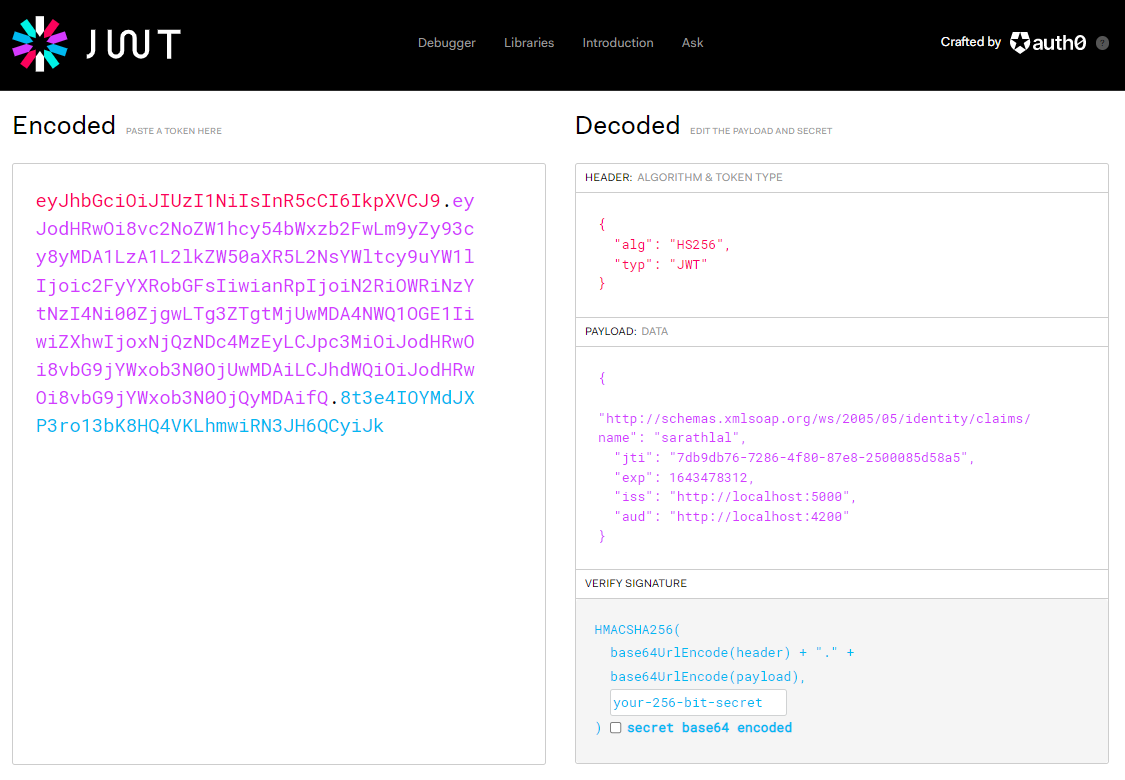
我们可以使用https://jwt.io站点 解码token并查看声明和其他信息。
我们可以在授权选项卡中将上述token值作为Bearer token传递,并再次调用WeatherForecastController的 get 方法。
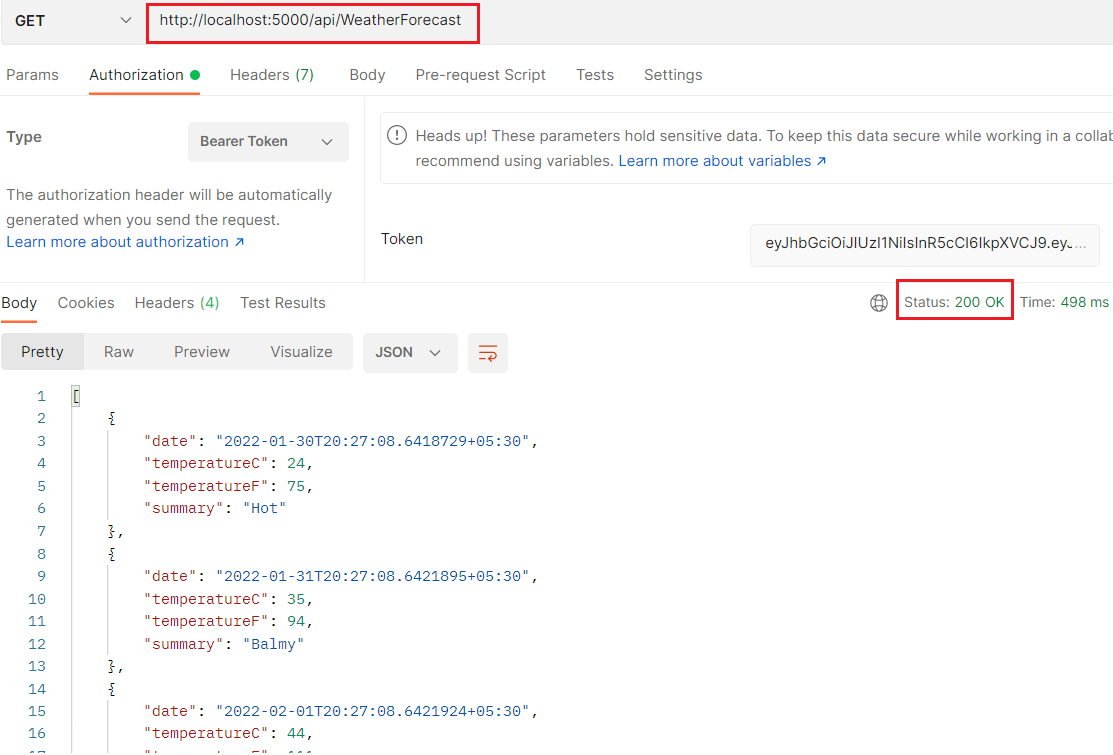
这一次,我们成功地接收到了来自控制器的值。
我们可以使用基于角色的授权来更改WeatherForecastController。
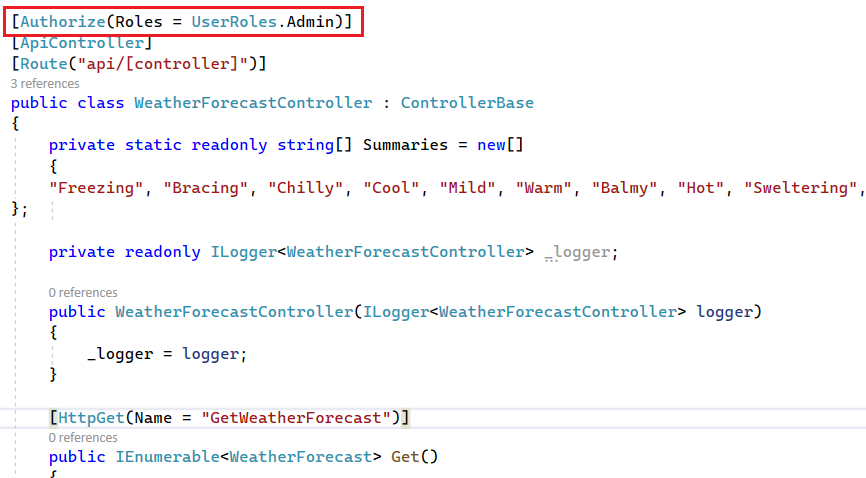
现在,只有具有管理员(Admin)角色的用户才能访问此控制器和方法。
我们可以尝试在 Postman 工具中再次使用相同的token访问 WeatherForecastController。
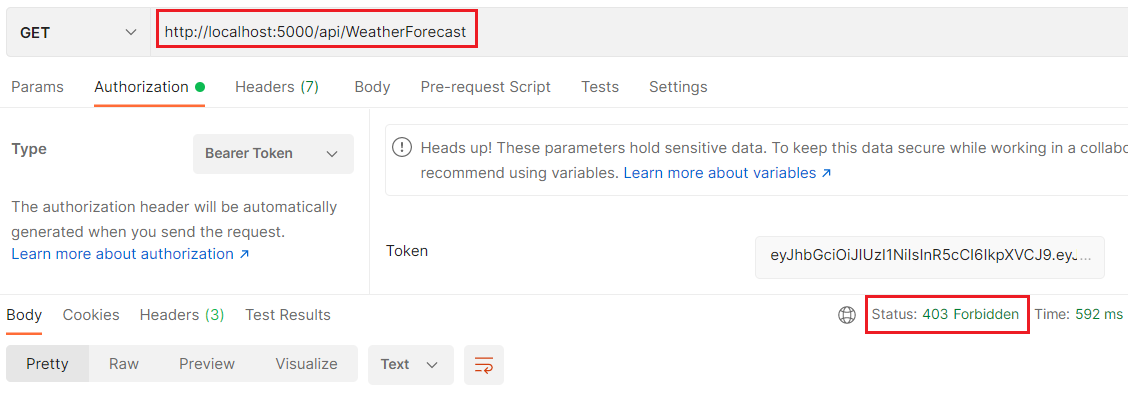
我们现在收到了 403 拒绝错误而不是 401。即使我们传递了一个有效的token,我们也没有足够的权限来访问控制器。要访问此控制器,用户必须具有Admin角色权限。当前用户是普通用户,没有任何Admin角色权限。
我们可以创建一个具有Admin角色权限的新用户。我们已经在AuthenticateController中有一个方法register-admin用于相同的目的。
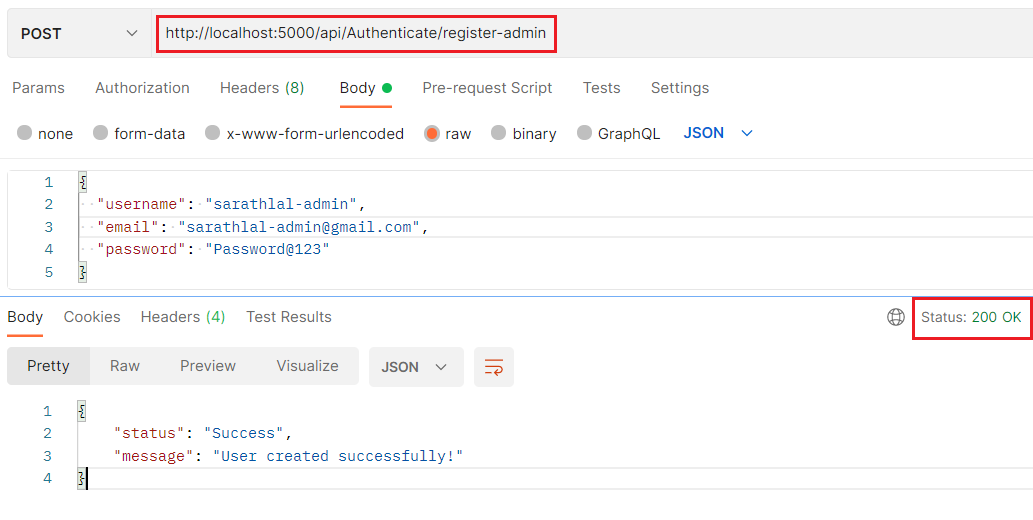
我们可以使用这些新的用户凭据登录并获得一个新的token。如果您对token进行解码,您可以看到角色已添加到token中。
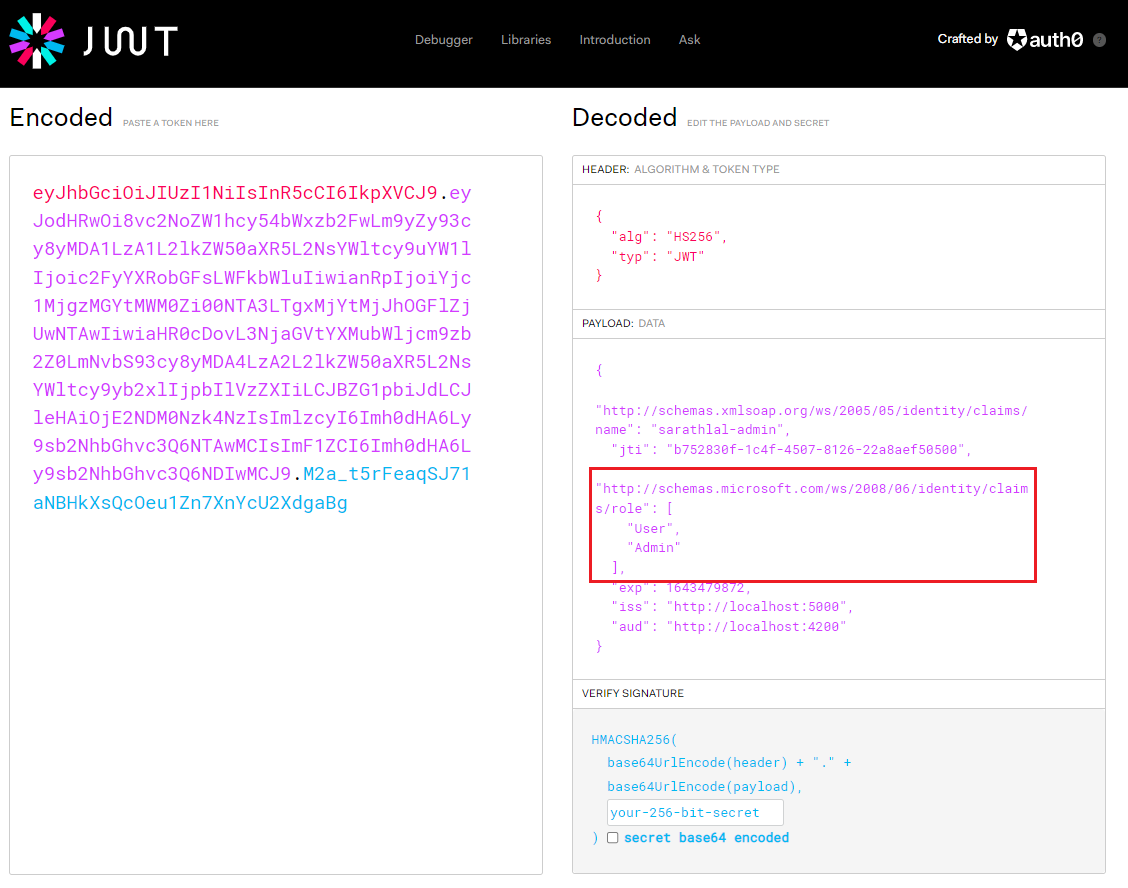
我们可以使用这个token而不是旧token来访问WeatherForecastController。
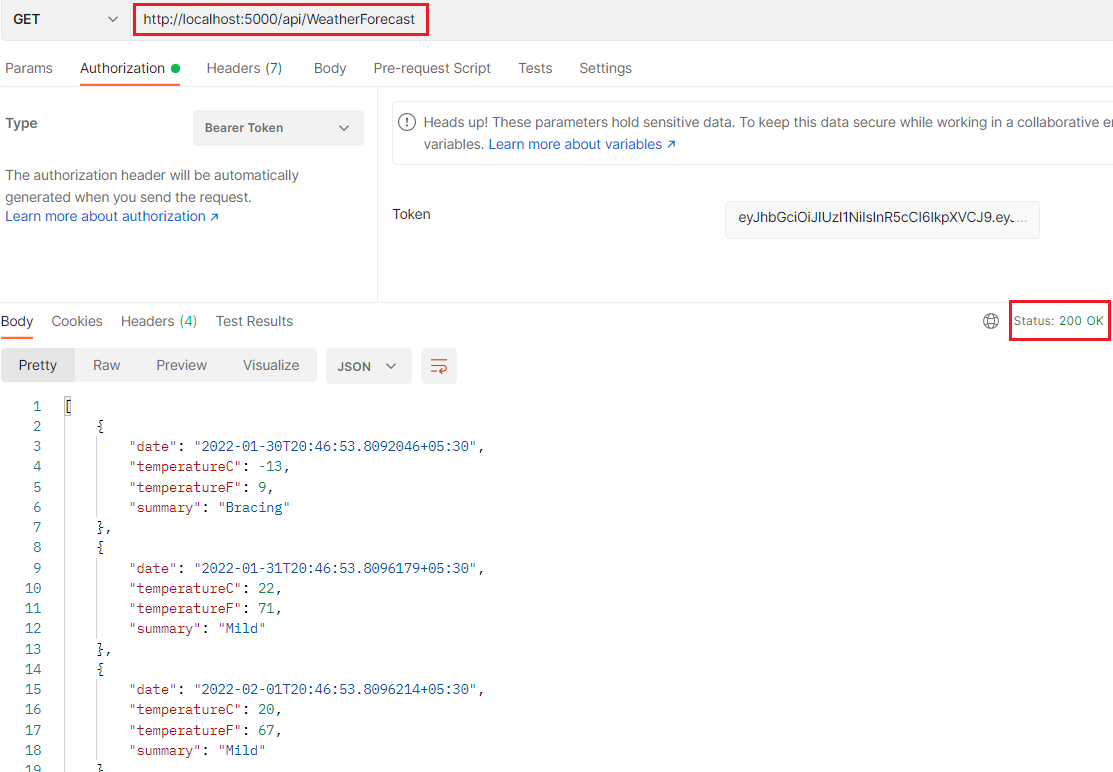
现在我们已经成功地从WeatherForecastController中获取了数据。
结论
在这篇文章中,我们了解了如何在 .NET 6.0 ASP.NET Core Web API 应用程序中创建 JSON Web token,并使用此token进行身份认证和授权。我们创建了两个用户,一个没有任何角色,一个有Admin角色。我们在控制器级别应用了身份认证和授权,并看到了这两个用户的不同行为。
- 本文源码:IdentityDemo