
在当今全球化的软件开发浪潮中,应用的国际化(i18n)与本地化(L10n)显得尤为重要。Avalonia UI 作为一款强大的跨平台 UI 框架,为开发者提供了多种实现国际化的途径。其中,使用传统的 Resx 资源文件进行国际化处理,不仅兼容了原 Winform、WPF、ASP.NET Core 等开发场景下的使用习惯,还借助一些实用工具和特定的开发流程,让国际化的实现变得高效且有条理。
1. 引言:Resx 资源文件与 Avalonia UI 国际化的邂逅
在软件开发领域,国际化是确保应用能够跨越语言和文化边界,触达全球用户的关键。Avalonia UI 以其灵活的架构和丰富的功能,在跨平台应用开发中崭露头角。而 Resx 资源文件,作为一种久经考验的本地化资源管理方式,在 Avalonia UI 中也找到了新的用武之地。通过将两者结合,开发者能够在熟悉的开发模式下,为应用赋予多语言支持的能力,轻松应对不同地区用户的需求。
下图是使用VS扩展 ResXManager 对Resx资源文件进行管理的截图:
2. 详细使用步骤:构建多语言应用的基石
2.1. Resx 资源文件的精心布局
2.1.1. 项目目录规划与基础资源文件创建
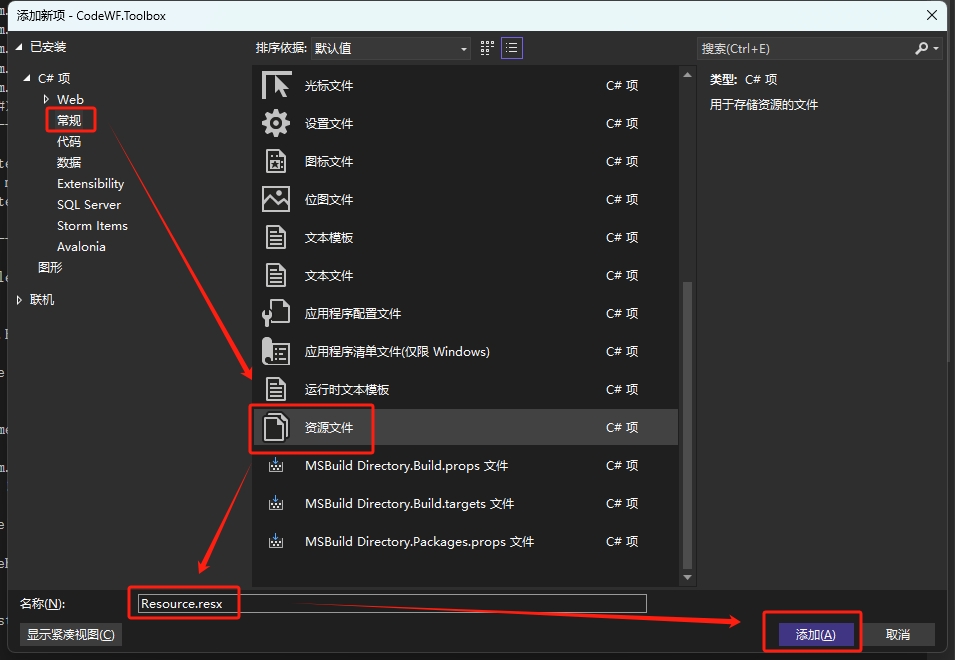
开启您的 Avalonia UI 项目之旅,无论是已有的成熟项目还是全新创建的项目,首先在项目中添加一个用于存放国际化资源的目录,这里我们命名为 I18n(您可根据项目实际情况自定义目录名)。在这个目录下,创建默认的英文语言资源文件 Resource.resx。这个文件将作为整个国际化资源体系的基础,承载着应用在英文环境下的所有文本资源。
2.1.2. 多语言资源文件的拓展
- 当英文资源文件就绪后,我们可以进一步拓展其他语言的资源文件。以中文简体、中文繁体和日语为例,它们的文件名需要遵循特定的命名规则:文件名前缀与默认语言资源文件名保持一致,即
Resource,并添加对应的CultureName后缀。例如,中文简体对应的资源文件名为Resource.zh-CN.resx,中文繁体为Resource.zh-Hant.resx,日语则是Resource.ja-JP.resx。这样的命名方式有助于 Avalonia UI 在运行时准确识别并加载不同语言的资源。 - 借助强大的 ResXManager 工具,我们可以方便地打开这些资源文件进行多语言文本的编辑。在编辑过程中,需要特别注意语言 Key 的命名,它必须满足 C# 变量语法,因为后续的开发流程会依据这些 Key 生成对应的语言 Key 类,确保在代码层面能够精准地引用和操作这些资源。
2.2. NuGet 包的引入:增强国际化功能的得力助手
Install-Package AvaloniaExtensions.Axaml
这个包为我们的项目带来了一系列实用的 API,包括多语言切换功能、便捷的获取 Key 对应翻译字符串的方法,以及在 axaml 前端界面中对语言标记的支持。这些功能将极大地简化我们在国际化开发过程中的代码编写和界面设计工作。
2.3. T4 文件:从资源文件到强类型资源类的桥梁
2.3.1. T4 文件的创建与配置
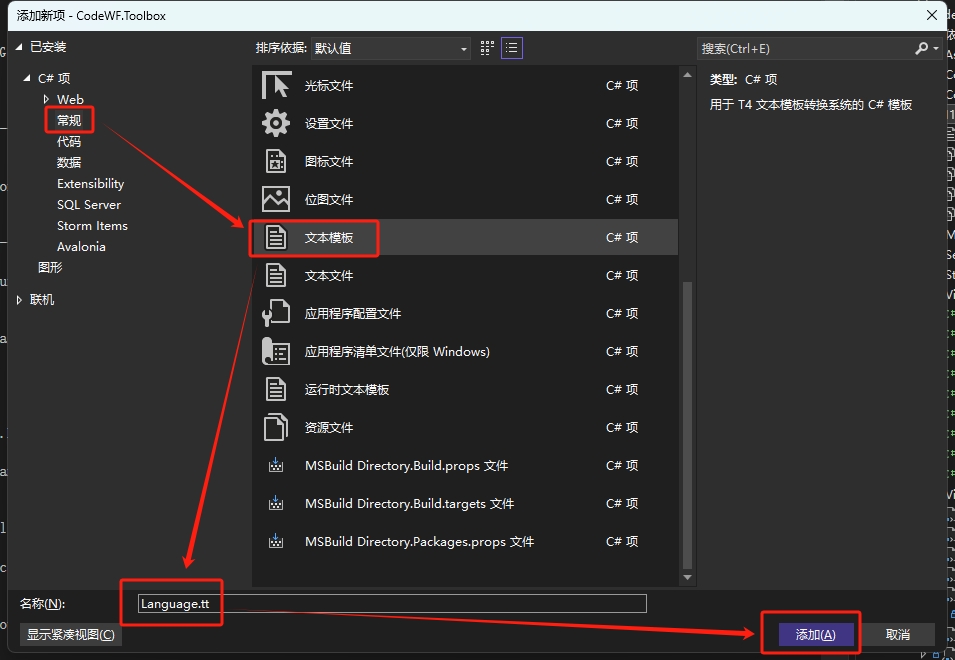
有了资源文件后,虽然已经能够在一定程度上实现国际化功能,但直接使用字符串 Key 在代码中进行资源引用既容易出错又不够直观。因此,我们引入 T4 文件来根据资源文件生成强类型的资源类。在之前创建的 I18n 目录下,添加一个 T4 文件,例如 Language.tt(文件名可根据项目需求灵活调整)。
2.3.2. T4 文件的内容解析与生成逻辑
打开 Language.tt 文件,其内容包含了一系列的指令和代码片段。首先,通过 #import 指令引入了多个命名空间,这些命名空间为后续的代码操作提供了必要的功能支持,如处理 XML 数据、文件操作等。
<#@ template debug="false" hostspecific="true" language="C#" #>
<#@ assembly name="System.Core" #>
<#@ assembly name="System.Xml" #>
<#@ assembly name="System.Xml.Linq" #>
<#@ import namespace="System.Linq" #>
<#@ import namespace="System.Text" #>
<#@ import namespace="System.Collections.Generic" #>
<#@ import namespace="System.Xml.Linq" #>
<#@ import namespace="System.IO" #>
<#@ output extension=".cs" #>
//------------------------------------------------------------------------------
// <auto-generated>
//     This code was generated by a tool.
//     Changes to this file may cause incorrect behavior and will be lost if
//     the code is regenerated.
// </auto-generated>
//------------------------------------------------------------------------------
<#
    const string ResourceFileName = "Resources.resx";
#>

namespace <#=System.Runtime.Remoting.Messaging.CallContext.LogicalGetData("NamespaceHint").ToString()#>;

public static class Language
{
<#
    var resourceKeys = XElement.Load(this.Host.ResolvePath(ResourceFileName))
        .Elements("data")
        .Select(item => item.Attribute("name")?.Value)
        .Where(item => item != null);

	var resourceDesignerName = Path.GetFileNameWithoutExtension(ResourceFileName);

    foreach (string resourceKey in resourceKeys)
    {
#>
	public static readonly string <#= resourceKey #> = "<#= resourceKey #>";
<#
    }
#>
}
其中,ResourceFileName 变量指定了前面创建的默认 Resx 资源文件名,这是 T4 文件生成强类型资源类的依据。在 T4 文件的主体部分,通过 XElement.Load 方法加载指定的资源文件,并使用 LINQ 查询表达式从资源文件的 XML 结构中提取出所有的语言 Key。然后,针对每个提取到的 Key,生成一个对应的公共静态只读字符串字段,字段名与 Key 相同,初始值也为 Key。这样,当 T4 文件执行保存操作(通常通过 Ctrl + S)时,就会在相同目录下生成一个名为 Language.cs 的 C# 文件,其中包含了强类型的资源类。例如:
//------------------------------------------------------------------------------
// <auto-generated>
//     This code was generated by a tool.
//     Changes to this file may cause incorrect behavior and will be lost if
//     the code is regenerated.
// </auto-generated>
//------------------------------------------------------------------------------

namespace CodeWF.Toolbox.I18n;

public static class Language
{
	public static readonly string AppName = "AppName";
	public static readonly string Home = "Home";
	public static readonly string SearchToolTip = "SearchToolTip";
	public static readonly string Setting = "Setting";
	public static readonly string DesiredAvailabilityNotification = "DesiredAvailabilityNotification";
	public static readonly string AccessToolbox = "AccessToolbox";
	public static readonly string MissingTool = "MissingTool";
	public static readonly string InterfaceStyleSettings = "InterfaceStyleSettings";
	public static readonly string GeneralSettings = "GeneralSettings";
	public static readonly string Theme = "Theme";
	public static readonly string FollowingSystem = "FollowingSystem";
	public static readonly string LightMode = "LightMode";
	public static readonly string DarkMode = "DarkMode";
	public static readonly string LanguageKey = "LanguageKey";
	public static readonly string AutoOpenToolboxAtStartup = "AutoOpenToolboxAtStartup";
	public static readonly string HideTrayIconOnClose = "HideTrayIconOnClose";
	public static readonly string TurnOn = "TurnOn";
	public static readonly string TurnOff = "TurnOff";
	public static readonly string Exit = "Exit";
	public static readonly string SureExit = "SureExit";
	public static readonly string FindInTrayIcon = "FindInTrayIcon";
	public static readonly string ShowMainWindow = "ShowMainWindow";
	public static readonly string DisplayPromptWhenClosing = "DisplayPromptWhenClosing";
	public static readonly string NoMorePrompts = "NoMorePrompts";
	public static readonly string About = "About";
	public static readonly string AboutMessage = "AboutMessage";
}
这个生成的资源类使得我们在代码中能够以强类型的方式引用资源 Key,大大提高了代码的可读性和可维护性。
2.4. 在项目中的具体应用:让多语言功能鲜活起来
2.4.1. 代码中的资源引用
在 C# 代码中,我们可以借助 I18nManager 类来获取指定语言 Key 对应的翻译字符串。例如:
I18nManager.GetString(Language.Setting)
这里的 Language.Setting 就是通过 T4 文件生成的强类型资源类中的字段,通过这种方式,我们能够在代码的任何地方方便地获取并使用多语言资源,确保应用在不同语言环境下的正确显示。
2.4.2. Axaml 界面中的语言绑定
在 axaml 前端界面中,我们首先需要引入相应的命名空间:
xmlns:i18n="https://codewf.com"
xmlns:language="clr-namespace:CodeWF.Toolbox.I18n"
然后,通过数据绑定的方式将界面元素的文本属性与语言资源关联起来。例如:
<TextBlock Text="{i18n:I18n {x:Static language:Language.AppName}}" />
这样,当应用的语言环境发生变化时,界面元素的文本会自动更新为对应的翻译文本,实现了界面的动态国际化。
- 语言切换的实现
实现语言切换功能也非常简单,只需调用 I18nManager.Instance.Culture 属性,并传入目标语言的 CultureInfo 对象即可。例如:
I18nManager.Instance.Culture = new CultureInfo(language);
这里的 language 变量可以是任何有效的语言代码,如 zh-CN、ja-JP 等。当设置了新的语言文化后,整个应用的语言显示会立即更新,为用户提供无缝的多语言切换体验。
3. 总结:Resx 资源文件国际化方案的优劣剖析
通过 Resx 资源文件实现 Avalonia UI 应用的国际化,无疑为传统开发者提供了一条熟悉且便捷的道路。它充分利用了已有的开发经验和工具生态,如 ResXManager 和 T4 文件技术,使得国际化的开发过程能够高效地融入到现有的项目流程中。然而,这种方式也并非完美无缺。其对于普通用户侧的维护来说,可能存在一定的难度。普通用户可能不熟悉 Resx 文件的结构和编辑方式,也难以理解 T4 文件生成代码的逻辑。这就要求在项目的设计和实施过程中,开发者需要充分考虑到后续的维护成本,可能需要为普通用户提供一些简单易用的界面或工具来辅助他们进行国际化资源的更新和管理。但总体而言,对于具有一定技术基础的开发团队和项目来说,Resx 资源文件的国际化方案仍然是一种值得推荐的选择,它在功能、效率和兼容性方面都有着出色的表现。
希望本文能够为广大 Avalonia UI 开发者在国际化实践中提供有益的参考和指导,让您的应用能够在全球舞台上绽放光彩。
彩蛋:下篇文章介绍XML文件实现国际化