

今天来实现身分验证的部分,笔者此前是用ASP.NET Core Web API 搭配Blazor,用户第一次成功登录时,在后端将Role、Claim 等权限储存在JWT,将JWT 存在浏览器的LocalStorage 里面,前端再自己重写AuthenticationStateProvider,去检查LocalStorage 的JWT,接着将AuthenticationState 当作CascadingParameter 层层传递到各Component,这样就不需要不停跟后端交换数据,这是个很宝贵的经验,让笔者对身分验证有深入了解,这次笔者试试看ASP.NET Core 自己的Identity。
首先去 NeGet 下载 3 个组件,分别为Microsoft.AspNetCore.Identity.EntityFrameworkCore、Microsoft.AspNetCore.Identity.UI、Microsoft.VisualStudio.Web.CodeGeneration.Design,第 1 个是Identity 必备组件,如果想自己实现JWT 的话,只需要下载第一个组件,再下载JWT 相关组件(Microsoft.AspNetCore.Authentication.JwtBearer)即可,后面 2 个都是让ASP.NET Core Identity帮我们生成预置Identity 页面的组件。
接着去BlazorServer.Models的AppDbContext,将继承的DbContext改为IdentityDbContext,代表接下来用的DB 跟Identity有关系。

在BlazorServer 项目按右键,选择「添加」,选择「新搭建基架的项目」,切换到「标识」页签,选择标识。


勾选「替代所有文件」,数据上下文类选择AppDbContext,要注意的是,如果刚才没将继承的类别改成IdentityDbContext,就不会有AppDbContext可以选,必须点右边的「+」符号自己新增一个IdentityDbContext。

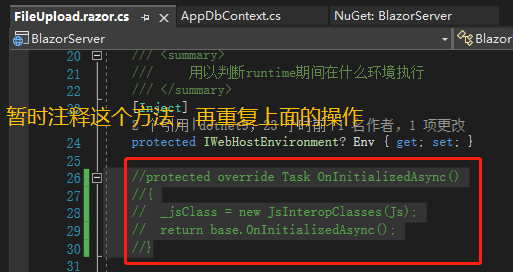
这时候有可能遇到这种「FileUpload.OnInitializedAsync(): 没有找到适合的方法来重写」的错误信息,这通常是Visual Studio 的问题,先将这里注释,重复一次上一段的做法就可以。

接着去Program.cs加上身分验证的服务,Identity 预置将验证信息存在 Cookie。

接着在程序包管理器控制台执行两段命令,Add-Migration IdentitySupport新增Migration,Update-Database更新DB,去看数据库,可以看到多了6 张表,其中最常用到的就是AspNetUsers、AspNetRoles 及AspNetUserRoles,如果以Claim 处理权限的话,就会用到AspNetUserClaims。

项目则多了一个Areas 文件夹,里面就是ASP.NET Core Identity 的实现,包括了登录系统、账号系统、管理系统。

我们去NavMenu.razor加上通往Login 的NavLink,在相对路径中Areas 跟Pages 可以省略。
<div class="nav-item px-3">
    <NavLink class="nav-link" href="Identity/Account/Login" Match="NavLinkMatch.All">
        <span class="bi bi-file-earmark-lock2 h4 p-2 mb-0" aria-hidden="true"></span> Login
    </NavLink>
</div>
启动网站后,从左边 Nav 前往 Login 页面,可以看到已经有个完善的登录系统,包括注册、登录、忘记密码等等功能,就连注册密码的规则也有,我们照规则注册一个账号,数据库也生成了刚刚注册的账号。

注册界面填写正确的邮箱和密码,AspNetUsers表即可查看注册的用户信息:

引用
- Claims-based authorization in ASP.NET Core
- Claim type and claim value in claims policy based authorization in asp net core
- ASP NET Core Identity tutorial from scratch
- Unable to resolve service for type IEmailSender while attempting to activate RegisterModel
注:本文代码通过 .NET 6 + Visual Studio 2022 重构,可点击原文链接与重构后代码比较学习,谢谢阅读,支持原作者