(23/30) Let's Learn Blazor Together: ASP.NET Core Identity (3)

(23/30) Let's Learn Blazor Together: ASP.NET Core Identity (3)

Earlier, we mentioned `UserAuthentication()` and `UserAuthorization()`. The difference is that the former is used to verify who the user is, and the latter determines what the user can do.

Last updated 12/23/2021 10:19 PM
StrayaWorker
6 min read
Category
Blazor
Topic
Let's Learn Blazor Series
Tags
.NET C# ASP.NET Core Blazor

Earlier we mentioned UserAuthentication() and UserAuthorization(). The difference between them is: the former is used to verify who the logged-in user is, while the latter determines what the logged-in user can do.

For example, when an employee logs into the employee system, they must enter their account (such as employee ID, name, or email) and password so the system knows who is logging in. This is Authentication. The ways to handle Authentication include Cookie, Token, Third-party authentication (OAuth or API-token), OpenId, and SAML.

When the employee logs into the system, a regular employee usually does not have cross-department or administrative permissions. They can only see information related to themselves or their own department. For example, an employee in the production department cannot see the financial data of the accounting department. However, the accounting department, in order to calculate costs, can see the raw material prices of the production department. This is Authorization.

Before deciding what the logged-in user can do, we must first know who the logged-in user is. Therefore, UserAuthentication() must be placed before UserAuthorization().

ASP.NET Core Identity uses claim-based authentication. To understand Claim, we must first know what Claim, ClaimsIdentity, and ClaimsPrincipal are.

A Claim is some information about the user. A Claim Type and a Claim Value (which can be omitted) together form a Claim. A Claim can be a name, phone number, role, Email, or even a role, etc. Authorization uses Claim to determine whether the user is authorized.

new System.Security.Claims.Claim(ClaimTypes.Role, role.Name)

ClaimsIdentity is a collection of multiple Claims, like a driver's license which records name, date of birth, phone number. The driver's license itself is a ClaimsIdentity.

ClaimsPrincipal is a collection of multiple ClaimsIdentity objects. People in Taiwan have both an ID card and a health insurance card, and some also have a driver's license. The ID card, health insurance card, and driver's license are all ClaimsIdentity objects, and the person holding them is the ClaimsPrincipal.

Each HTTP request generates an HttpContext object, which holds information about the current request. Under it, there is a property named User of type ClaimsPrincipal. This property is generated by the Authentication Middleware introduced by UseAuthentication().

The login mechanism can be implemented using Cookie or JWT. But how does the Authentication Middleware know which method to use to generate the User property? That depends on the Authentication Scheme and Authentication Handlers.

Authentication Handlers

Authentication Handlers are the methods for processing authentication. ASP.NET Core Identity can call the AuthenticateAsync() API to verify that the user is logged in. If authentication fails, it calls ChallengeAsync() to redirect the user to the login page. If authorization fails, it uses ForbidAsync() to forbid the user from accessing. Of course, you can also implement these behaviors yourself. In the example below, JWT and Cookie authentication methods are used. If the former is used, you must validate the JWT token and generate a ClaimsPrincipal to pass back to HttpContext.User; if the latter is used, it checks the current request's cookie and generates a ClaimsPrincipal.

builder.Services.AddAuthentication()
	.AddJwtBearer()
	.AddCookie();

Authentication Scheme

Registering Authentication Handlers in any way is called an Authentication Scheme. Each Authentication Scheme has a unique name for identification, and you can set your own Authentication Handlers. The following code produces the same result as above because they all have default Scheme names.

builder.Services.AddAuthentication()
    .AddJwtBearer("Bearer")
    .AddCookie("Cookies");

Blazor Authentication

The authentication method used by Blazor is the same as that of ASP.NET Core. However, Blazor WebAssembly and Blazor Server differ. For the former, authentication can be bypassed just like any front-end website, because client-side code can be modified by the user. Therefore, the API endpoint that sends data must also be authenticated. For the latter, you can use the built-in AuthenticationStateProvider to obtain the HttpContext.User mentioned earlier. The author previously implemented JWT authentication by inheriting and overriding this Service.

AuthenticationStateProvider is the reason why <AuthorizeView> and <CascadingAuthenticationState> (mentioned yesterday) can obtain the current authentication state. However, if you do not need to override the default authentication mechanism, it is recommended not to inject an AuthenticationStateProvider directly into your own Component. The downside of doing so is obvious: if the authentication state of the current request changes, because you have altered the authentication mechanism of this Component, the Component will not be notified.

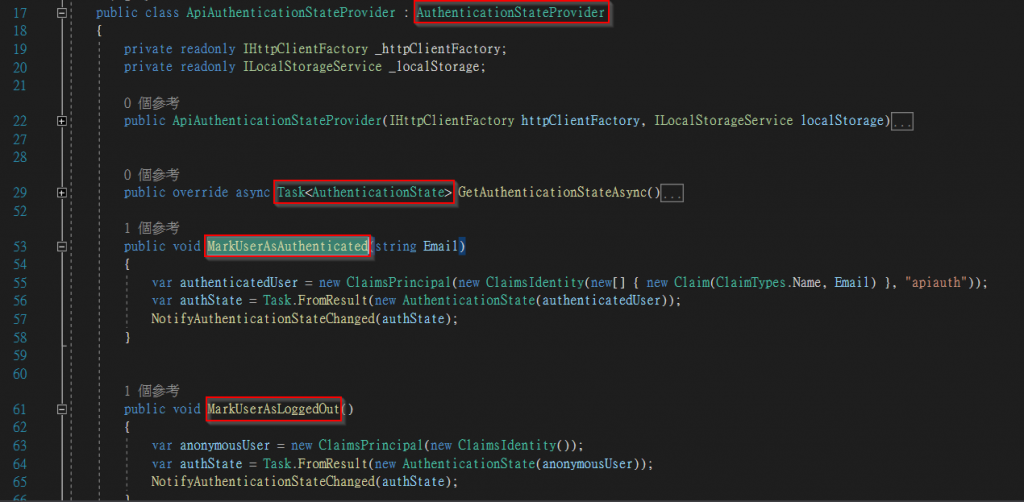
As shown in the figure below, ApiAuthenticationStateProvider inherits from AuthenticationStateProvider and overrides Task<AuthenticationState>. This property can obtain the current authentication state. MarkUserAsAuthenticated() and MarkUserAsLoggedOut() are custom methods written by the author to mark the user as authenticated or logged out. NotifyAuthenticationStateChanged(), as its name suggests, notifies each Component of the current authentication state. This is an example of inheriting and overriding.

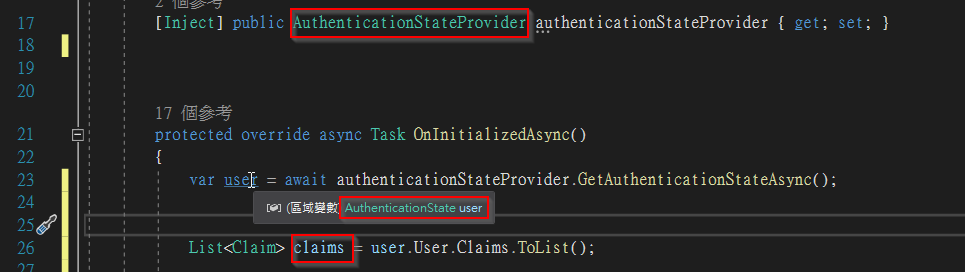
The figure below shows how to obtain the HttpContext.User and Claims of the current request in a Component. However, here we first use a service to get the User and then get its Claims, which is actually unnecessary.

If you only need to get HttpContext.User, you can simply do it as shown below, because Task<AuthenticationState> is passed down layer by layer as a [CascadingParameter].

References:

  1. Introduction to Authentication in ASP.NET Core
  2. ASP.NET Core Blazor authentication and authorization

Note: The code in this article has been refactored using .NET 6 + Visual Studio 2022. You can click the original link to compare the code with the refactored version. Thank you for reading and supporting the original author.

Keep Exploring

Related Reading

More Articles
Same category / Same tag 12/25/2021

(29/30)Learn Blazor Together: Blazor Unit Testing

The most boring part of developing a system is probably fixing bugs, especially errors like trying to access a null object (`Object reference not set to an instance of an object.`), which is the most common problem most people encounter when they first step into programming. To break free from the tedious bug-fixing process, this article introduces `unit testing`.

Continue Reading
Same category / Same tag 12/25/2021

(28/30) Learning Blazor Together: Policy-based Authorization

It was mentioned earlier that `ASP.NET Core Identity` uses `Claim`-based authentication. In fact, `ASP.NET Core Identity` has different types of authorization methods, the simplest being `Login Authorization`, `Role Authorization`, and `Claim Authorization`. However, all of the above are implemented in one way: Policy-based Authorization.

Continue Reading