

昨天角色的CRUD 功能都完成了,接着就是要把角色分配给用户了,先建立一个 ViewModel CustomUserRoleViewModel,这是用来呈现角色底下用户的 ViewModel。
namespace BlazorServer.ViewModels;

public class CustomUserRoleViewModel
{
	public string? UserId { get; set; }

	public string? UserName { get; set; }

	public bool IsSelected { get; set; }
}
再于IRolesRepository跟RolesRepository加上编辑角色内用户的功能,这里用了多载,第一个相当于Get 取得页面初始数据,第二个则是Post 提交修改后的数据。
IRolesRepository.cs
…
    Task<List<CustomUserRoleViewModel>> EditUsersInRoleAsync(string roleId);
	Task<ResultViewModel> EditUsersInRoleAsync(List<CustomUserRoleViewModel> model, string roleId);
RolesRepository.cs
…
    public async Task<List<CustomUserRoleViewModel>> EditUsersInRoleAsync(string roleId)
	{
		var role = await _roleManager.FindByIdAsync(roleId);
		var model = new List<CustomUserRoleViewModel>();

        // 这里注意,_userManager.Users.ToList()后面一定要加.ToList(),否则会抛出异常:https://stackoverflow.com/questions/60727080/helping-solving-there-is-already-an-open-datareader-associated-with-this-comman
		foreach (var user in _userManager.Users.ToList())
		{
			var userRoleViewModel = new CustomUserRoleViewModel
			{
				UserId = user.Id,
				UserName = user.UserName
			};

			if (await _userManager.IsInRoleAsync(user, role.Name))
				userRoleViewModel.IsSelected = true;
			else
				userRoleViewModel.IsSelected = false;
			model.Add(userRoleViewModel);
		}

		return model;
	}

	public async Task<ResultViewModel> EditUsersInRoleAsync(List<CustomUserRoleViewModel> model, string roleId)
	{
		var role = await _roleManager.FindByIdAsync(roleId);
		foreach (var m in model)
		{
			var user = await _userManager.FindByIdAsync(m.UserId);
			IdentityResult result;
			if (m.IsSelected && !await _userManager.IsInRoleAsync(user, role.Name))
				result = await _userManager.AddToRoleAsync(user, role.Name);
			else if (!m.IsSelected && await _userManager.IsInRoleAsync(user, role.Name))
				result = await _userManager.RemoveFromRoleAsync(user, role.Name);
			else
				continue;
			if (result.Succeeded)
			{
				if (model.Count > 0)
					continue;
				return new ResultViewModel
				{
					Message = roleId,
					IsSuccess = true
				};
			}

			return new ResultViewModel
			{
				Message = roleId,
				IsSuccess = false
			};
		}

		return new ResultViewModel
		{
			Message = roleId,
			IsSuccess = true
		};
	}
接着加上页面。
EditUsersInRole.razor.cs
using BlazorServer.Repository;
using BlazorServer.Shared;
using BlazorServer.ViewModels;
using Microsoft.AspNetCore.Components;
using Microsoft.JSInterop;

namespace BlazorServer.Pages.RolesManagement;

public partial class EditUsersInRole
{
	[Inject] protected IRolesRepository? RolesRepository { get; set; }
	[Inject] protected NavigationManager? NavigationManager { get; set; }
	[Inject] protected IJSRuntime? Js { get; set; }
	private JsInteropClasses? _jsClass;
	[Parameter] public string? Id { get; set; }
	public List<CustomUserRoleViewModel> UserRoleViewModel { get; set; } = new List<CustomUserRoleViewModel>();

	protected override async Task OnInitializedAsync()
	{
		await LoadData();
		_jsClass = new JsInteropClasses(Js!);
	}

	private async Task LoadData()
	{
		UserRoleViewModel = (await RolesRepository!.EditUsersInRoleAsync(Id!)).ToList();
	}


	public async Task HandleValidSubmit()
	{
		var result = await RolesRepository!.EditUsersInRoleAsync(UserRoleViewModel, Id!);

		if (result.IsSuccess)
		{
			NavigationManager!.NavigateTo($"/RolesManagement/EditRole/{Id}");
		}
		else
		{
			await _jsClass!.Alert(result.Message!);
		}
	}

	public void Cancel()
	{
		NavigationManager!.NavigateTo($"/RolesManagement/EditRole/{Id}");
	}
}
EditUsersInRole.razor
@page "/RolesManagement/EditUsersInRole/{Id}" @attribute [Authorize]

<EditForm Model="UserRoleViewModel" OnValidSubmit="HandleValidSubmit">
  <DataAnnotationsValidator />
  <ValidationSummary />
  <div class="card">
    <div class="card-header">
      <h2>从角色新增或者删除用户</h2>
    </div>
    <div class="card-body">
      @foreach (var user in UserRoleViewModel) {
      <div class="form-check m-1">
        <label class="form-check-label">
          <InputCheckbox @bind-Value="@user.IsSelected"></InputCheckbox>
          @user.UserName
        </label>
      </div>
      }
    </div>
    <div class="card-footer">
      <button type="submit" class="btn btn-primary">更新</button>
      <button type="button" class="btn btn-danger" @onclick="@Cancel">
        取消
      </button>
    </div>
  </div>
</EditForm>
EditRole.razor.cs新增一个方法,跳转EditUsersInRole.razor,可以编辑角色底下用户。
public void EditUsersInRole()
{
    NavigationManager!.NavigateTo($"/RolesManagement/EditUsersInRole/{Id}");
}
EditRole.razor加上一个按钮调用该方法。
<button type="button" class="btn btn-info" @onclick="EditUsersInRole">
  新增或移除该角色底下的用户
</button>
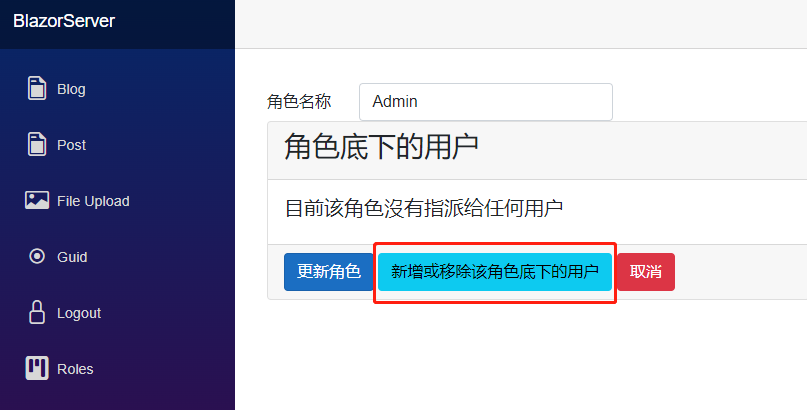
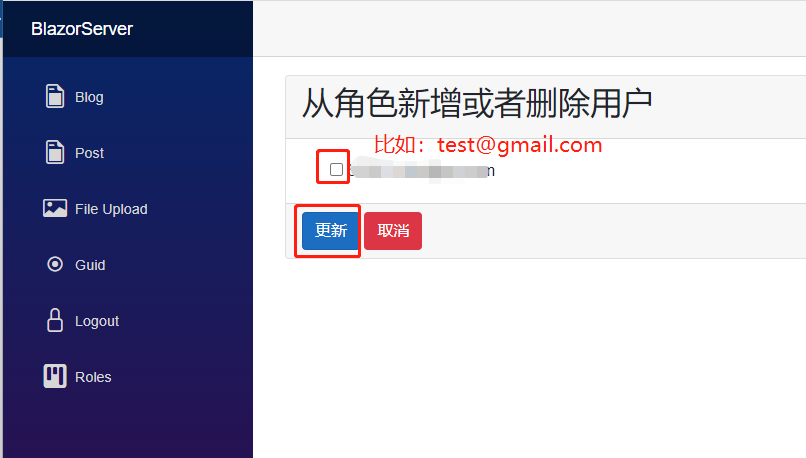
启动网页进入编辑角色用户页面,可以看到目前只有一个用户,将Admin角色分配给这个用户,如此一来就完成了Admin跟test@gmail.com的分配,不过要测试是否成功的话,需要对页面加入限制,还要新增一个用户测试。
先将每个razor component 的@attribute [Authorize]改成@attribute [Authorize(Roles = "Admin")],表示要看到这页面的人必须有 Role Admin。
再去NavMenu.razor,于原本的<AuthorizeView>上方加入下面这段代码,同理要看到跳转Roles链接的人必须有 Role Admin,再把原本<AuthorizeView>的Roles链接删除。
<AuthorizeView Roles="Admin">
  <Authorized>
    <li class="nav-item px-3">
      <NavLink
        class="nav-link"
        href="RolesManagement/RolesList"
        Match="NavLinkMatch.All"
      >
        <span class="bi bi-kanban-fill h4 p-2 mb-0" aria-hidden="true"></span>
        Roles
      </NavLink>
    </li>
  </Authorized>
</AuthorizeView>
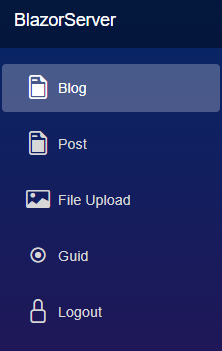
最后新增一名用户,名为user@gmail.com,以此用户登录,会发现左边的Roles不见了,手动输入网址也会提示没有权限,这就是最基本的角色(Role)授权,如果系统很简单只要用角色划分权限,这样就能满足需求了。

引用:
注:本文代码通过 .NET 6 + Visual Studio 2022 重构,可点击原文链接与重构后代码比较学习,谢谢阅读,支持原作者