
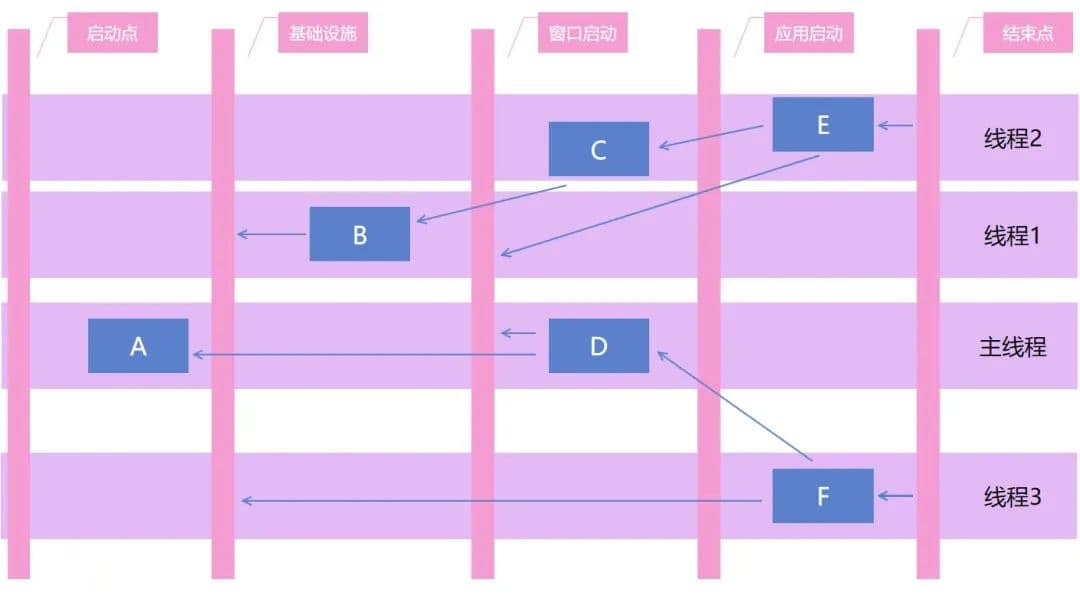
对于大型的应用软件,特别是客户端应用软件,应用启动过程中,需要执行大量的逻辑,包括各个模块的初始化和注册等等逻辑。大型应用软件的启动过程都是非常复杂的,而客户端应用软件是对应用的启动性能有所要求的,不同于服务端的应用软件。设想,用户双击了桌面图标,然而等待几分钟,应用才启动完毕,那用户下一步会不会就是点击卸载了。为了权衡大型应用软件在启动过程,既需要执行复杂的启动逻辑,又需要关注启动性能,为此过程造一个框架是一个完全合理的事情。我所在的团队为启动过程造的库,就是本文将要和大家介绍我所在团队开源的 dotnetCampus.ApplicationStartupManager 启动流程框架的库
背景
这个库的起源是一次听 VisualStudio 团队的分享,当时大佬们告诉我,为了优化 VisualStudio 的启动性能,他的团队制定了一个有趣的方向,那就是在应用启动的时候将 CPU 和内存和磁盘跑满。当然,这是一个玩笑的话,本来的意思是,在 VisualStudio 应用启动的时候,应该充分压榨计算机的性能。刚好,我所在的团队也有很多个大型的应用,代码的 MergeRequest 数都破万的应用。这些应用的逻辑复杂度都是非常高的,原本只能是采用单个线程执行,从而减少模块之间的依赖复杂度导致的坑。但在后续为了优化应用软件的启动性能,考虑到进行机器性能的压榨策略,其中就包括了多线程的方式
然而在开多线程的时候,自然就会遇到很多线程相关的问题,最大的问题就是如何处理各个启动模块之间的依赖关系。如果没有一个较好的框架来进行处理,只靠开发者的个人能力来处理,做此重构是完全不靠谱的,或者说这个事情是做不远的,也许这个版本能优化,但下个版本呢
还有一点非常重要的是如何做启动性能的监控,如分析各个启动项的耗时情况。在进行逐个启动业务模块的性能优化之前,十分有必要进行启动模块的性能测量。而有趣的是,启动模块是非常和妖魔的用户环境相关的,也就是在实验室里测量的结果,和实际的用户使用的结果是有很大的误差的。这也就给启动流程框架提了一个重要的需求,那就是能支持方便的对各个启动模块进行性能测量监控
由于有多个项目都期望接入启动流程框架,因此启动流程框架应该做到足够的抽象,最好不能有耦合单一项目的功能
经过了大概一年的开发时间,在 2019 年正式将启动流程框架投入使用。当前在近千万台设备上跑着启动流程框架的逻辑
当前此启动流程框架的库在 GitHub 上,基于最友好的 MIT 协议,也就是大家可以随便用的协议进行开源,开源地址: https://github.com/dotnet-campus/dotnetCampus.ApplicationStartupManager
功能
我所在的团队开源的 ApplicationStartupManager 启动流程框架的库提供了如下的卖点
- 自动构建启动流程图
- 支持高性能异步多线程的启动任务项执行
- 支持 UI 线程自动调度逻辑
- 动态分配启动任务资源
- 支持接入预编译框架
- 支持所有的 .NET 应用
- 启动流程耗时监控
启动流程图
各个启动任务项之间,必然存在显式或隐式依赖,如依赖某个逻辑或模块初始化,或者依赖某个服务的注册,或者有执行时机的依赖。在开发者梳理完成依赖之后,给各个启动任务项确定相互之间的依赖关系,即可根据此依赖关系构建出启动流程图
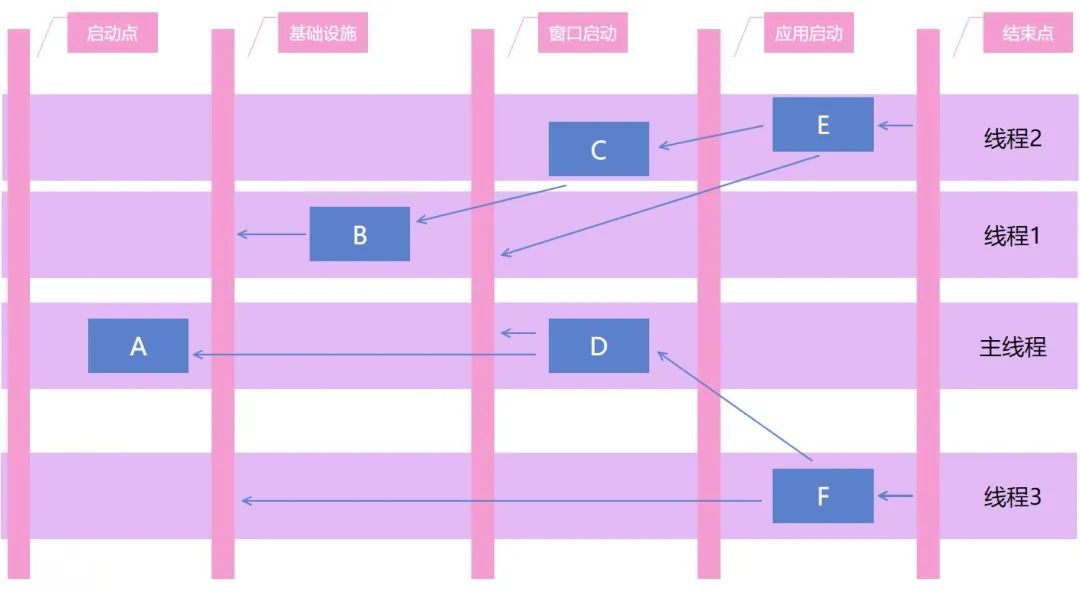
假设有以下几个启动任务项,启动任务项之间有相互的依赖关系,如下图,使用箭头表示依赖关系
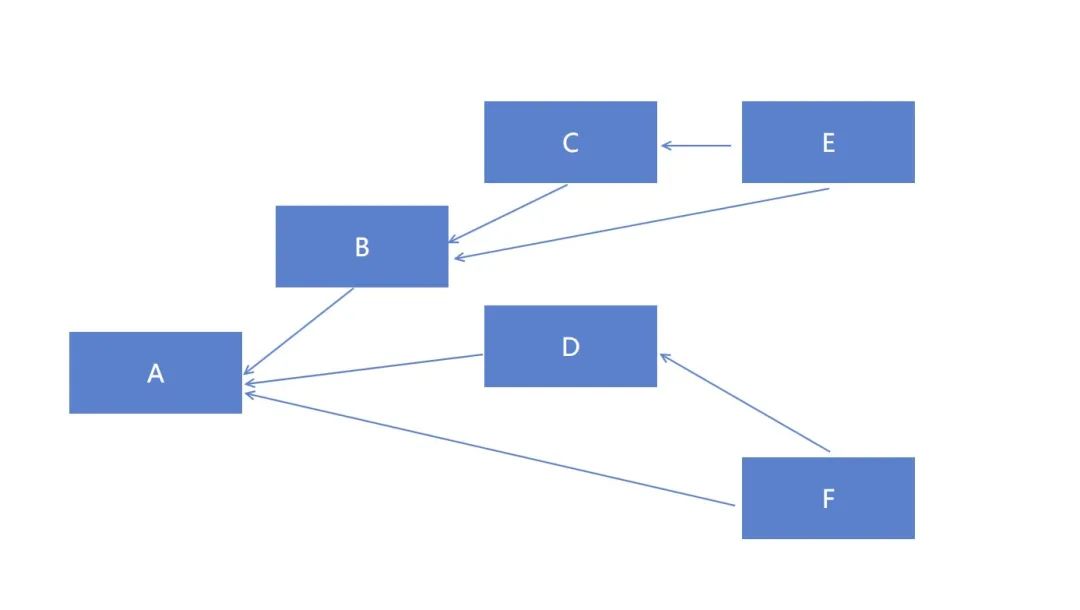
- 启动任务项 A : 最先启动的启动任务项,如日志或容器的初始化启动任务项
- 启动任务项 B : 一些基础服务,但是需要依赖 A 启动任务项完成才能执行
- 启动任务项 C : 依赖 B 启动任务项的执行完成
- 启动任务项 D : 另一个独立的模块,和 B C E 启动任务项没有联系,但是也依赖 A 启动任务项的完成
- 启动任务项 E : 同时依赖 B C 启动任务项的完成
- 启动任务项 F : 同时依赖 A D 启动任务项的完成
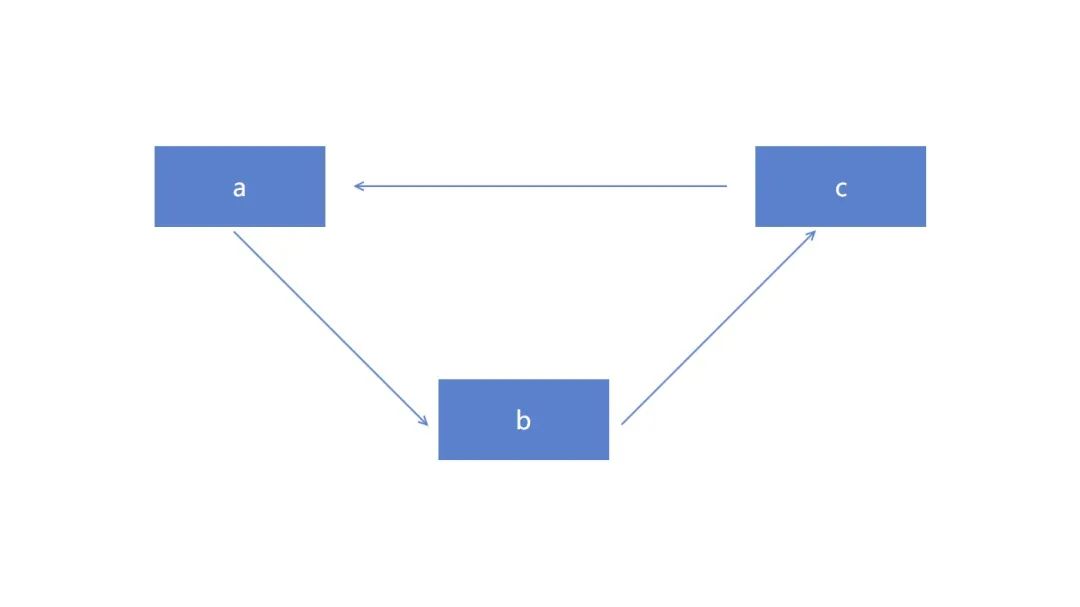
以上的启动任务项可以构成一个有向无环启动流程图,每个启动任务项都可以有自己的前置或后置。那为什么需要是无环呢?要是有两个启动任务项是相互等待依赖的,那就自然就无法成功启动了,如下图,有三个启动任务项都在相互依赖,那也就是说无论哪个启动任务项先启动,都是不符合预期的,因为先启动的启动任务项的前置没有被满足,启动过程中逻辑上是存在有前置依赖没有执行
为了更好的构建启动流程图,在逻辑上也加上了两个虚拟的节点,那就是启动点和结束点,无论是哪个启动任务项,都会依赖虚拟的启动点,以及都会跟随着结束点
另外,具体业务方也会定义自己的关联启动过程,也就是预设的启动节点,关键启动过程点将被各个启动项所依赖,如此即可人为将启动过程分为多个阶段
例如可以将启动过程分为如下阶段
- 启动点: 虚拟的节点,表示应用启动,用于构建启动流程图
- 基础设施: 表示在此之前应该做启动基础服务的逻辑,例如初始化日志,初始化容器等等。其他启动任务项可以依赖基础设施,从而认为在基础设施之后执行的启动任务项,基础设施已准备完成
- 窗口启动: 在客户端程序的窗口初始化之前,需要完成 UI 的准备逻辑,例如样式资源和必要的数据准备,或者 ViewModel 的注入等。在窗口启动之后,即可对 UI 元素执行逻辑,或者注册 UI 强相关逻辑。或者是在窗口启动之后,执行那些不需要在主界面显示之前执行的启动任务项,从而提升主界面显示性能
- 应用启动: 完成了启动的逻辑,在应用启动之后的启动任务项都是属于可以慢慢执行的逻辑,例如触发应用的自动更新,例如执行一下日志文件清理等等
- 结束点: 虚拟的节点,表示应用启动过程完全完成,用于构建启动流程图
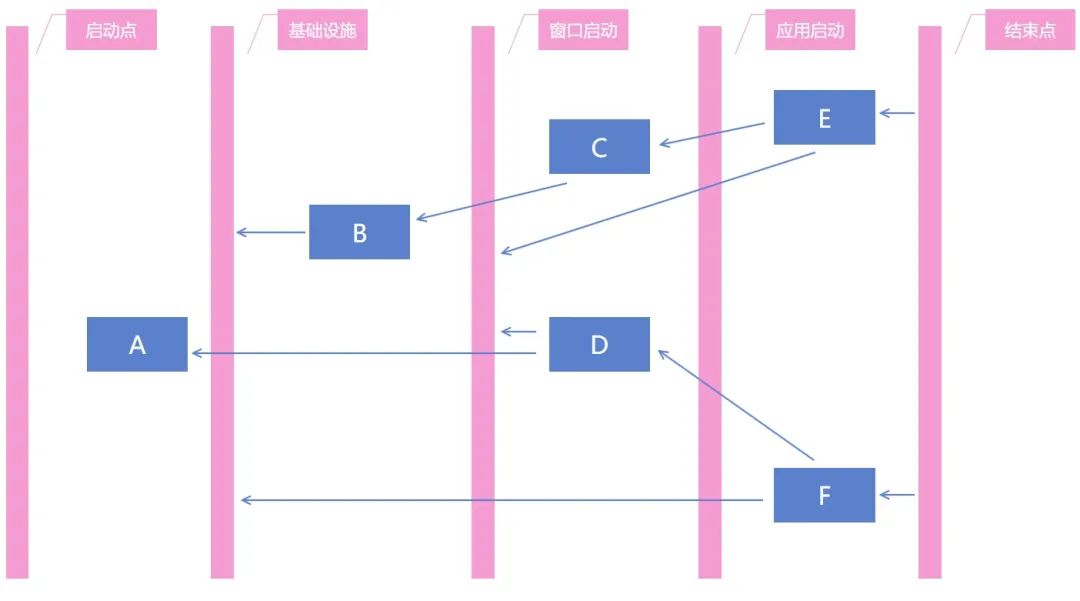
如图,每个启动任务项可以选择依赖的是具体的某个启动任务项,也可以选择依赖的是关键启动过程点
通过此逻辑,可以为后续的优化做准备,也方便上层业务开发者开发业务层的启动任务项。让上层业务开发者可以比较清晰了解自己新写的启动任务项应该放在哪个地方,也可以提供了调试各个模块的启动任务项的依赖情况,了解是否存在循环的依赖逻辑
高性能异步多线程的启动任务项执行
为了更好的压榨机器性能,进行多线程启动是必要的。在完成了启动流程图的构建之后,即可将启动任务项画成树形,自然也就方便进行多线程调度。基于 .NET 的 Task 方式调度,可以实现多线程异步等待,解决多个启动任务项的依赖在多线程情况下的线程安全问题
如使用线程池的 Task 调度,可以从逻辑上,将不同的启动任务项的启动任务链划分为给不同的线程执行。实际执行的线程是依靠线程池调度,甚至实际执行上,线程池只是用了两个实际线程在执行
对应用的启动过程中,在不明白 .NET 线程池调度机制的情况下,将在开启多线程问题上稍微有一点争议。核心争议的就是如果一个应用启动过程中,占满了 CPU 资源,是否就让用户电脑卡的不能动了。其实上面这个问题不好回答,如果大家有此疑惑,那就请听我细细分析一下。首先一点就是问题本身,先问 问题 本身一个问题,如果只是开一个线程启动,会不会也让用户的电脑卡的不能动了?答案是 是的,完全取决于用户电脑,包括电脑配置以及电脑的妖魔环境,例如一个渣配的设备配合国产的好几个杀毒软件一起,那么在应用启动的瞬间,就有大量的杀毒工作在执行,自然就卡的不能动了。而且,电脑卡的不能动了,是不是和 CPU 被占满是必然关系?答案是 完全不是,应用启动过程中,一定会存在 DLL 加载的过程,特别是应用的冷启动过程,大量的文件读写,对于一些机械盘来说,将会占满磁盘的读写,自然也就能让电脑卡的不能动了,这个过程和是否开启多线程,其实关系很小,毕竟机械盘和 CPU 之间的性能摆在这。第二个是卡的时间是否重要,例如应用开了多线程就卡了 500 毫秒,而如果应用启动只用单线程则需要 4 x 500ms = 2s 的耗时,那是否此时开多线程划得来呢? 这个是需要权衡的,不同的应用逻辑自然不同,例如生产力工具,我本来开机就是为了用此工具,例如写代码用的 VisualStudio 工具,我打开了这个应用,过程中自然没有其他同步使用的需求,卡了就卡了咯。最后一个问题就是,开启 .NET 的多线程完全不等于占满了 CPU 资源,别忘了 IO 异步哦
当然了,会接入应用流程的开发者肯定不属于新手,相信对于线程方面知识已有所了解,会自己选择合适的方式执行启动任务项。这也侧面告诉大家,本启动流程框架的库接入是有一定的门槛的
支持 UI 线程自动调度逻辑
对于客户端应用,自然有一个特殊的线程是 UI 线程,启动过程,有很多逻辑是需要在 UI 线程执行的。由于 .NET 系的各个应用框架的 UI 线程调度都不咋相同,因此需要启动流程框架执行一定量的适配
在具体的启动任务项上标记当前的启动任务项需要在 UI 线程执行即可,框架层将会自动调度启动任务项到 UI 线程执行
设计上,默认将会调度启动任务项到非 UI 线程执行
动态分配启动任务资源
在用户端的各个启动任务项的耗时和在实验室里测试的结果,无论是开发机还是测试机,大多数时候都是有很大的差值的。如果按照固定的顺序去执行启动任务项,自然有很多启动时间都在空白的等待上。本启动流程框架库支持在启动过程中,自动根据各个启动任务项的耗时,动态进行调度
核心方法就是构建出来的启动流程图,支持各个任务的等待逻辑,基于 Task 等待机制,即可进行动态调度等待逻辑,从而实现动态编排启动任务项,在紧凑的时间内让多条线程排满启动任务的执行。如果对应的上层业务开发者能正确使用 Task 机制,例如正确使用异步等待,可以实现在启动过程中极大隐藏
支持接入预编译框架
启动过程是属于性能敏感的部分,各个模块的启动任务项如何收集是一个很大的问题。启动部分属于性能敏感部分,不合适采用反射的机制。好在 dotnet campus 里面有技术储备,在 2018 年的时候就开源了 SourceFusion 预编译框架,后面在 2020 年时吸取了原有 SourceFusion 的挖坑经验,重新开源了 dotnetCampus.Telescope 预编译框架,新开源的 dotnetCampus.Telescope 也放在 SourceFusion 仓库中
在 ApplicationStartupManager 启动流程框架开发之初就考虑了对接预编译框架,通过预编译提供了无须反射即可完成启动任务项收集的能力,可以极大减少因为启动过程中反射程序集的性能损耗
对接了预编译框架,相当于原本需要在用户端执行的逻辑的时间,搬到开发者编译时,在开发者编译时执行了原本需要在用户端执行的逻辑。如此可以减少用户端的执行逻辑的时间
接入了预编译框架,可以实现在开发者编译时,将所有项目的启动任务项收集起来,包括启动任务项类型和委托创建启动任务项,以及启动任务项的 Attribute 特性
启动流程耗时监控
对于大型应用来说,很重要的一点就是关注在用户端的运行效果。启动过程中,监控是十分重要的。监控最大的意义在于:
第一,可以了解到在用户设备上,各个启动任务项的实际执行耗时情况,从而在后续版本进行性能优化的时候,有数据支撑。否则凭借在开发或测试端有限的设备上,很难跑出真正的性能瓶颈。如不仅关注在用户设备上的 95 线启动分布,所谓 95 线就是在百分之九十五的用户上的启动耗时分布,也可以关注关注 95 线到 99 线中间的用户的启动分布,了解一些比较特殊的设备的环境,从而做特别的优化
第二,可以做版本对比,做预警。对于大型应用,基本都有灰发和预发机制,通过在灰发过程中监控启动耗时,可以对接预警机制,在某个启动任务项耗时上升时告诉开发者。如此可以有利项目的长远开发
最后一点,是可以告诉用户,启动的慢,是慢在哪一步。这个机制集中在提供了开放性上,例如 Visual Studio 将会不断告诉你,启动慢是哪个插件导致的
使用方法
在抽离了各个项目的定制化需求之后,启动流程框架的库只有核心的逻辑,这也就意味着在使用的时候,还需要具体的业务方自己加入初始化逻辑和适配业务的具体逻辑。换句话说是,接入启动流程框架不是简单安装一下库,然后调用 API 即可,而是需要根据应用的业务需求,进行一部分对接的工作。好在启动流程框架只有在大型项目或者预期能做到大型的项目才适用,相比于大型应用的其他逻辑,对接启动流程框架的代码量基本可以忽略。对于小型项目或非多人协作的项目,自然是不合适的
整个 ApplicationStartupManager 启动流程框架设计上是高性能的,减少各个部分的性能内损。但是在上启动流程框架本身就存在一定的框架性能损耗,如果对应的只是小项目或非多人协作的项目,假设可以自己编排启动任务项,那自然自己编排启动任务项如此做是能达到性能最高的
应用 ApplicationStartupManager 启动流程框架能解决的矛盾点在于项目的复杂度加上多人协作的沟通,与启动性能之间的矛盾。接入启动流程框架可以让上层业务开发者屏蔽对启动过程细节的干扰,方便上层业务开发者根据业务需求加入启动任务项,方便启动模块维护者定位和处理启动任务项的性能
按照惯例,在使用 .NET 的某个库的第一步就是通过 NuGet 安装库
第一步使用 NuGet 安装 ApplicationStartupManager 库。如果项目使用 SDK 风格的项目文件格式,可以在 csproj 项目文件上添加如下的代码进行安装
<ItemGroup>
    <PackageReference Include="dotnetCampus.ApplicationStartupManager" Version="0.0.1-alpha01" />
</ItemGroup>
为了方便让大家看到 ApplicationStartupManager 启动流程框架库的效果,我采用了放在 https://github.com/dotnet-campus/dotnetCampus.ApplicationStartupManager 里的例子代码来作为例子
新建三个项目,分别如下
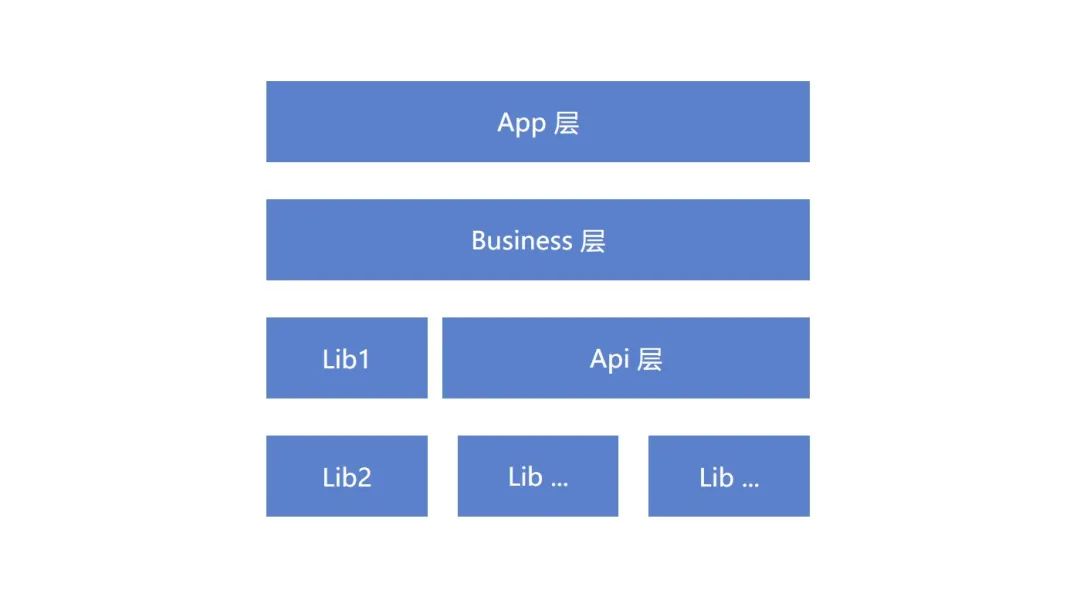
- WPFDemo.Lib1: 代表底层的各个组件库,特别指业务组件
- WPFDemo.Api: 应用的 API 层的程序集,将在这里部署启动流程的框架逻辑
- WPFDemo.App: 应用的顶层,也就是 Main 函数所在的程序集,在这里触发启动的逻辑
大概的抽象之后的应用的模型架构如下,不过为了演示方便,就将 Business 层和 App 层合一,将众多的 Lib 组件合为一个 Lib1 项目
新建完成项目,也安装完成 NuGet 包,现在就是开始在 API 层搭建应用相关联的启动框架逻辑。为什么在安装完成了 NuGet 包之后,还需要 API 做额外的逻辑? 每个应用都有自己独特的逻辑,每个应用的启动任务项所需的参数是不相同的,每个应用的日志记录方式也可以是不相同的,不同类型的应用的启动节点也是不相同的,如此这些都是需要做应用相关的定制的
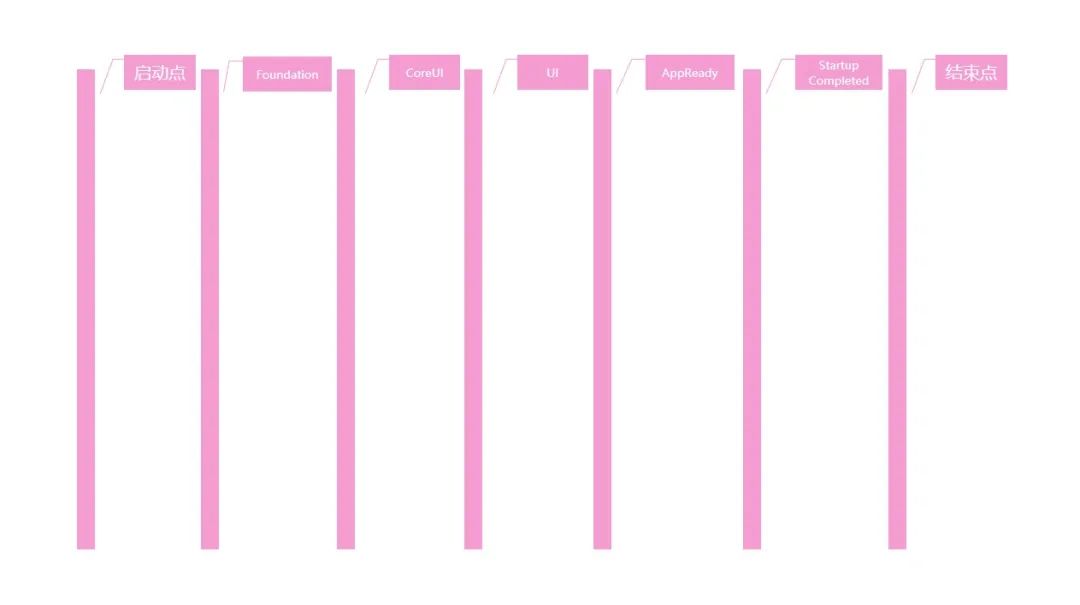
先定义应用相关的预设的启动节点
/// <summary>
/// 包含预设的启动节点。
/// </summary>
public class StartupNodes
{
    /// <summary>
    /// 基础服务(日志、异常处理、容器、生命周期管理等)请在此节点之前启动,其他业务请在此之后启动。
    /// </summary>
    public const string Foundation = "Foundation";

    /// <summary>
    /// 需要在任何一个 Window 创建之前启动的任务请在此节点之前。
    /// 此节点之后将开始启动 UI。
    /// </summary>
    public const string CoreUI = "CoreUI";

    /// <summary>
    /// 需要在主 <see cref="Window"/> 创建之后启动的任务请在此节点之后。
    /// 此节点完成则代表主要 UI 已经初始化完毕(但不一定已显示)。
    /// </summary>
    public const string UI = "UI";

    /// <summary>
    /// 应用程序已完成启动。如果应该显示一个窗口,则此窗口已布局、渲染完毕,对用户完全可见,可开始交互。
    /// 不被其他业务依赖的模块可在此节点之后启动。
    /// </summary>
    public const string AppReady = "AppReady";

    /// <summary>
    /// 任何不关心何时启动的启动任务应该设定为在此节点之前完成。
    /// </summary>
    public const string StartupCompleted = "StartupCompleted";
}
定义完成之后,即可通过此将启动过程分为如下阶段
再定义一个和应用业务方相关的日志类型,不同的应用记录日志的方式大部分都是不相同的,所使用的底层日志记录也都是不相同的
/// <summary>
/// 和项目关联的日志
/// </summary>
public class StartupLogger : StartupLoggerBase
{
    public void LogInfo(string message)
    {
        Debug.WriteLine(message);
    }

    public override void ReportResult(IReadOnlyList<IStartupTaskWrapper> wrappers)
    {
        var stringBuilder = new StringBuilder();
        foreach (var keyValuePair in MilestoneDictionary)
        {
            stringBuilder.AppendLine($"{keyValuePair.Key} - [{keyValuePair.Value.threadName}] Start:{keyValuePair.Value.start} Elapsed:{keyValuePair.Value.elapsed}");
        }

        Debug.WriteLine(stringBuilder.ToString());
    }
}
如例子上的日志就是记录到 Debug.WriteLine 输出,同时日志里也添加了 LogInfo 方法
继续定制应用业务相关的启动任务项的参数,如例子代码的项目就用到了 dotnetCampus.CommandLine 提供的命令行参数解析,各个启动任务项也许会用到命令行参数,因此也就需要带入到启动任务项的参数里面,作为一个属性。例子代码的项目也用到了 dotnetCampus.Configurations 高性能配置文件库 提供的应用软件配置功能,也是各个启动任务项所需要的,放入到启动任务项的参数
加上和应用业务相关的属性之后的启动任务项的参数定义如下
public class StartupContext : IStartupContext
{
    public StartupContext(IStartupContext startupContext, CommandLine commandLine, StartupLogger logger, FileConfigurationRepo configuration, IAppConfigurator configs)
    {
        _startupContext = startupContext;
        Logger = logger;
        Configuration = configuration;
        Configs = configs;
        CommandLine = commandLine;
        CommandLineOptions = CommandLine.As<Options>();
    }

    public StartupLogger Logger { get; }

    public CommandLine CommandLine { get; }

    public Options CommandLineOptions { get; }

    public FileConfigurationRepo Configuration { get; }

    public IAppConfigurator Configs { get; }

    public Task<string> ReadCacheAsync(string key, string @default = "")
    {
        return Configuration.TryReadAsync(key, @default);
    }

    private readonly IStartupContext _startupContext;
    public Task WaitStartupTaskAsync(string startupKey)
    {
        return _startupContext.WaitStartupTaskAsync(startupKey);
    }
}
为了继续承接 WaitStartupTaskAsync 的功能,于是构造函数依然带上 IStartupContext 用于获取框架里默认提供的启动任务项的参数。上面代码的 Configuration 和 Configs 两个属性都是 dotnetCampus.Configurations 高性能配置文件库 提供的功能,可以使用 COIN 格式进行配置文件的读写
完成了启动任务项的参数的定义,就可以来定制具体应用的启动任务项的基类型了。因为启动任务项的基类型一定是和启动任务项的参数相关,而启动任务项的参数每个应用都有所不同,因此启动任务项的基类型也就不同。即使不同的程度只有启动任务项的参数,代码层面可以使用泛形来解决,但也会因为泛形的将会让业务层的代码量较多,不如在应用上再定义
/// <summary>
/// 表示一个和当前业务强相关的启动任务
/// </summary>
public class StartupTask : StartupTaskBase
{
    protected sealed override Task RunAsync(IStartupContext context)
    {
        return RunAsync((StartupContext) context);
    }

    protected virtual Task RunAsync(StartupContext context)
    {
        return CompletedTask;
    }
}
如上代码,所有的应用的业务端都应该继承 StartupTask 作为启动任务项的基类。继承之后,依然是重写 RunAsync 方法,在此方法里面执行业务逻辑
这里设计上让 RunAsync 作为一个虚方法而不是一个抽象方法是因为有一些应用业务上需要一点占坑用的启动任务项,这些启动任务项没有实际逻辑功能,只是为了优化启动流程的编排而添加。另外重要的一点在于可以让上层业务开发者在编写到一些只有同步的逻辑时,解决不知道如何返回 RunAsync 的 Task 的问题,可以让上层业务开发者自然返回 base.RunAsync 方法的结果,从而减少了各个诡异的返回 Task 的方法
在完成了定制启动任务基类型之后,就需要编写基于 StartupManagerBase 的和应用业务相关的 StartupManager 类型,在这里的逻辑需要包含如何启动具体的启动任务项的逻辑,代码如下
/// <summary>
/// 和项目关联的启动管理器,用来注入业务相关的逻辑
/// </summary>
public class StartupManager : StartupManagerBase
{
    public StartupManager(CommandLine commandLine, FileConfigurationRepo configuration, Func<Exception, Task> fastFailAction, IMainThreadDispatcher mainThreadDispatcher) : base(new StartupLogger(), fastFailAction, mainThreadDispatcher)
    {
        var appConfigurator = configuration.CreateAppConfigurator();
        Context = new StartupContext(StartupContext, commandLine, (StartupLogger) Logger, configuration, appConfigurator);
    }

    private StartupContext Context { get; }

    protected override Task<string> ExecuteStartupTaskAsync(StartupTaskBase startupTask, IStartupContext context, bool uiOnly)
    {
        return base.ExecuteStartupTaskAsync(startupTask, Context, uiOnly);
    }
}
以上代码通过重写 ExecuteStartupTaskAsync 方法实现在调用具体的启动任务项传入业务相关的 StartupContext 参数
如果应用有更多的需求,可以重写 StartupManagerBase 更多方法,包括导出所有的启动项的 ExportStartupTasks 方法,重写此方法可以让应用定义如何导出所有的启动任务项。重写 AddStartupTaskMetadataCollector 方法可以让应用定义如何加入被管理的程序集中的启动信息等
以上几步完成之后,还有一项需要完成的是,刚才新建的 WPFDemo.Api 项目其实没有加上 WPF 的依赖,而在应用里面,是有启动任务项需要依赖在 UI 线程执行,于是就在加上 WPF 的依赖的 WPFDemo.App 上完成定义
class MainThreadDispatcher : IMainThreadDispatcher
{
    public async Task InvokeAsync(Action action)
    {
        await Application.Current.Dispatcher.InvokeAsync(action);
    }
}
以上的基础完成之后,就可以在 Program.cs 的主函数将启动框架跑起来,进入到 WPFDemo.App 项目的 Program 类型,在主函数里面先解析命令行,然后再创建 App 再跑起启动框架
[STAThread]
static void Main(string[] args)
{
    var commandLine = CommandLine.Parse(args);

    var app = new App();

    //开始启动任务
    StartStartupTasks(commandLine);

    app.Run();
}
在 StartStartupTasks 方法里面使用 Task.Run 的方式在后台线程跑起来启动框架,如此可以让主线程也就是此应用的 UI 线程开始跑起来界面相关逻辑
private static void StartStartupTasks(CommandLine commandLine)
{
    Task.Run(() =>
    {
        // 1. 读取应用配置
        // 应用将会根据配置决定启动的行为
        var configFilePath = "App.coin";
        var repo = ConfigurationFactory.FromFile(configFilePath);

        // 2. 对接预编译模块,获取启动任务项
        var assemblyMetadataExporter = new AssemblyMetadataExporter(BuildStartupAssemblies());

        // 3. 创建启动框架和跑起来
        var startupManager = new StartupManager(commandLine, repo, HandleShutdownError, new MainThreadDispatcher())
            // 3.1 导入预设的应用启动节点,这是必要的步骤,业务方的各个启动任务项将会根据此决定启动顺序
            .UseCriticalNodes
            (
                StartupNodes.Foundation,
                StartupNodes.CoreUI,
                StartupNodes.UI,
                StartupNodes.AppReady,
                StartupNodes.StartupCompleted
            )
            // 3.2 导出程序集的启动项
            .AddStartupTaskMetadataCollector(() =>
                // 这是预编译模块收集的应用的所有的启动任务项
                assemblyMetadataExporter.ExportStartupTasks());
        startupManager.Run();
    });
}
以上的例子应用里面,有业务是需要根据配置决定启动过程,因此需要先读取应用配置。应用配置选取 dotnetCampus.Configurations 高性能配置文件库 可以极大减少因为读取配置而占用太多启动时间。以上的例子里,还对接了预编译模块。预编译模块的功能是收集应用里的所有启动任务项,如此可以极大提升收集启动任务项的耗时,也不需要让上层业务开发者需要手工注册启动任务项
以上代码即可实现在 Main 函数启动之后,跑起来启动框架。不过上面代码编译还不能通过,因为还没有完成 AssemblyMetadataExporter 的逻辑,这个预编译模块相关逻辑
这不等价于这套启动框架强依赖于预编译模块,而是说可选接入预编译模块。只需要有任何的逻辑,能对接 AddStartupTaskMetadataCollector 方法,在此方法里面能传入获取应用所需的启动任务项即可。无论使用任何的方式,包括反射等都是可以的。接入预编译模块只是为了优化性能,减少收集启动任务项的耗时
接下来就是预编译模块的接入逻辑,本文不涉及 Telescope 预编译模块的原理部分,只包含如何接入的方法
和 .NET 的其他库一样,为了接入预编译模块,就需要先安装 NuGet 库。通过 NuGet 安装 dotnetCampus.Telescope 库,如果是新 SDK 风格的项目文件,可以编辑 csproj 项目文件,添加如下代码安装
<ItemGroup>
    <PackageReference Include="dotnetCampus.TelescopeSource" Version="1.0.0-alpha02" />
</ItemGroup>
不同于其他的库,由于 dotnetCampus.Telescope 预编译框架是对项目代码本身进行处理的,需要每个用到预编译都安装此库,因此需要为以上三个项目都安装,而不能靠引用依赖自动安装
安装完成之后,在项目上新建一个 AssemblyInfo.cs 的文件,给程序集添加特性。按照约定,需要将 AssemblyInfo.cs 文件放入到 Properties 文件夹里面。这个 Properties 文件夹算是一个特别的文件夹,在 Visual Studio 里新建就可以看到此文件夹的图标和其他文件夹不相同
在 AssemblyInfo.cs 文件里面添加如下代码
[assembly: dotnetCampus.Telescope.MarkExport(typeof(WPFDemo.Api.StartupTaskFramework.StartupTask), typeof(dotnetCampus.ApplicationStartupManager.StartupTaskAttribute))]
以上就是对接预编译框架的代码,十分简单。通过给程序集加上 dotnetCampus.Telescope.MarkExportAttribute 可以标记程序集的导出预编译的类型,传入的两个参数分别是导出的类型的基类型以及所继承的特性
以上代码表示导出所有继承 WPFDemo.Api.StartupTaskFramework.StartupTask 类型,且标记了 dotnetCampus.ApplicationStartupManager.StartupTaskAttribute 特性的类型
标记之后,重新构建代码,将会在 obj 文件夹找到 AttributedTypesExport.g.cs 生成文件,如在本文的例子项目里面,生成文件的路径如下
C:\lindexi\Code\ApplicationStartupManager\demo\WPFDemo\WPFDemo.Api\obj\Debug\net6.0\TelescopeSource.GeneratedCodes\AttributedTypesExport.g.cs
假设有一个叫 Foo1Startup 的启动任务项定义如下
[StartupTask(BeforeTasks = StartupNodes.CoreUI, AfterTasks = StartupNodes.Foundation)]
public class Foo1Startup : StartupTask
{
    protected override Task RunAsync(StartupContext context)
    {
        context.Logger.LogInfo("Foo1 Startup");
        return base.RunAsync(context);
    }
}
那么生成的 AttributedTypesExport.g.cs 将包含以下代码
using dotnetCampus.ApplicationStartupManager;
using dotnetCampus.Telescope;
using System;
using System.Collections.Generic;
using System.Linq;
using System.Text;
using System.Threading.Tasks;
using WPFDemo.Api.StartupTaskFramework;

namespace dotnetCampus.Telescope
{
    public partial class __AttributedTypesExport__ : ICompileTimeAttributedTypesExporter<StartupTask, StartupTaskAttribute>
    {
        AttributedTypeMetadata<StartupTask, StartupTaskAttribute>[] ICompileTimeAttributedTypesExporter<StartupTask, StartupTaskAttribute>.ExportAttributeTypes()
        {
            return new AttributedTypeMetadata<StartupTask, StartupTaskAttribute>[]
            {
                new AttributedTypeMetadata<StartupTask, StartupTaskAttribute>(
                    typeof(WPFDemo.Api.Startup.Foo1Startup),
                    new StartupTaskAttribute()
                    {

                        BeforeTasks = StartupNodes.CoreUI,
                        AfterTasks = StartupNodes.Foundation
                    },
                    () => new WPFDemo.Api.Startup.Foo1Startup()
                ),
            };
        }
    }
}
也就是自动收集了程序集里面的启动项,生成收集的代码
可以在启动框架模块里面,新建一个叫 AssemblyMetadataExporter 的类型来从 AttributedTypesExport.g.cs 拿到收集的类型。从 Telescope 拿到 __AttributedTypesExport__ 生成类型的方法是调用 AttributedTypes 的 FromAssembly 方法,代码如下
IEnumerable<AttributedTypeMetadata<StartupTask, StartupTaskAttribute>> collection = AttributedTypes.FromAssembly<StartupTask, StartupTaskAttribute>(_assemblies);
以上代码传入的 _assemblies 参数就是需要获取收集的启动任务项程序集列表,调用以上代码,将会从传入的各个程序集里获取预编译收集的类型
将此收集的返回值封装为 StartupTaskMetadata 即可返回给启动框架
using System.Reflection;

using dotnetCampus.ApplicationStartupManager;
using dotnetCampus.Telescope;

namespace WPFDemo.Api.StartupTaskFramework
{
    public class AssemblyMetadataExporter
    {
        public AssemblyMetadataExporter(Assembly[] assemblies)
        {
            _assemblies = assemblies;
        }

        public IEnumerable<StartupTaskMetadata> ExportStartupTasks()
        {
            var collection = Export<StartupTask, StartupTaskAttribute>();
            return collection.Select(x => new StartupTaskMetadata(x.RealType.Name.Replace("Startup", ""), x.CreateInstance)
            {
                Scheduler = x.Attribute.Scheduler,
                BeforeTasks = x.Attribute.BeforeTasks,
                AfterTasks = x.Attribute.AfterTasks,
                //Categories = x.Attribute.Categories,
                CriticalLevel = x.Attribute.CriticalLevel,
            });
        }

        public IEnumerable<AttributedTypeMetadata<TBaseClassOrInterface, TAttribute>> Export<TBaseClassOrInterface, TAttribute>() where TAttribute : Attribute
        {
            return AttributedTypes.FromAssembly<TBaseClassOrInterface, TAttribute>(_assemblies);
        }

        private readonly Assembly[] _assemblies;
    }
}
回到 Program.cs 里面,新建一个 BuildStartupAssemblies 方法,此方法里面,写明需要收集启动任务项的程序集列表,交给 AssemblyMetadataExporter 去获取
class Program
{
    private static void StartStartupTasks(CommandLine commandLine)
    {
        Task.Run(() =>
        {
            var assemblyMetadataExporter = new AssemblyMetadataExporter(BuildStartupAssemblies());

            // 忽略其他逻辑
        });
    }

    private static Assembly[] BuildStartupAssemblies()
    {
        // 初始化预编译收集的所有模块。
        return new Assembly[]
        {
            // WPFDemo.App
            typeof(Program).Assembly,
            // WPFDemo.Lib1
            typeof(Foo2Startup).Assembly,
            // WPFDemo.Api
            typeof(Foo1Startup).Assembly,
        };
    }
}
通过 StartupManager 的 AddStartupTaskMetadataCollector 即可将导出的启动任务项加入到启动框架
var assemblyMetadataExporter = new AssemblyMetadataExporter(BuildStartupAssemblies());

var startupManager = new StartupManager(/*忽略代码*/)
// 导出程序集的启动项
.AddStartupTaskMetadataCollector(() => assemblyMetadataExporter.ExportStartupTasks());

startupManager.Run();
如此即可完成所有的应用的启动框架配置逻辑,接下来就是各个业务模块编写启动逻辑
通过添加各个业务模块的启动任务项演示启动框架的使用方法
在 WPFDemo.App 添加 MainWindowStartup 用来做主窗口的启动,代码如下
using System.Threading.Tasks;

using dotnetCampus.ApplicationStartupManager;

using WPFDemo.Api.StartupTaskFramework;

namespace WPFDemo.App.Startup
{
    [StartupTask(BeforeTasks = StartupNodes.AppReady, AfterTasks = StartupNodes.UI, Scheduler = StartupScheduler.UIOnly)]
    internal class MainWindowStartup : StartupTask
    {
        protected override Task RunAsync(StartupContext context)
        {
            var mainWindow = new MainWindow();
            mainWindow.Show();

            return CompletedTask;
        }
    }
}
以上代码通过 StartupTask 特性标记了启动任务项需要在 AppReady 之前执行完成,需要在 UI 之后执行,要求调度到主线程执行。对于主窗口显示,自然是需要等待其他的 UI 相关逻辑执行完成,如 ViewModel 注册和样式字典初始化等才能显示的。而只有在主窗口准备完成之后,才能算 AppReady 应用完成,因此可以如此编排启动任务项
接下来再添加一个和业务相关的启动任务项,添加 BusinessStartup 实现业务,业务要求在主界面添加一个按钮。因此如需求,需要让 BusinessStartup 在 MainWindowStartup 执行完成之后才能启动,代码如下
[StartupTask(BeforeTasks = StartupNodes.AppReady, AfterTasks = "MainWindowStartup", Scheduler = StartupScheduler.UIOnly)]
internal class BusinessStartup : StartupTask
{
    protected override Task RunAsync(StartupContext context)
    {
        if (Application.Current.MainWindow.Content is Grid grid)
        {
            grid.Children.Add(new Button()
            {
                HorizontalAlignment = HorizontalAlignment.Center,
                VerticalAlignment = VerticalAlignment.Bottom,
                Margin = new Thickness(10, 10, 10, 10),
                Content = "Click"
            });
        }

        return CompletedTask;
    }
}
可以看到,在 BusinessStartup 里,通过 AfterTasks 设置了 MainWindowStartup 字符串,也就表示了需要在 MainWindowStartup 执行完成之后才能执行
此外,依赖关系是可以跨多个项目的,例如在基础设施里面有 WPFDemo.Lib1 程序集的 LibStartup 表示某个组件的初始化,这个组件属于基础设施,通过 BeforeTasks 指定要在 Foundation 预设启动节点启动
[StartupTask(BeforeTasks = StartupNodes.Foundation)]
class LibStartup : StartupTask
{
    protected override Task RunAsync(StartupContext context)
    {
        context.Logger.LogInfo("Lib Startup");
        return base.RunAsync(context);
    }
}
如上可以看到,在此框架设计上,给了 StartupTask 类型的 RunAsync 作为虚方法,方便业务对接时,做同步逻辑,可以通过调用基类方法返回 Task 对象
以上代码只是标记了 BeforeTasks 而没有标记 AfterTasks 那么将会默认给 AfterTasks 赋值为虚拟的启动点,也就是不需要等待其他启动项
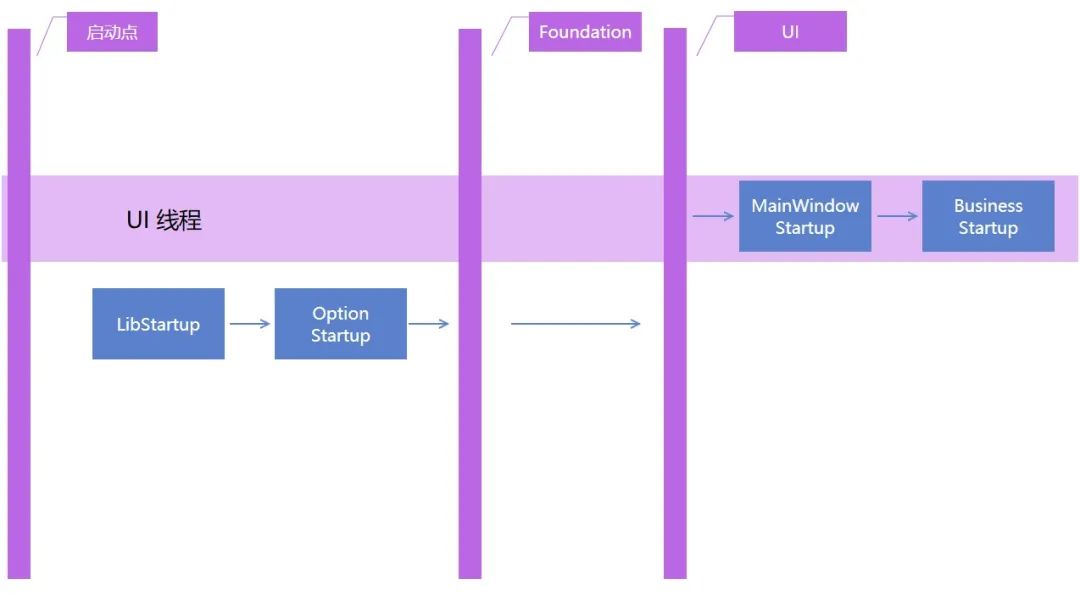
在 WPFDemo.Api 程序集里面有一个 OptionStartup 表示根据命令行决定执行的逻辑,这个也属于基础设施,但是依赖于 LibStartup 的执行完成,代码如下
[StartupTask(BeforeTasks = StartupNodes.Foundation, AfterTasks = "LibStartup")]
class OptionStartup : StartupTask
{
    protected override Task RunAsync(StartupContext context)
    {
        context.Logger.LogInfo("Command " + context.CommandLineOptions.Name);

        return CompletedTask;
    }
}
如此即可实现让 OptionStartup 在 LibStartup 之后执行,且在 Foundation 之前执行
以上的代码的启动图如下,其中 LibStartup 和 OptionStartup 没有要求一定要在 UI 线程,默认是调度到线程池里执行
在 BeforeTasks 和 AfterTasks 都是可以传入多个不同的启动项列表,多个之间使用分号分割。也可以换成使用 BeforeTaskList 和 AfterTaskList 使用数组的方式,例如有 WPFDemo.Api 程序集的 Foo1Startup 和在 WPFDemo.Lib1 的 Foo2Startup 和 Foo3Startup 启动任务项,其中 Foo3Startup 需要依赖 Foo1Startup 和 Foo2Startup 的执行完成,可以使用如下代码
[StartupTask(BeforeTasks = StartupNodes.CoreUI, AfterTaskList = new[] { nameof(WPFDemo.Lib1.Startup.Foo2Startup), "Foo1Startup" })]
public class Foo3Startup : StartupTask
{
    protected override Task RunAsync(StartupContext context)
    {
        context.Logger.LogInfo("Foo3 Startup");
        return base.RunAsync(context);
    }
}
以上就是应用接入 ApplicationStartupManager 启动流程框架的方法,以及业务方编写启动任务项的例子。以上的代码放在 https://github.com/dotnet-campus/dotnetCampus.ApplicationStartupManager 的例子项目