

Flutter Web 稳定版本发布至今也有一年多了,经过这一年多的发展,今天就让我们来看看作为大前端时代的乱流,Flutter Web 究竟有什么不同之处,本篇分享主要内容是目前 Flutter 下少有较为全面的 Web 内容。
本篇来自本人在《T 技术沙龙-大前端时代的挑战与机遇(深圳场)》的线下技术分享。
一、起源与实现
说起 Flutter 的起源就很有意思,大家都知道早期 Flutter 最先支持的平台是 Android 和 iOS ,至今最核心的维护平台依然是 Android 和 iOS ,但是事实上 Flutter 其实起源于前端团队。
Flutter 来源于前端 Chrome 团队,起初 Flutter 的创始人和整个团队几乎都是来自 Web,在 Flutter 负责人 Eric 的相关访谈中, Eric 表示 Flutter 来自 Chrome 内部的一个实验,他们把一些乱七八糟的 Web 规范去掉后,在一些内部基准测试的性能居然能提升 20 倍,因此 Google 内部就开始立项,所以 Flutter 出现了。
另外前端的同学应该知道, Dart 起初也是为了 Web 而生,事实上在 Dart 诞生至今也有 10 年了,所以可以说 Flutter 其实充满了 Web 的基因。
但是作为从 Web 里诞生的框架,和 React Native/ Weex 不同的是,前者是先有了 Web 下的 React 和 Vue 实现之后才有的客户端支持,而对于 Flutter 则是反过来,先有客户端实现之后才支持 Web 平台,这里其实可以和 Weex 做个简单对照。
Weex 作为曾经闪耀过的跨平台框架,它同样支持 Android 、iOS 和 Web 三个平台,在 Android 和 iOS 上 Weex 和 React Native 差异性不大,在 Web 上 Weex 则是删减版的 Vue 支持,而由于 API 和平台差异性的问题,Weex 在 Web 上的支持体验一直不是很好:
因为 Weex 需要依赖平台控件实现渲染,导致一个 Text 控件需要兼顾 Android 、iOS 和 Web 上原生平台接口的逻辑,从而出现各种由于耦合带来的兼容性问题。
而 Flutter 实现更为特别,通过 Skia 实现了独立的渲染引擎之后,在 Android 和 iOS 上控件几乎就与平台无关,所以 Flutter 上的控件可以做到独立且不同平台上渲染一致的效果。

但是回到 Web 上又有些特殊,首先 Web 平台完全是 html / js / css 的天下,并且 Web 平台需要同时兼顾 PC 和 Mobile 的不同环境,这就让 Flutter Web 成了 Flutter 所有平台里“最另类又奇葩”的落地。
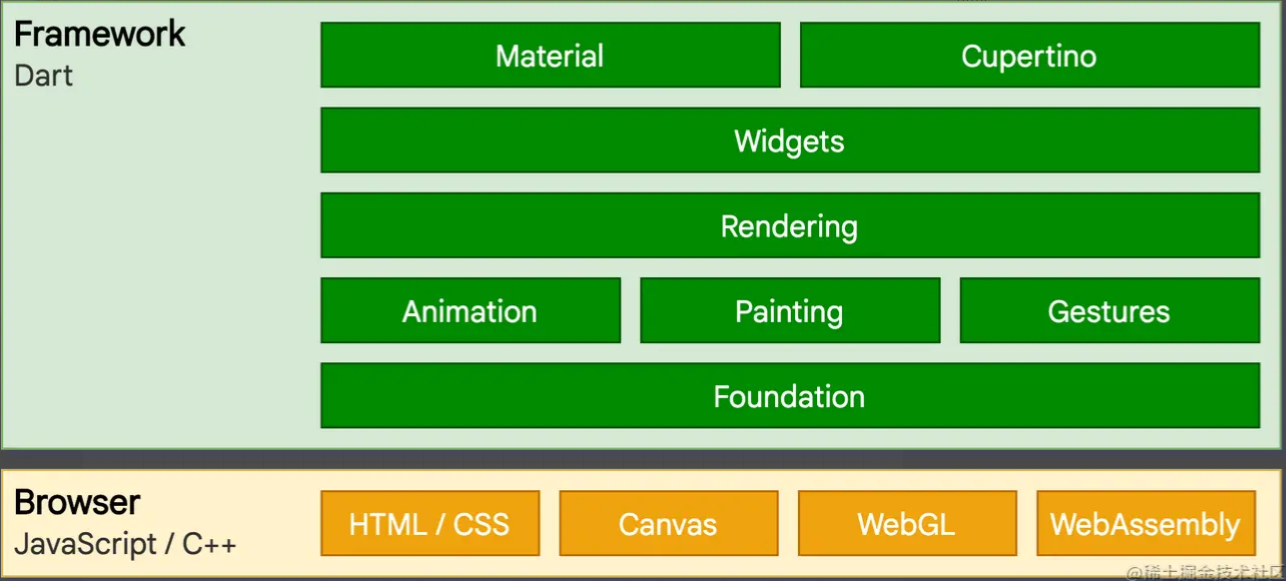
首先 Flutter Web 和其他 Flutter 平台一样共用一套 Framework ,理论上绝大多数的控件实现都是通用的,当然如果要说最不兼容的 API 对象,那肯定就是 Canvas 了,这其实和 Flutter Web 特殊的实现有关系,后面我们会聊到这个问题。
而由于 Web 的特殊场景,Flutter Web 在“几经周折”之后落地了两种不同的渲染逻辑:html 和 canvaskit ,它们的不同之余在于:
html
好处:html 的实现更轻量级,渲染实现基本依赖于 Web 平台的各种 HTMLElement ,特别是 Flutter Web 下定义的各种
<flt-*>实现,可以说它更贴近现在的 Web 环境,所以有时候我们也称呼它为DomCanvas,当然随着 Flutter Web 的发展这个称呼也发了一些变化,后续我们会详细讲到这个。问题:html 的问题也在于太过于贴近 Web 平台,这就和 Weex 一样,贴近平台也就是耦合于平台,事实上
DomCanvas实现理念其实和 Flutter 并不贴切,也导致了 Flutter Web 的一些渲染效果在 html 模式下存在兼容问题,特别是Canvas的 API 。
canvaskit
好处:canvaskit 的实现可以说是更贴近 Flutter 理念,因为它其实就是 Skia + WebAssembly 的实现逻辑,能和其他平台的实现更一致,性能更好,比如滚动列表的渲染流畅度更高等。
问题:很明显使用 WebAssembly 带来的 wasm 文件会导致体积增大不少,Web 场景下其实很讲究加载速度,而在这方面 wasm 能优化的空间很小,并且 WebAssembly 在兼容上也是相对较差,另外 skia 还需要自带字体库等问题都挺让人头痛。
默认情况下 Flutter Web 在打包渲染时会把 html 和 canvaskit 都打包进去,然后在 PC 端使用 canvaskit 模式,在 mobile 端使用 html 模式 ,当然你也可以在打包时通过 flutter build web --web-renderer html --release 之类的配置强行指定渲染模式。
既然这里我们讲到了 Flutter Web 的打包构建,那就让我们先从构建打包角度开始来深入介绍 Flutter Web 。
二、构建和优化
Flutter Web 虽说是和其他平台共用一个 framework ,但是它在 dart 层开始就有一套自己特殊的 engine 实现,并且这套实现是独立于 framework 的一套特殊代码。
所以在 Flutter Web 打包时,会把默认的 /flutter/bin/cache/lib/_engine 变成了 flutter/bin/cache/flutter_web_sdk/lib/_engine 的相关实现,这是因为 Flutter Web 在 framework 之下的 engine 需要一套特殊的 API。
下图右侧构建是指定 web 的打包路径,和左边默认时的对比。

同样下图所示,可以看到 web sdk 里会有如 html 、 canvaskit 这样不同的实现,甚至会有一个特殊的 text 目录,这是因为在 web 上对于文本的支持是个十分复杂的问题。
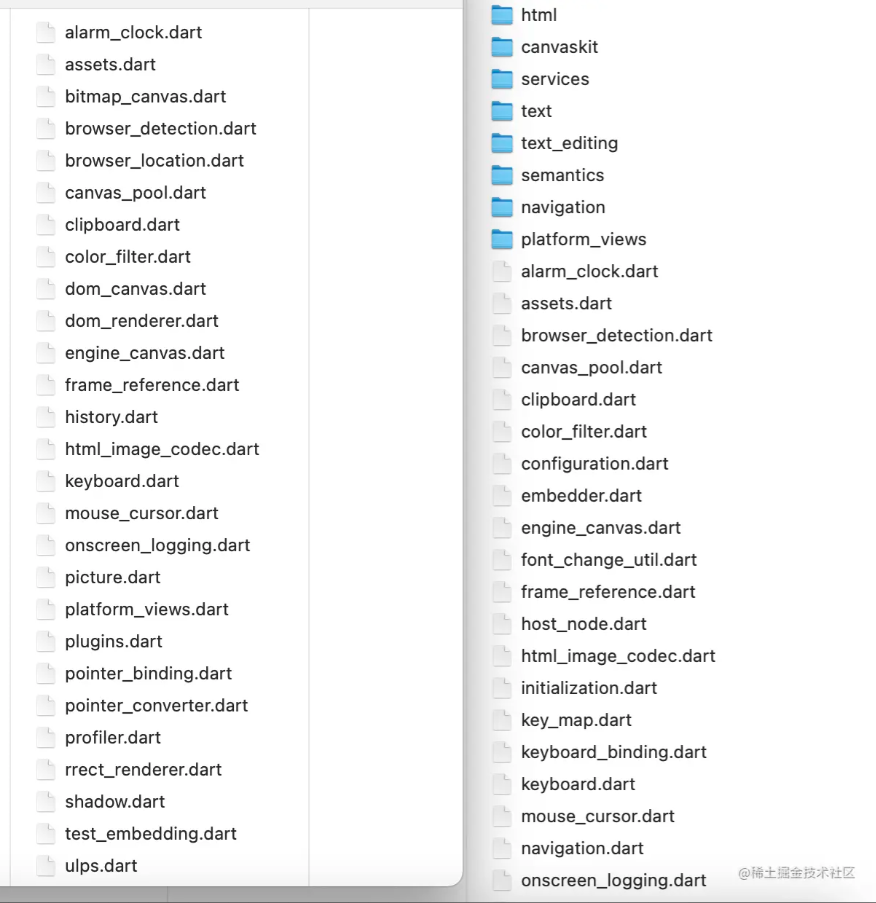
那到这里我们知道了在 _engine 层面,Flutter Web 有着自己一套独立的实现,那构建之后的产物是什么样的情况呢?
如下图所示是 GSY 的一个简单的开源示例项目,在部署到服务器后可以看到,默认情况下在不做任何处理时, 在 PC 端打开后会使用 canvaskit 渲染,主要会有:
- 2.3 MB 的
main.dart.js; - 2.8 MB 的
canvaskit.wasm; - 1.5 MB 的
MaterialIcons-Regular.otf; - 284 kB 的
CupertinoIcons.ttf;
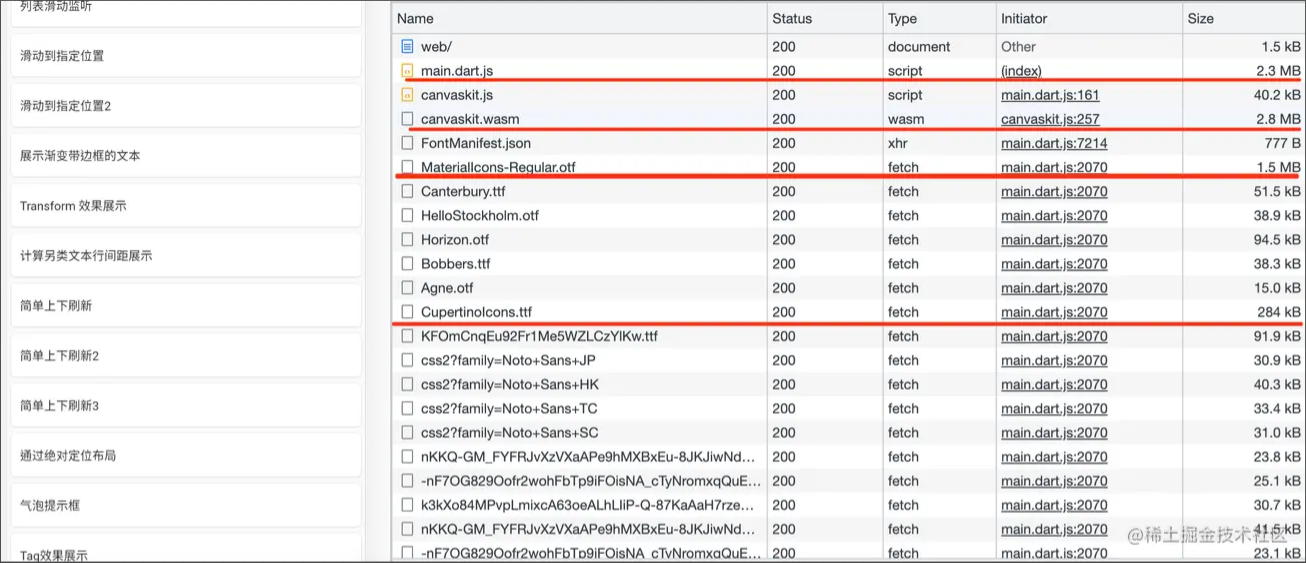
可以看到这些文件占据了 Flutter Web 编译后产物的大部分体积,并且从大小上看确实让人有些无法接受,因为示例项目的代码量并不大,结构也不复杂,这样的体积肯定十分影响加载速度。
所以我们首先考虑在 html 和 canvaskit 两种渲染模式中先选定一种,出于实用性考虑,结合前面的对比情况,选用 html 渲染模式在兼容性和可优化上会更友好,所以这里优化的第一步就是先指定 html 模式作为渲染引擎。
开始优化
首先可以看到 CupertinoIcons.ttf 这个矢量图标文件,虽然默认创建项目时会通过 cupertino_icons 被添加到项目里,但是由于我们不需要使用,所以可以在 yaml 文件里去除。
之后通过运行 flutter build web --release --web-renderer html 后,可以看到使用 html 模式加载后的产物很干净,而需要优化的体积现在主要在 main.dart.js 和 MaterialIcons-Regular.otf 上。

虽然在项目中我们会使用到 MaterialIcons 的一些矢量图标,但是每次加载都要全量加载一个 1.5 MB 的字体库文件显然并不符合逻辑,所以在 Flutter 里官方提供了 --tree-shake-icons 的命令帮助我们优化这部分的内容。
但是不幸的是,如下图所示,在当前的 2.10 版本下该配置运行会有 bug ,而不幸中的万幸是,在原生平台的编译中 shake-icons 行为是可以正常执行。

所以我们可以先运行 flutter build apk ,然后通过如下命令,将 Android 上已经 shake-icons 的 MaterialIcons-Regular.otf 资源复制到已经编译好的 web/ 目录下。
cp -r ./build/app/intermediates/flutter/release/flutter_assets/ ./build/web/assets
再次打包后可以看到,经过优化后 MaterialIcons-Regular.otf 资源如今只剩下 3.2 kB ,那接下来就是考虑针对 2.2 MB 的 main.dart.js 进行优化处理。

要优化 main.dart.js ,我们就要讲到 Flutter 里的 deferred-components , 在 Flutter 里可以通过把控件定义为 “deferred component” 来实现控件的懒加载,而这个行为在 Flutter Web 上被编译之后就会变成多个 *part.js 文本,原理上就是对 main.dart.js 进行拆包。
举个例子,首先我们定义一个普通的 Flutter 控件,按照正常的控件进行实现就可以。
import 'package:flutter/widgets.dart';
class DeferredBox extends StatelessWidget {
  DeferredBox() {}
  @override
  Widget build(BuildContext context) {
    return Container(
      height: 30,
      width: 30,
      color: Colors.blue,
    );
  }
}
在需要的地方 import 对应控件然后添加 deferred as box 关键字,之后在适当时机通过 box.loadLibrary() 加载控件,最后通过 box.DeferredBox() 渲染。
import 'box.dart' deferred as box;
class MainPage extends StatefulWidget {
  @override
  _MainPageState createState() => _MainPageState();
}
class _MainPageState extends State<MainPage> {
  @override
  void initState() {
    super.initState();
  }
  @override
  Widget build(BuildContext context) {
    return FutureBuilder<void>(
      future: box.loadLibrary(),
      builder: (BuildContext context, AsyncSnapshot<void> snapshot) {
        if (snapshot.connectionState == ConnectionState.done) {
          if (snapshot.hasError) {
            return Text('Error: ${snapshot.error}');
          }
          return box.DeferredBox();
        }
        return CircularProgressIndicator();
      },
    );
  }
}
当然,这里还需要额外在 yaml 文件里添加 deferred-components 来制定对应的 libraries 路径。
deferred-components:
  - name: crane
    libraries:
      - package:gsy_flutter_demo/widget/box.dart
回归到上面的 GSY 示例项目中,通过相对极端的分包实现,这里把 GSY 示例里的每个页面都变成一个独立的 懒加载页面,然后在页面跳转时再加载显示,最终打包部署后如下图所示:
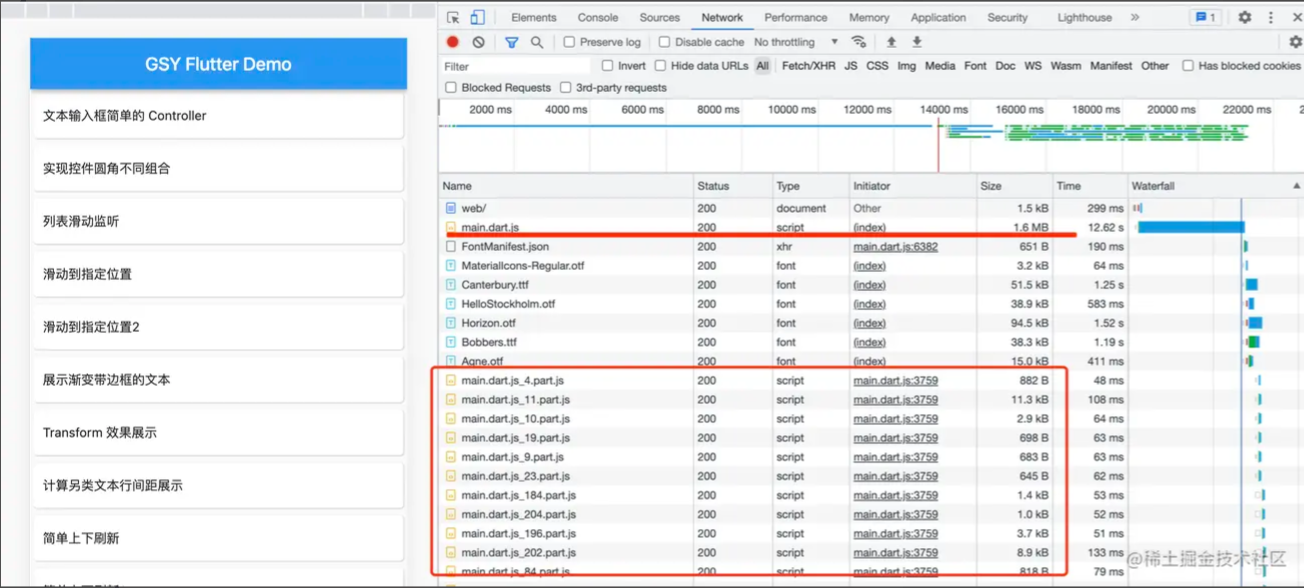
可以看到拆分之后 main.dart.js 从 2.2 MB 变成了 1.6 MB ,而其他内容通过 deferred components 变成了各个 part.js 的独立文件,并且只在点击时才动态下载对应的 part.js 文件,但是此时的 main.dart.js 依旧并不小,而官方提供的能力上已经没有太多优化的余地。
关于
deferred-components会遇到的问题,可以参考 《一个编译问题带你了解 Flutter Web 的打包构建和分包实现》
在这里可以通过前端的 source-map-explorer 工具去分析这个文件,首先在编译时要添加 --source-maps 命令,这样在打包时会生成 main.dart.js 的 source map 文件,然后就执行 source-map-explorer main.dart.js --no-border-checks 生成对应的分析图:
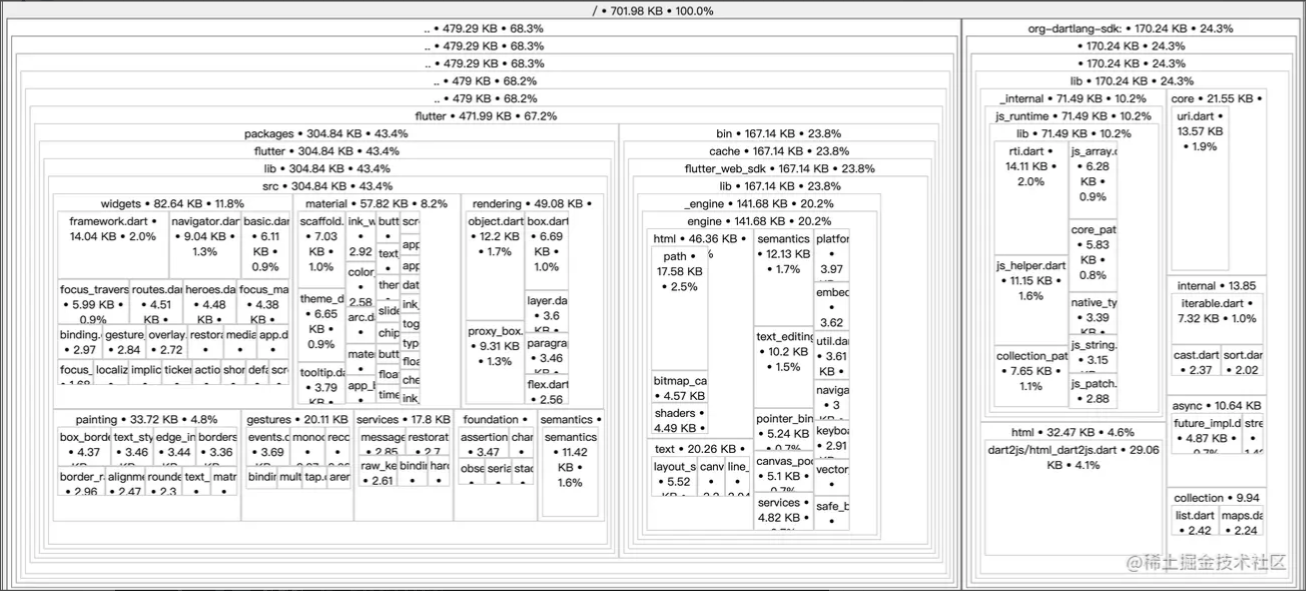
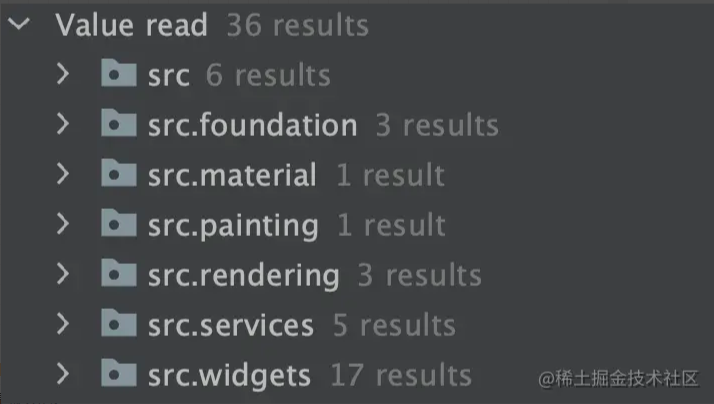
这里只展示能够被 mapped 的部分,可以看到 700k 几乎就是 Flutter Web 整个 framewok + engine + vm 的大小,而这部分内容其实可以优化的空间并不大,尽管会有一些如 kIsWeb 的冗余代码,但是其实可以调整的内容并不多,大概有 36 处可以调整和删减的地方,实质上打包时 Flutter Web 也都有相应的优化压缩处理,所以这部分收益并不高。
另外,如下图所示是两种不同 web rendder 构建后代码上的差异,可以看到 html 和 canvaskit 单独构建后的 engine 代码结构差异性还是很大的。
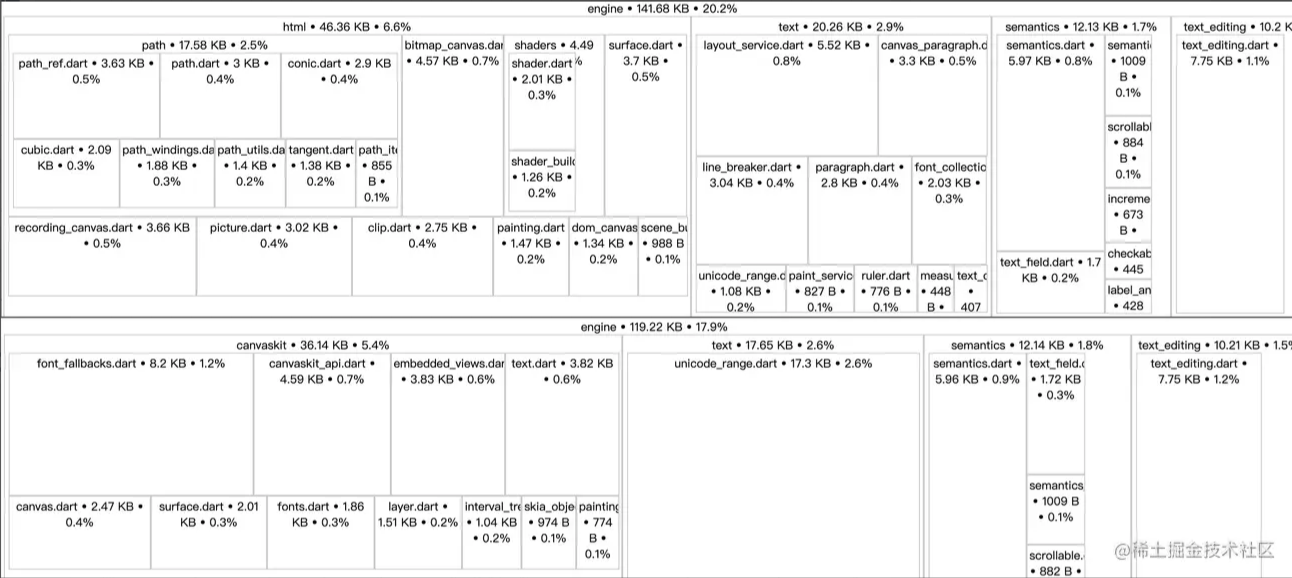
而如果你在编译时时默认的 auto 模式,就会看到 html 和 canvaskit 的代码都会打包进去,所以相对的 main.dart.js 也会增加一些。

那还有什么可以优化的地方吗?还是有的,通过外部手段,例如通过在部署时开启 gzip 或者 brotli 压缩,如下图所示 ,开始 gzip 后大概可以让 main.dart.js 下降到 400k 左右 。

另外也有在 index.html 里增加 loading 效果来做等待加载过程的展示,例如:
<!DOCTYPE html>
<html>
  <head>
    <meta charset="UTF-8" />
    <title>gsy_flutter_demo</title>
    <style>
      .loading {
        display: flex;
        justify-content: center;
        align-items: center;
        margin: 0;
        position: absolute;
        top: 50%;
        left: 50%;
        -ms-transform: translate(-50%, -50%);
        transform: translate(-50%, -50%);
      }

      .loader {
        border: 16px solid #f3f3f3;
        border-radius: 50%;
        border: 15px solid;
        border-top: 16px solid blue;
        border-right: 16px solid white;
        border-bottom: 16px solid blue;
        border-left: 16px solid white;
        width: 120px;
        height: 120px;
        -webkit-animation: spin 2s linear infinite;
        animation: spin 2s linear infinite;
      }

      @-webkit-keyframes spin {
        0% {
          -webkit-transform: rotate(0deg);
        }
        100% {
          -webkit-transform: rotate(360deg);
        }
      }

      @keyframes spin {
        0% {
          transform: rotate(0deg);
        }
        100% {
          transform: rotate(360deg);
        }
      }
    </style>
  </head>
  <body>
    <div class="loading">
      <div class="loader"></div>
    </div>
    <script src="main.dart.js" type="application/javascript"></script>
  </body>
</html>
所以大致上以上这些就是今天关于 Flutter Web 上产物体积的优化,总结起来就是:
- 去除无用的 icon 引用;
- 使用
tree-shake-icons优化引用矢量图库; - 通过
deferred-components实现懒加载分包; - 开启
gzip等压缩算法压缩main.dart.js;
三、渲染
讲完构建,最后我们聊聊渲染,Flutter Web 的渲染在 Flutter 里是十分特殊,前面我们说过它自带了两种渲染模式,而我们知道 Flutter 的设计理念里,所有的控件都是通过 Engine 绘制出来,如果这时候你去 framework 里看 Canvas 的实现,就会发现它其实继承的是 NativeFieldWrapperClass1 :
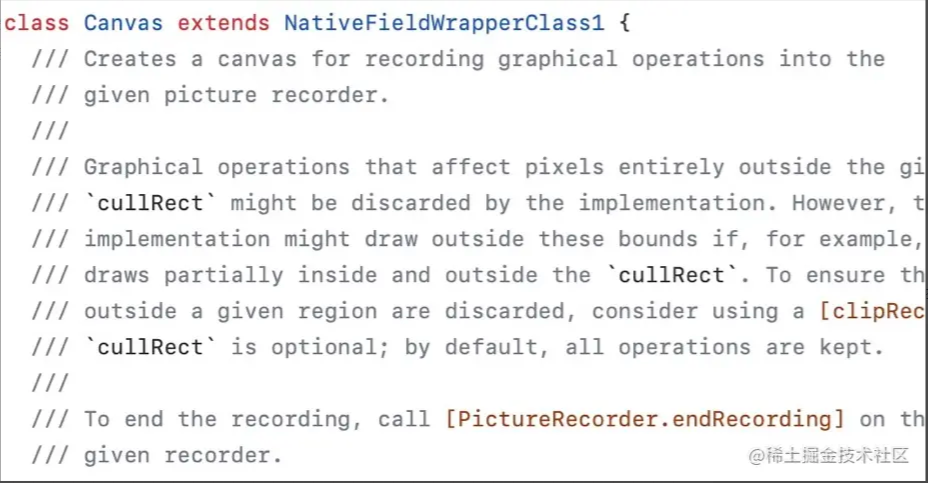
NativeFieldWrapperClass1 也就是它的逻辑是由不同平台的 Engine 区分实现,其中编译后的 Flutter Web 上的 Canvas 代码应该是继承如下所示的结构:

可以看到在 Flutter Web 的 Canvas 里会根据逻辑判断是使用 CanvasKitCanvas 还是 SurfaceCanvas ,而相对于直接使用 skia 的 CanvasKitCanvas ,更贴近 Web 平台的 SurfaceCanvas 在实现的耦合复杂度上会更高。
首先如下图所示是 Flutter Web 里 Canvas 的大致结构,而接下来我们要聊的主要也是集中在 SurfaceCanvas 上,为什么 SurfaceCanvas 层级会这么复杂,它们又是怎么分配绘制,接下来就让深入揭秘它们的规则。

先看例子,如下图所示,可以看到在 html 渲染模式下, Flutter Web 是有一大堆自定义的 <flt-*> 标签实现渲染,并且在一个长列表中,标签会被控制在一个合适的数量,在滚动时动进行动态切换渲染。

如果这时候我们放慢去看细节,如下动图所示,可以看到当 item 处于不可见时 <flt-picture> 里其实并没有内容,而当 Item 可见之后,<flt-picture> 下会有 <canvas> 标签把文字绘制出来。

**看到一个重点没有?在这里的文本为什么是由 <canvas> 标签绘制而不是 <p> 标签之类的呢?**这就是我们重点要讲的 SurfaceCanvas 渲染逻辑。
在 Flutter Web 的 SurfaceCanvas 里,文本绘制一般都会是以这样的情况出现,基本都是从 picture 开始进入绘制流程:
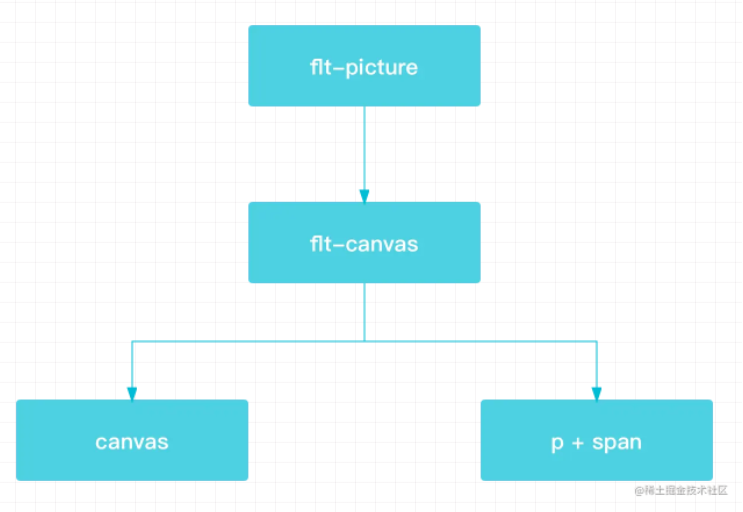
那么在对应的 picture.dart 的代码实现里可以看到,如下关键代码所示,当 hasArbitraryPaint 为 true 时就会进入到 BitmapCanvas 的逻辑,不然就会使用 DomCanvas 。
void applyPaint(EngineCanvas? oldCanvas) {
  if (picture.recordingCanvas!.renderStrategy.hasArbitraryPaint) {
    _applyBitmapPaint(oldCanvas);
  } else {
    _applyDomPaint(oldCanvas);
  }
}
那么这里有两个问题:BitmapCanvas 和 DomCanvas 的区别是什么?hasArbitraryPaint 的判断逻辑是什么?
1、首先 BitmapCanvas 和 DomCanvas 的最大的区别就是:
DomCanvas会通过创建标签来实现绘制,比如文本利用p+span标签进行渲染;BitmapCanvas会考虑优先使用canvas渲染,如果场景需要再使用标签来实现绘制;
2、在 web sdk 里 hasArbitraryPaint 参数默认是 false ,但是在需要执行以下这些行为时就会被设置为 true ,而这些调用上可以看出,其实大部分时候的绘制逻辑是会先进入到 BitmapCanvas 里。
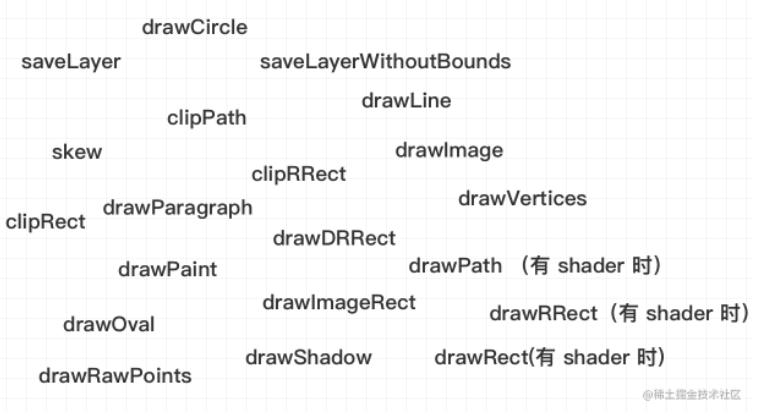
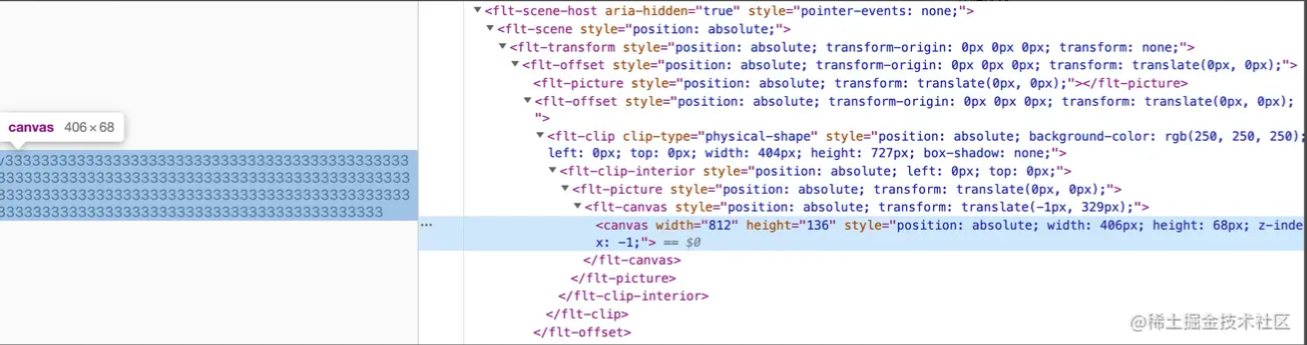
回到前面的文本问题上,在 Flutter 的文本绘制一般都是通过 drawParagraph 实现,所以理论上只要有文本存在,就会进入到 BitmapCanvas 的绘制流程,那么目前看来这个结论符合上面 Item 里文本是使用 canvas 绘制的预期。
那 Flutter 里对于文本,在 BitmapCanvas 又是何时使用canvas 何时使用 p+span 标签呢?
我们先看如下代码,运行后效果如下图所示,可以看到此时的文本是直接使用 canvas 渲染的,这个结果符合我们目前的预期。
Scaffold(
  body: Container(
    alignment: Alignment.center,
    child: Center(
      child: Container(
        child: Text(    "v333333333333333333333333333333333333333333333333333333333333333333333333333333333333333333333333333333333333333333333333333333333333333333333333333333333333333333333333333333333333",
        ),
      ),
    ),
  ),
)
接下来给这段代码加上一个红色背景,运行后可以看到,此时的文本变成了 p+span 标签,并且红色的背景是通过 draw-rect 标签实现,层级里并没有 canvas ,这又是为什么呢?
Scaffold(
  body: Container(
    alignment: Alignment.center,
    child: Center(
      child: Container(
        decoration: BoxDecoration(
          color: Colors.red,
        ),
        child: Text( "v333333333333333333333333333333333333333333333333333333333333333333333333333333333333333333333333333333333333333333333333333333333333333333333333333333333333333333333333333333333333",
        ),
      ),
    ),
  ),
)

这里就需要先讲到 BitmapCanvas 的 drawRect 实现,如下关键代码所示,在 drawRect 时,如果在满足 _useDomForRenderingFillAndStroke 这个函数条件的情况下,就会 x 通过 buildDrawRectElement的方式实现渲染,也就是使用 draw-rect 标签而不是 canvas ,所以我们需要先分析这个函数的判断逻辑。
@override
void drawRect(ui.Rect rect, SurfacePaintData paint) {
  if (_useDomForRenderingFillAndStroke(paint)) {
    final html.HtmlElement element = buildDrawRectElement(
        rect, paint, 'draw-rect', _canvasPool.currentTransform);
    _drawElement(
        element,
        ui.Offset(
            math.min(rect.left, rect.right), math.min(rect.top, rect.bottom)),
        paint);
  } else {
    setUpPaint(paint, rect);
    _canvasPool.drawRect(rect, paint.style);
    tearDownPaint();
  }
}
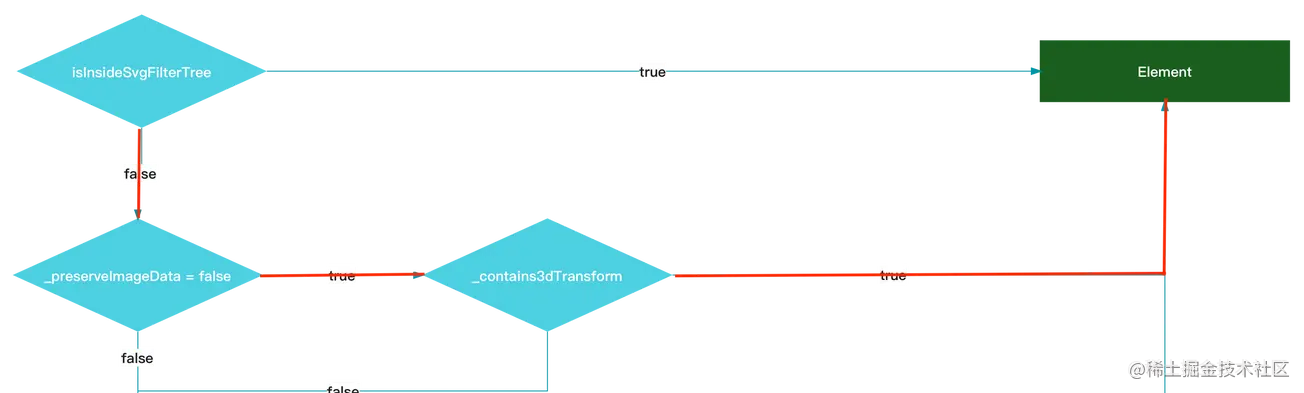
如下代码所示,可以看到这个函数有很多的判断条件,而得到 true 的条件就是满足其中三大条件之一即可,下述表格里大致描述了每个条件的所代表的意义。
  bool _useDomForRenderingFillAndStroke(SurfacePaintData paint) =>
      _renderStrategy.isInsideSvgFilterTree ||
      (_preserveImageData == false && _contains3dTransform) ||
      ((_childOverdraw ||
              _renderStrategy.hasImageElements ||
              _renderStrategy.hasParagraphs) &&
          _canvasPool.isEmpty &&
          paint.maskFilter == null &&
          paint.shader == null);
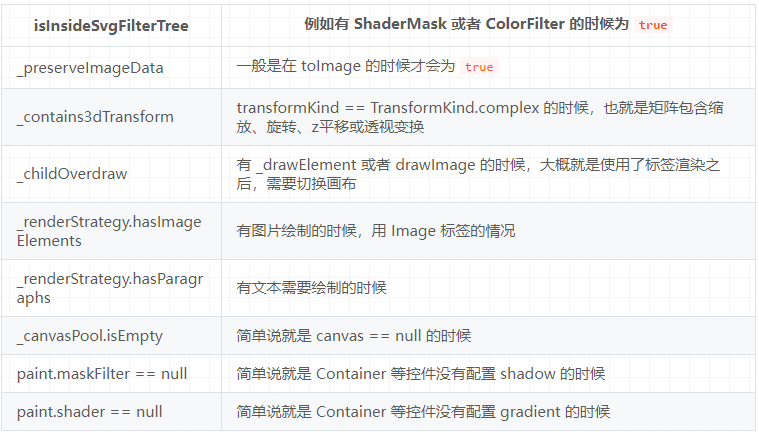
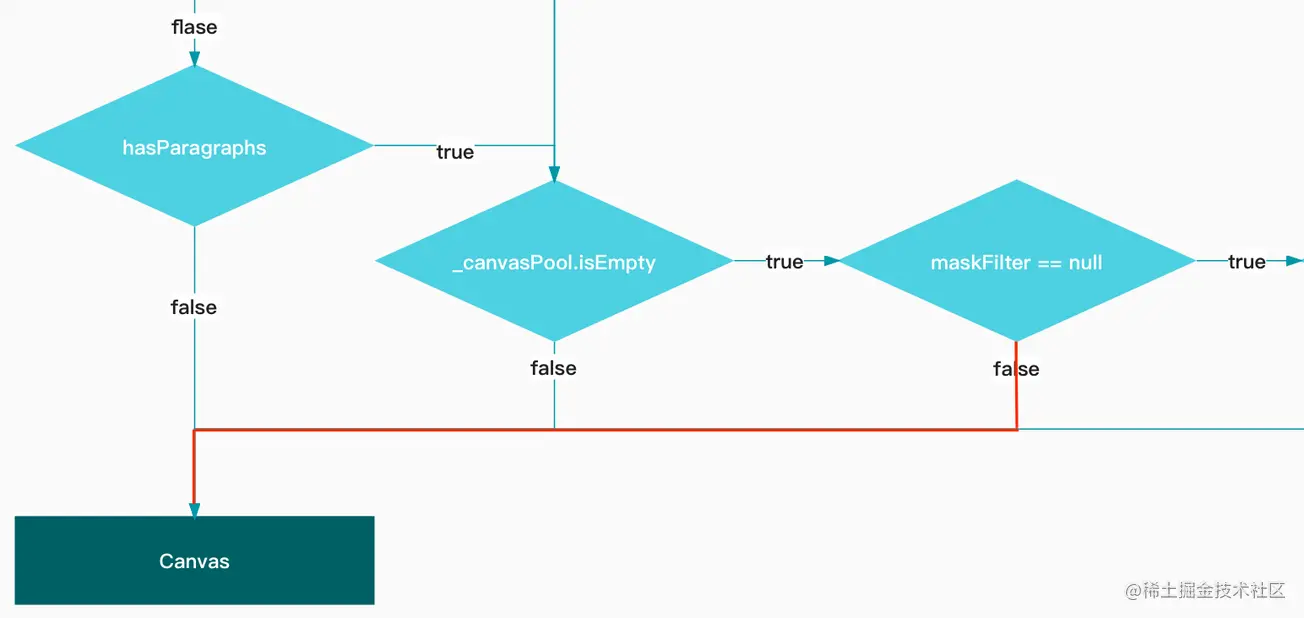
大概流程也如图所示,前面绘制红色背景时并没有添加什么特殊配置,所以会进入到 _drawElement 的逻辑,可以看到针对不同的渲染场景,BitmapCanvas 会采取不一样的绘制逻辑,那为什么前面多了红色背景就会导致文本也变成标签呢?
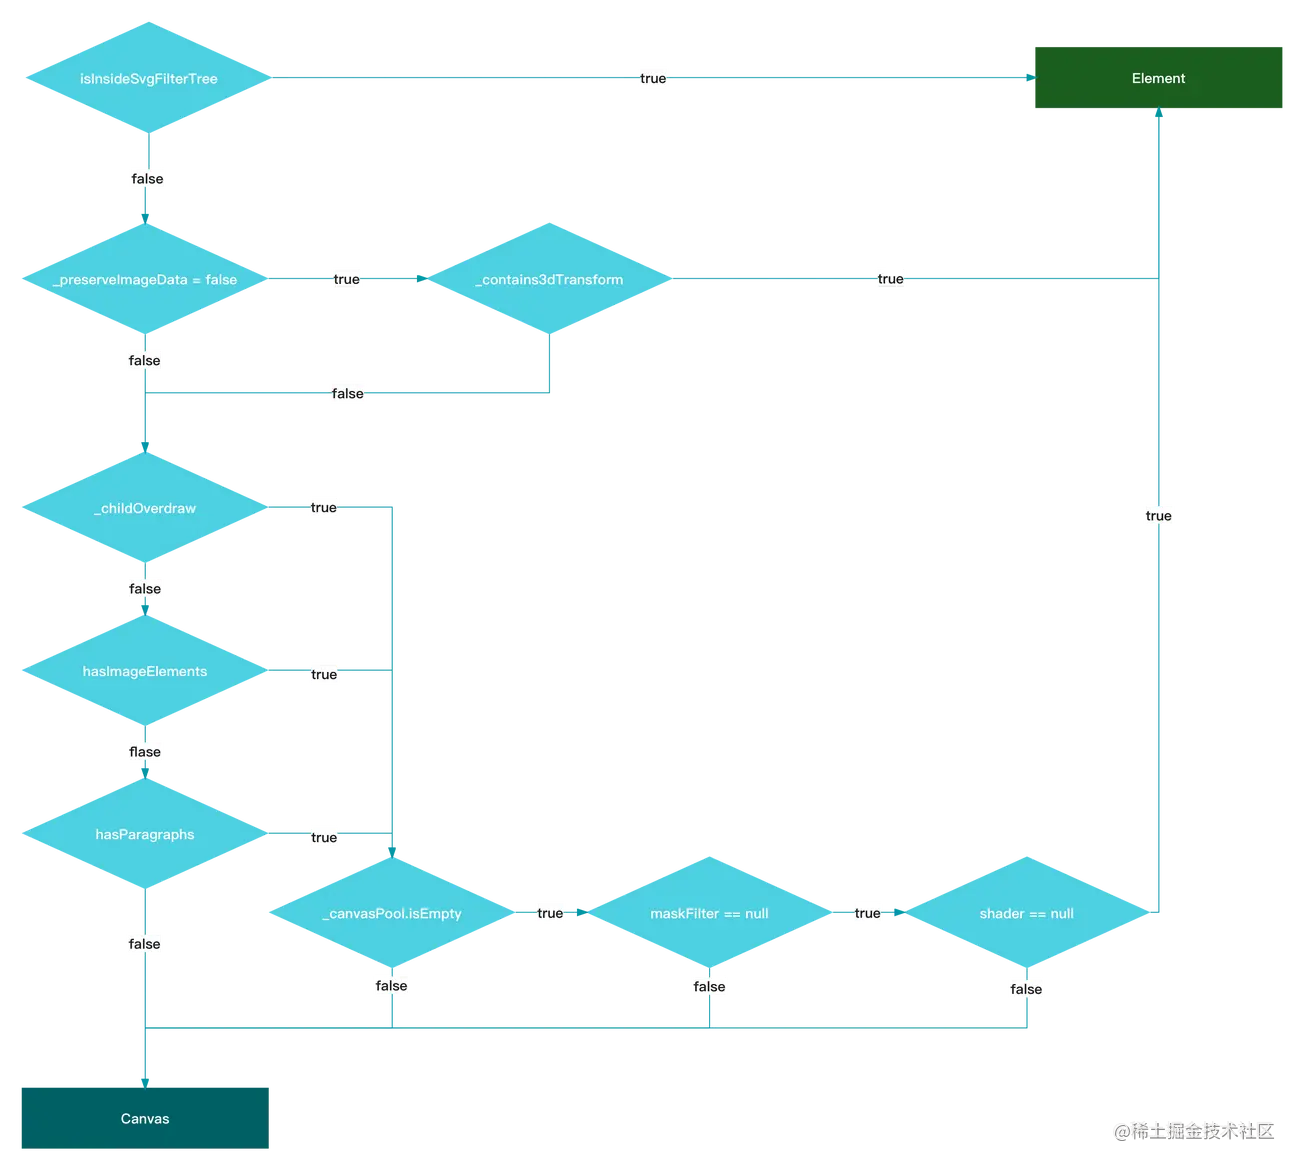
这是因为在 BitmapCanvas 如果有使用标签构建,也就是 _drawElement 的时候,就会执行一个 _closeCurrentCanvas 函数,该函数会把 _childOverdraw 设置为 true ,并且清空 _canvasPool 里的 canvas 。
所以我们看 drawParagraph 的实现,如下所示代码,可以看到由于 _childOverdraw 是 true 时, 文本会采用 Element 来绘制文本。
@override
void drawParagraph(EngineParagraph paragraph, ui.Offset offset) {
  ····
  if (paragraph.drawOnCanvas && _childOverdraw == false &&
      !_renderStrategy.isInsideSvgFilterTree) {
    paragraph.paint(this, offset);
    return;
  }
  ····
  final html.Element paragraphElement =
      drawParagraphElement(paragraph, offset);

  ····
}
而在 BitmapCanvas 里,有三个操作会触发 _childOverdraw = true 和 _canvasPool Empty :
- _drawElement
- drawImage/drawImageRect
- drawParagraph
所以先总结一下,结合前面的流程图,我们可以简单认为:在没有 maskFilter(shadow) 和 shader(gradient )的情况下,只要触发了上述三种情况,就会使用标签绘制。
是不是感觉有点乱?
不怕,先接着继续看新的例子,在原本红色背景实现的基础上,这里给 Container 增加了 shadow 用于配置阴影,运行之后可以看到,不管是背景色或者文本又都变成了 canvas 渲染的情况。
Scaffold(
      body: Container(
        alignment: Alignment.center,
        child: Center(
          child: Container(
            decoration: BoxDecoration(
              color: Colors.red,
              boxShadow: [
                BoxShadow(
                    color: Colors.black54,
                    blurRadius: 4.0,
                    offset: Offset(2, 2))
              ],
            ),
            child: Text(
              "v333333333333333333333333333333333333333333333333333333333333333333333333333333333333333333333333333333333333333333333333333333333333333333333333333333333333333333333333333333333333",
            ),
          ),
        ),
      ),
    )

结合前面的流程看这是符合预期,因为此时带有 boxShadow 参数,该参数会在绘制时通过 toPaint 方法转化为 maskFilter ,所以在 maskFilter != null 的情况下,流程不会进入到 Element 的判断,所以使用 canvas 。
继续前面的例子,如果这时候我们再加一个 ColorFiltered 控件,前面表格说过,有 ShaderMask 或者 ColorFilter 的时候,sInsideSvgFilterTree 参数就会是 true ,这时候渲染就会直接进入使用 Element 绘制而无视其他条件如 BoxShadow ,从运行结果上看也是如此。
Scaffold(
      body: Container(
        alignment: Alignment.center,
        child: Center(
          child: ColorFiltered(
            colorFilter: ColorFilter.mode(Colors.yellow, BlendMode.hue),
            child:Container(
              decoration: BoxDecoration(
                color: Colors.red,
                boxShadow: [
                  BoxShadow(
                      color: Colors.black54,
                      blurRadius: 4.0,
                      offset: Offset(2, 2))
                ],
              ),
              child: Text(
                "v333333333333333333333333333333333333333333333333333333333333333333333333333333333333333333333333333333333333333333333333333333333333333333333333333333333333333333333333333333333333",
              ),
            ),
          ),
        ),
      ),
    )
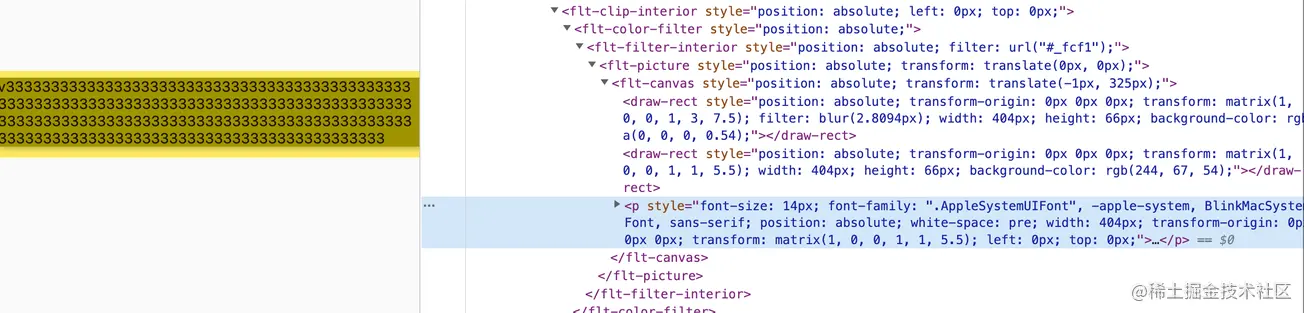
可以看到此时变成了两个 draw-rect 和 p 标签的绘制,为什么会有这样的逻辑,因为一些浏览器,例如 iOS 设备上的 Safari, 它不会把 svg filter 等信息传递给 canvas ,如果继续使用 canvas 就会如 shader mask 等无法正常渲染,详细可见 :#27600 。
继续这个例子,如果此时不加 ColorFiltered ,而是给 Container 添加一个 transform ,运行后可以看到还是 draw-rect 和 p 标签的实现,因为此时的 transform 是属于 TransformKind.complex 的状态,会导致 _contains3dTransform = true , 从而进入 Element 的逻辑。
Scaffold(
  body: Container(
    alignment: Alignment.center,
    child: Center(
      child: Container(
          transform: Matrix4.identity()..setEntry(3, 2, 0.001) ..rotateX(100)..rotateY(100),
          decoration: BoxDecoration(
            color: Colors.red,
            boxShadow: [
              BoxShadow(
                  color: Colors.black54,
                  blurRadius: 4.0,
                  offset: Offset(2, 2))
            ],
          ),
          child: Text(
            "v333333333333333333333333333333333333333333333333333333333333333333333333333333333333333333333333333333333333333333333333333333333333333333333333333333333333333333333333333333333333",
          ),
        ),
    ),
  ),
)

最后再来一个例子,这里回归到只有红色背景和阴影的情况,在之前它运行后是使用 canvas 标签来渲染文本,因为它的 maskFilter != null,但是这时候我们给 Text 配置上 TextDecoratoin ,运行之后可以看到背景颜色依然是 canvas ,但是文本又变成了 p 标签的实现。
 Scaffold(
      body: Container(
        alignment: Alignment.center,
        child: Center(
          child: Container(
            decoration: BoxDecoration(
              color: Colors.red,
              boxShadow: [
                BoxShadow(
                  color: Colors.black54,
                  blurRadius: 4.0,
                  offset: Offset(2, 2))
              ],
            ),
            child: Text(
              "v333333333333333333333333333333333333333333333333333333333333333333333333333333333333333333333333333333333333333333333333333333333333333333333333333333333333333333333333333333333333",
              style: TextStyle(decoration: TextDecoration.lineThrough),
            ),
          ),
        ),
      ),
    );

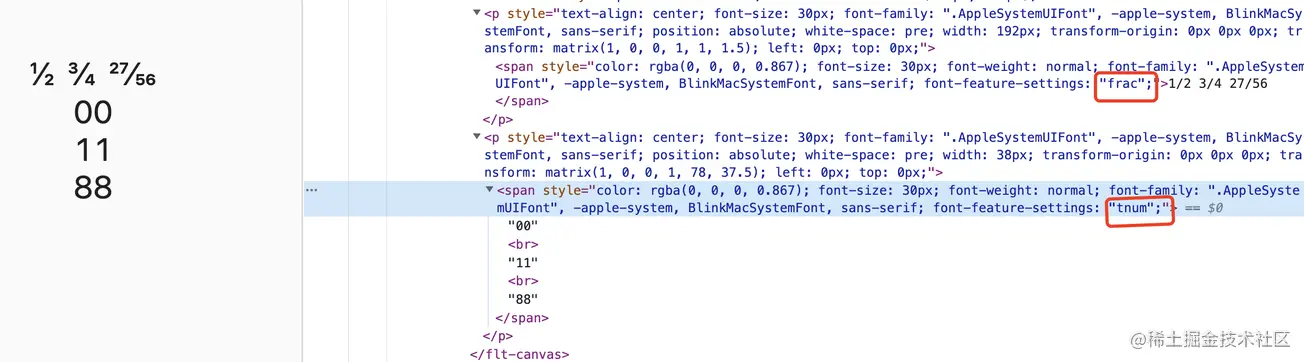
这是因为前面说过 drawParagraph , 在这个函数里有另外一个判断条件 _drawOnCanvas , 在 Flutter Web 绘制文本时,当文本具备不为 none 的 TextDecoration 或者 fontFeatures 时,_drawOnCanvas 就会被设置为 fasle ,从而变成使用 p 标签渲染的情况。
这也很好理解,例如 fontFeatures 是影响字形选择的参数,如下图所示,这些行为在 Web 上用 Canvas 绘制相对会麻烦很多,关于 fontFeatures 可以参考 《Flutter 上字体的另类玩法:FontFeature》
那前面讲了那么多例子都是 BitmapCanvas , 那 Domcanvas 什么时候会用到呢?
还记得前面列举的方法吗,需要进入 _applyDomPaint 就需要 hasArbitraryPaint == false ,换言之就是没有文本,然后 drawRect 的时候没有 shader( radient) 等就可以了。
依然是前面的例子,绘制一个带有阴影的红色方框,但是此时把文本内容去掉,运行后可以看到不是 canvas 而是 draw-rect 标签,因为虽然此时 maskFilter != null (有 shadow),但是因为没有文本或者 shader( gradient) ,所以单纯普通的 drawRect 并不会触发 hasArbitraryPaint == true, 所以会直接使用 Domcanvas 绘制,完全脱离了 canvas 的渲染。
Scaffold(
  body: Container(
    alignment: Alignment.center,
    child: Center(
      child: Container(
          height: 50,
          decoration: BoxDecoration(
            color: Colors.red,
            boxShadow: [
              BoxShadow(
                  color: Colors.black54,
                  blurRadius: 4.0,
                  offset: Offset(2, 2))
            ],
          ),
        ),
    ),
  ),
)

所以最后总结一下:首先除了下图所示之外的情况,大部分时候 Flutter Web 绘制都会进入到 BitmapCanvas。

结合前面介绍的例子,进入到 BitmapCanvas 之后的流程可以总结:
- 存在 ShaderMask 或者 ColorFilter 就会使用 Element ;
- 一般情况忽略
_preserveImageData,有复杂矩阵变换时也是直接使用 Element ,因为复杂矩阵变换 canvas 支持并不好; - _childOverdraw 经常和 _canvasPool.isEmpty 一起达成条件,一般有 picture 上有 _drawElement 之后就会调用
_closeCurrentCanvas设置_childOverdraw = true并且清空 _canvasPool; - 结合上述第三个条件的状态,如果没有 maskFilter 或者 shader ,就会使用 Element 渲染 UI ;
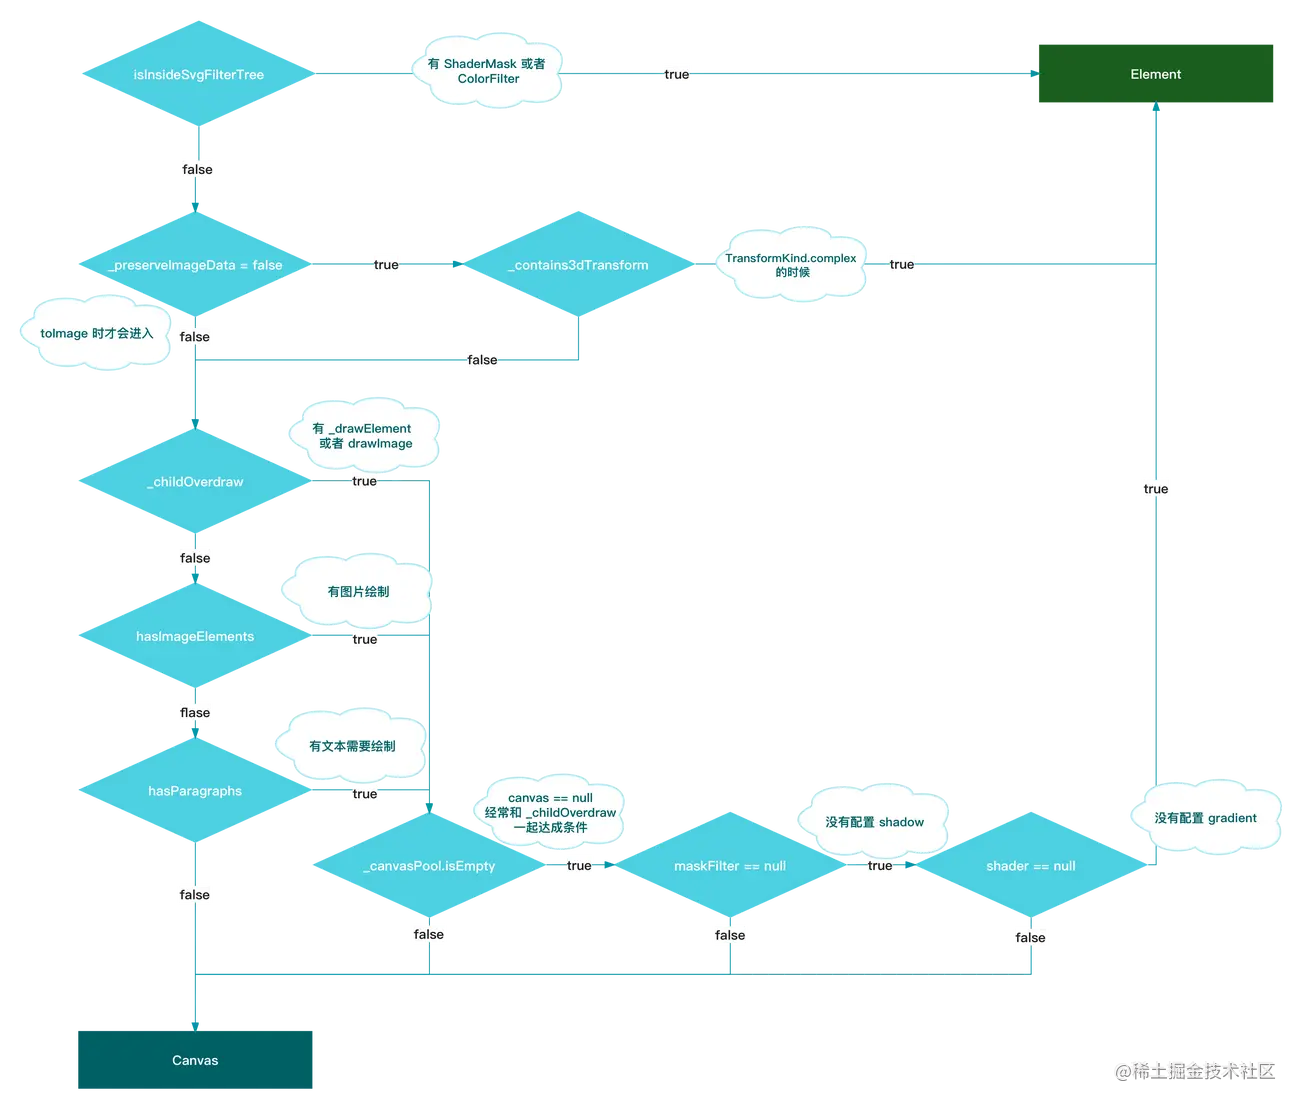
最后针对文本,在 drawParagraph 时还有特殊处理,关于 _childOverdraw 和 !isInsideSvgFilterTree 相关前面解释过了,新增条件是在有 TextDecoration 或者 FontFeatures 时,也会触发文本绘制变为 Element ,也就是 p + span 标签的形式。

四、最后
虽然本次介绍的东西不少 ,但是 Flutter Web 在 html 渲染模式下的知识点远不止这些,而由小窥大,以 drawRect 和文本为切入点去了解 SurfaceCanvas 就是很不错的开始。
另外可以看到,在 Flutter Web 里有很多的自定义的 <flt-*> 标签,这些标签都是通过如 html.Element.tag('flt-canvas'); 等方式创建,它们和 Flutter 里的对应关系如下图片所示,如果感兴趣可以在 chrome 的 source 里对应的 dart_sdk.js 查看具体实现。

作者:恋猫 de 小郭
链接:https://juejin.cn/post/7095294020900880420/
来源:稀土掘金
著作权归作者所有。商业转载请联系作者获得授权,非商业转载请注明出处。