How to create a professional software installation package?

How to create a professional software installation package?

After completing C/S client development, the program needs to be delivered to users. Directly compressing and sending it to users is possible (just a bit unprofessional). If there is a nice-looking installation interface, the quality level is different.

Last updated 2/1/2021 5:16 PM
沙漠尽头的狼
6 min read
Category
Sharing
Tags
.NET C# WPF Winform Installation Package

C/S client development is complete, and the program needs to be delivered to users. Sending the compressed file directly to users is acceptable (though a bit unprofessional). Having a nice-looking installation interface makes a big difference.

This article introduces how to use Advanced Installer 17.9 to create a professional Windows client installer. Steps for other software or other versions of this tool are similar. Below is the installation demo after the installer is created:

Software Installation Demo

Software Installation Demo

This article provides the source code of the packaged program for download and a finished installer for testing. Feel free to browse and download:

The following describes the steps for creating the installer:

1. Download Advanced Installer 17.9

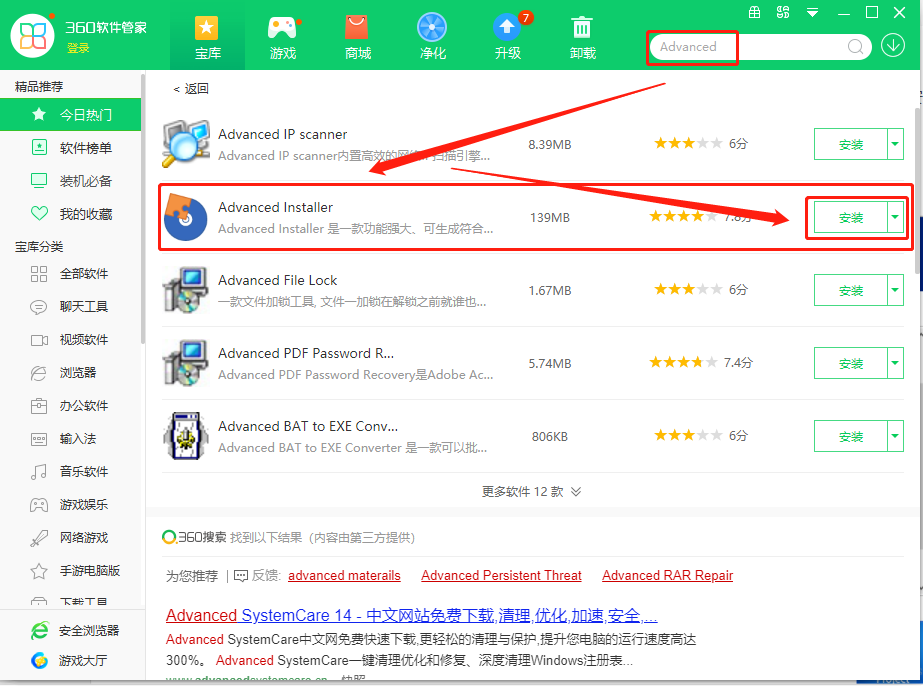
First, download the installer-making software. You can download the installer from the 360 Software Manager or other channels:

Download installer-making software

Download installer-making software

After downloading, install it using the default steps.

2. Create an installer project

Creating a software installer is similar to software development. First, create an installer project, which saves the installer configuration for later modification and repackaging:

Create software installer configuration project

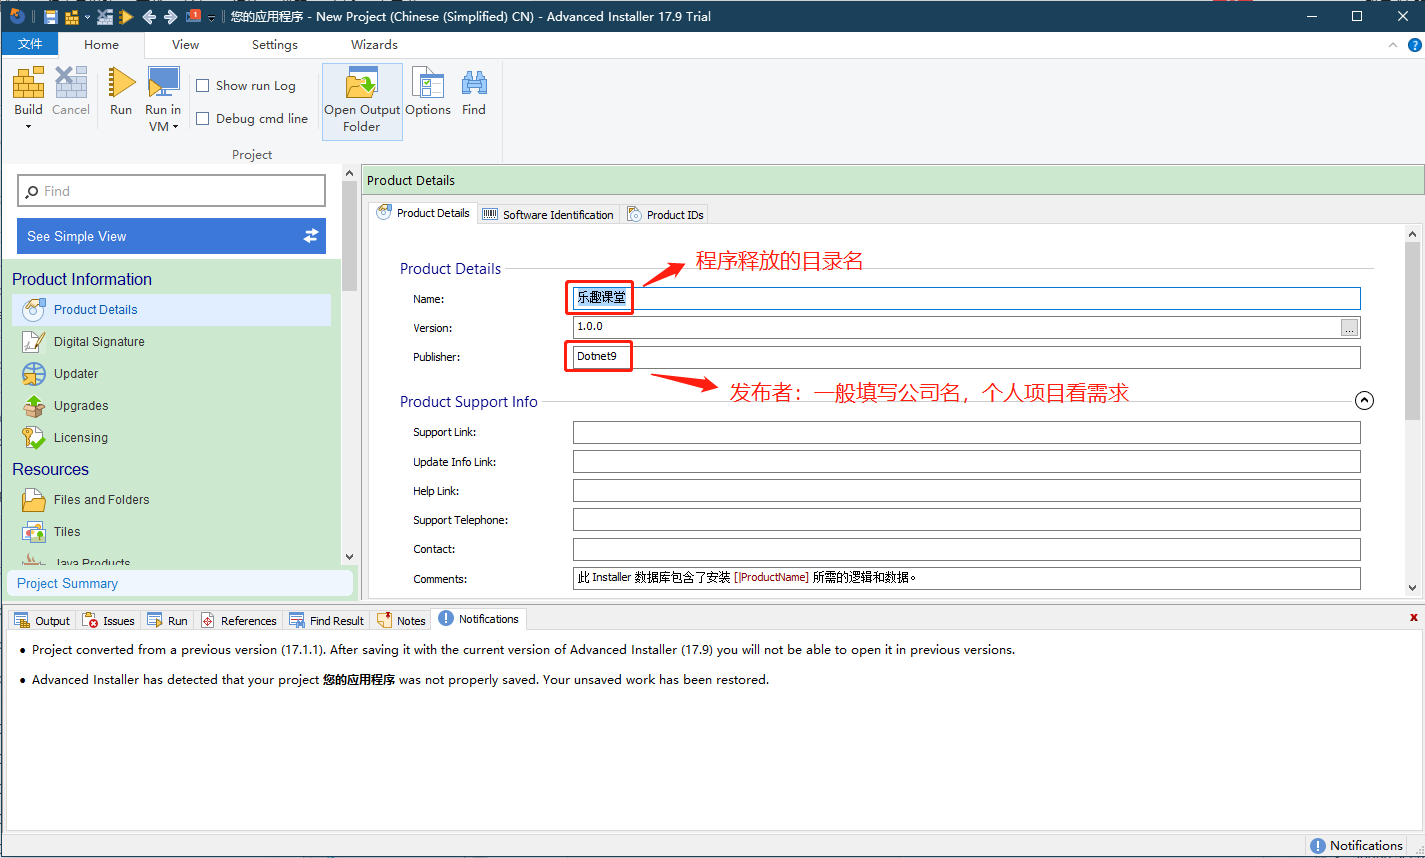
3. Installer product information

  • Enter the directory name for the program release: LeQu Classroom
  • Enter the company name, which together with the program release directory forms the installation path: Dotnet9

For example, the default installation path would be: C:\Program Files (x86)\Dotnet9\LeQu Classroom, but the path can be modified during installation.

Installer product information

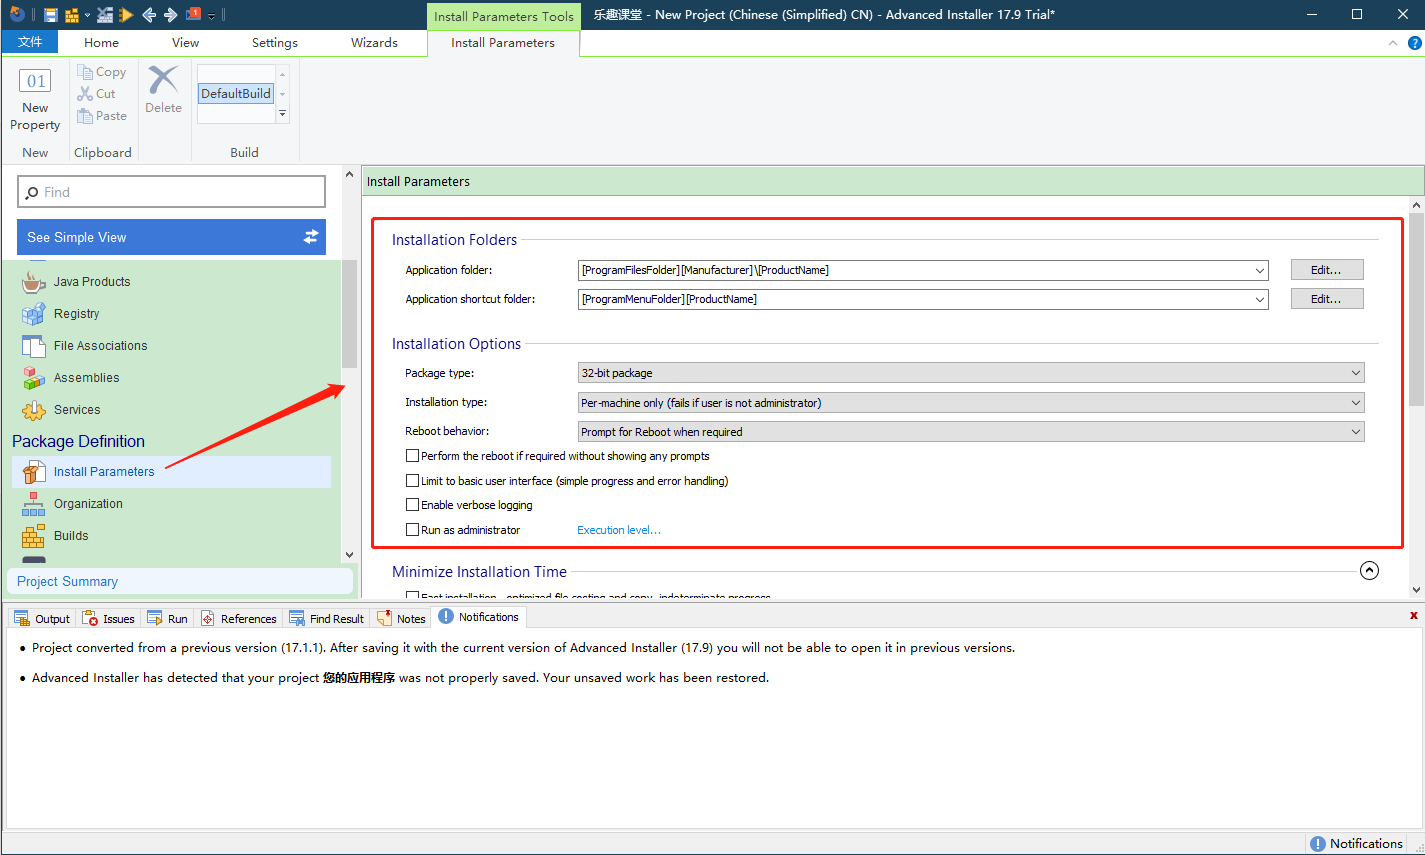
4. Enter installation parameters

The application folder can be left unchanged; the default is fine:

Installation parameters

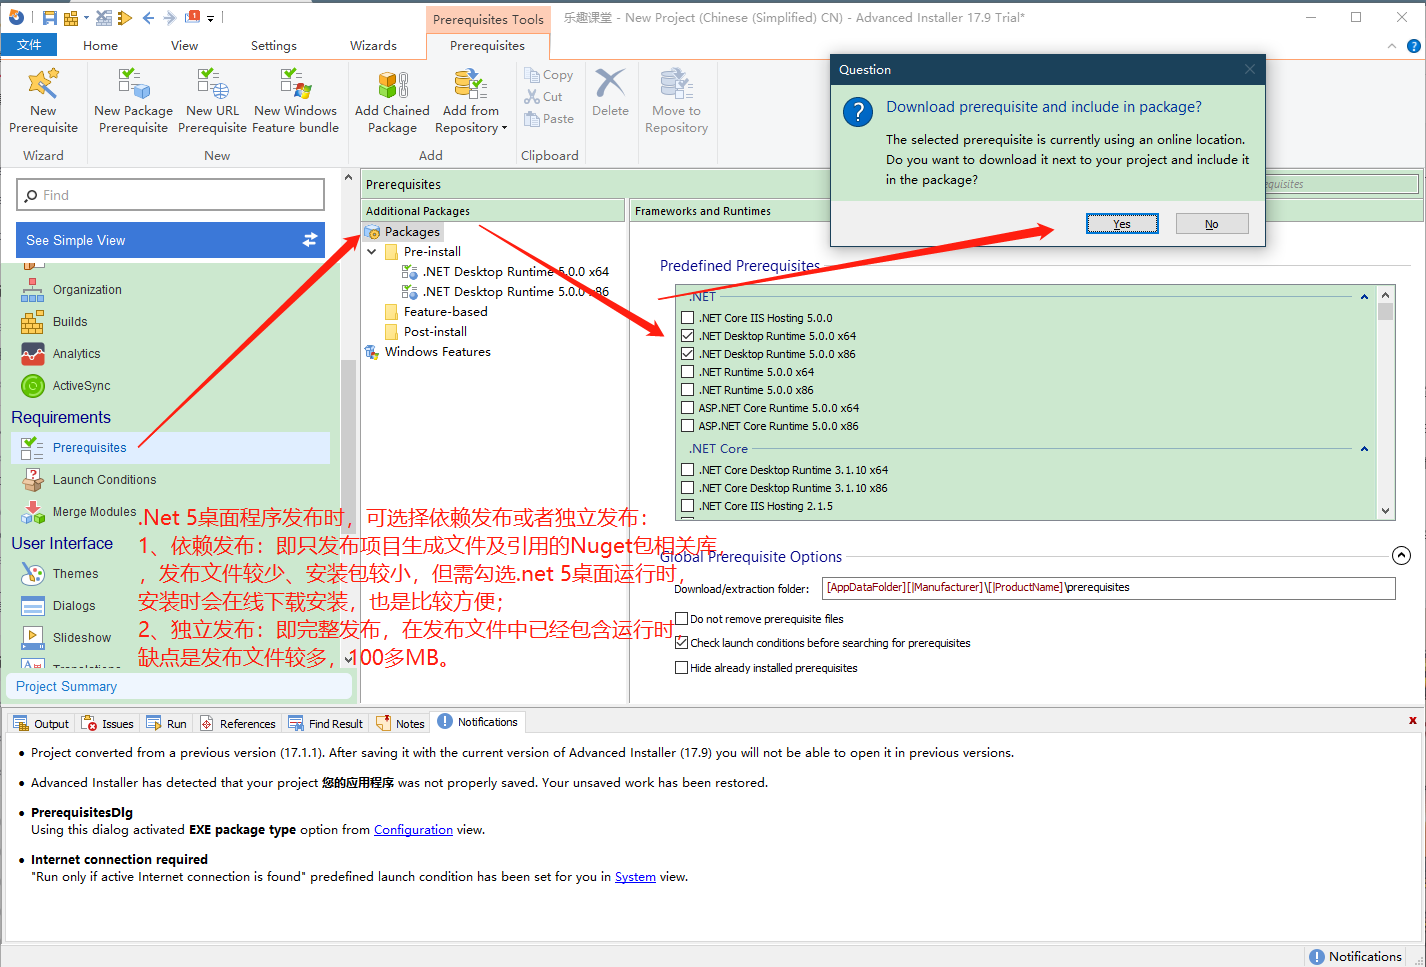
5. Select the program runtime environment

The test program being packaged (visit LeQu Classroom source code repository) depends on the .NET 5 runtime (it was published as framework-dependent). Therefore, in the configuration below, you can choose to download and install the .NET 5 runtime during installation (this step can be ignored for self-contained publishing):

Runtime environment configuration

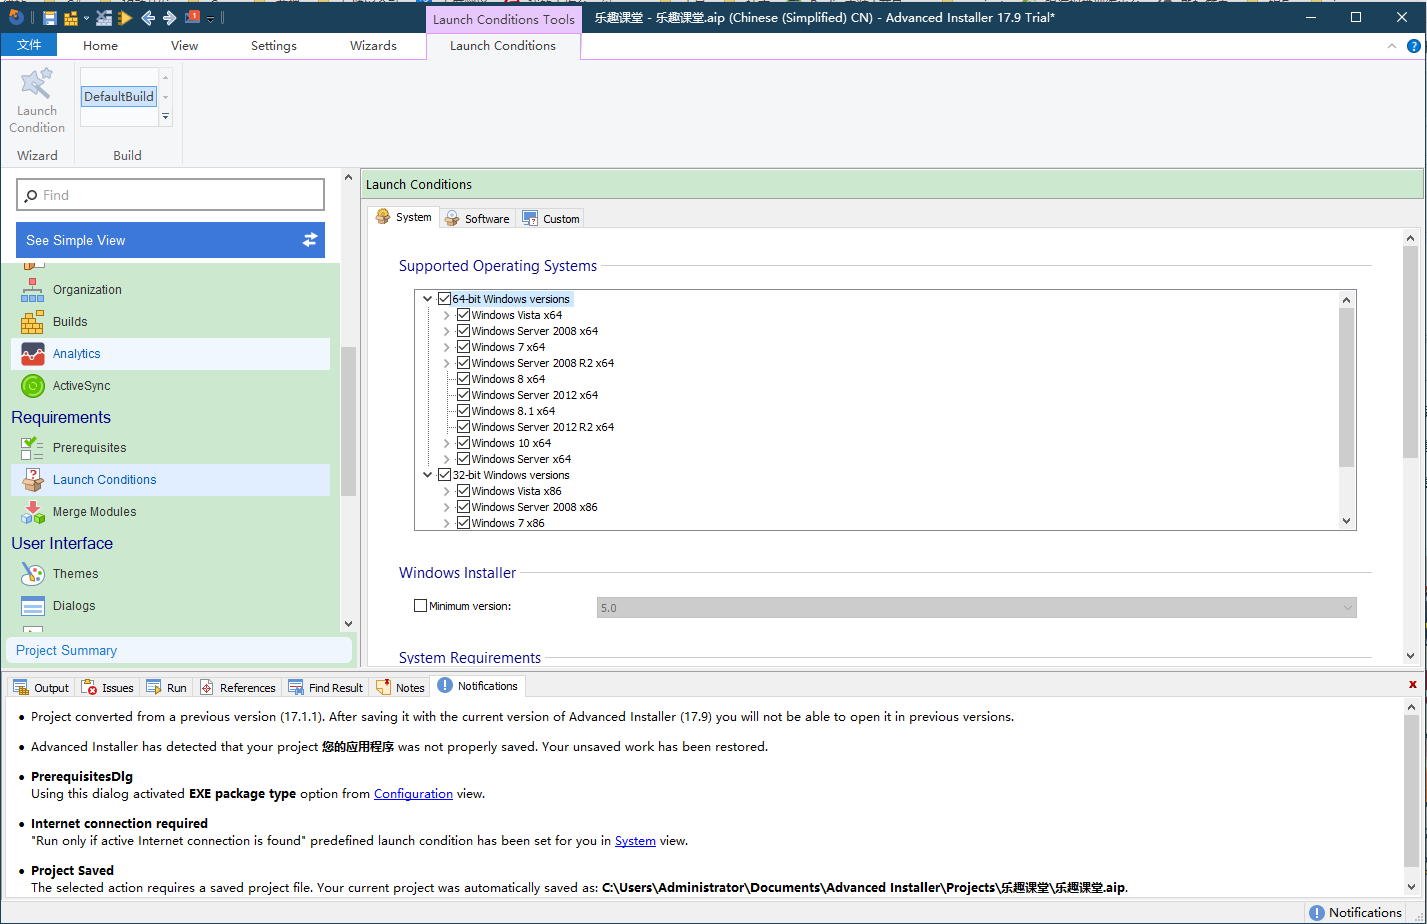
6. Set program launch conditions

In the interface below, select the operating systems where the program can run, including x86 and x64 versions of Windows:

Set launch conditions

7. Select installation files

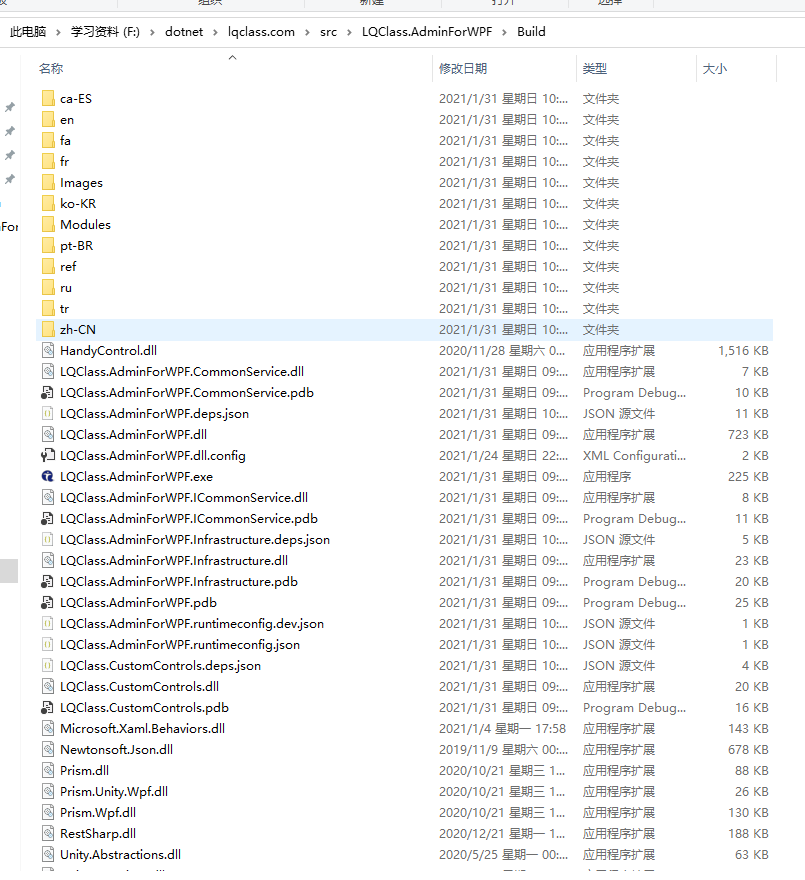
Below is the directory structure of the target program, i.e., the folder to be packaged. The executable and its dependencies are in this folder:

List of output directory files for LeQu Classroom

List of output directory files for LeQu Classroom

In the installer-making interface, add application files (folders). Select the folder mentioned above. Note that subdirectories and files need to be selected separately.

Select the program package files menu

Select program package files menu

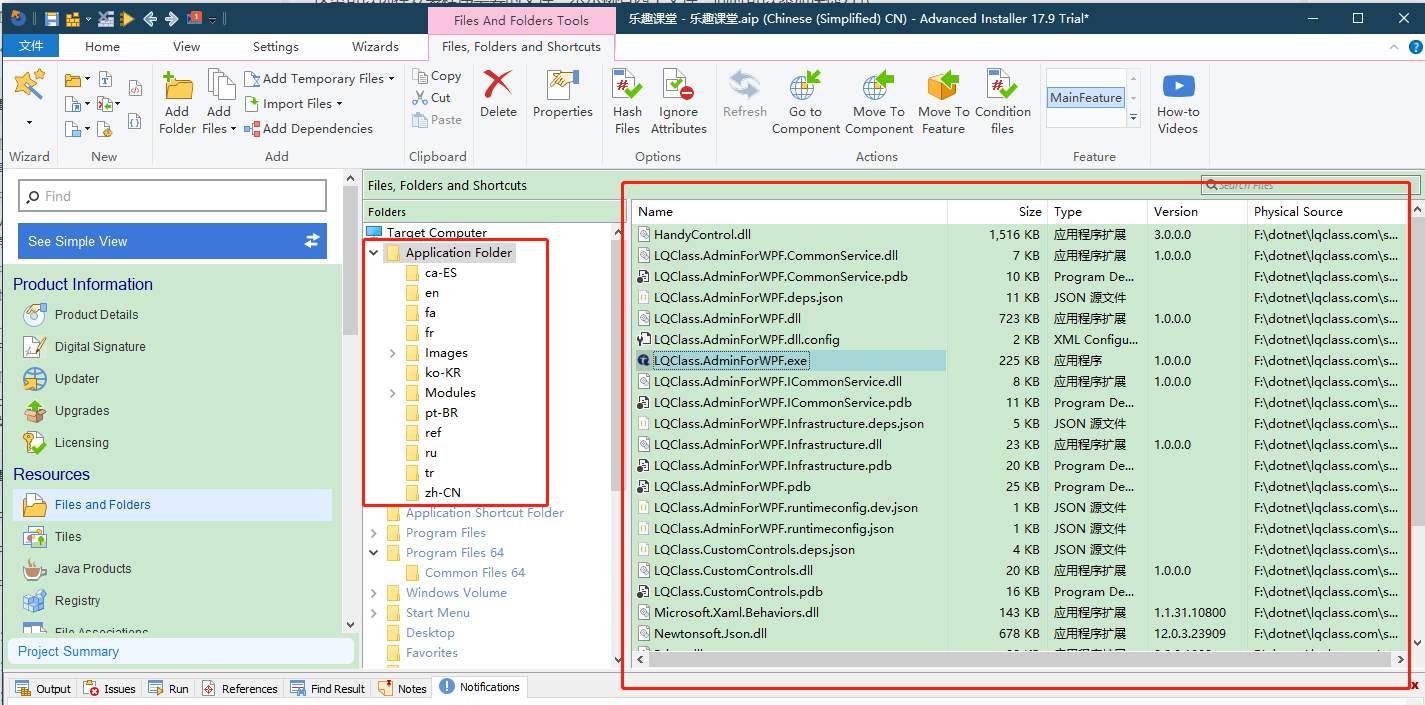
After adding, the directory structure in the installer-making interface is as follows: subdirectories are shown in the middle, and files in the Application Folder are shown on the right:

File structure after selection

File structure after selection

8. Add shortcuts

Normally, you need to add program shortcuts in the Start menu and on the desktop, as shown below:

Start menu shortcut

Start menu shortcut

Desktop shortcut

Desktop shortcut

To achieve the above effect, the requirements are simple:

  • Add a program directory in the Start menu: create a subfolder "LeQu Classroom" (change it to your program name) under [Start Menu] => [Programs]
  • The Start menu program directory needs a shortcut for launching the program and a shortcut for uninstallation
  • Add a shortcut to launch the program on the desktop

8.1 Add a launch shortcut

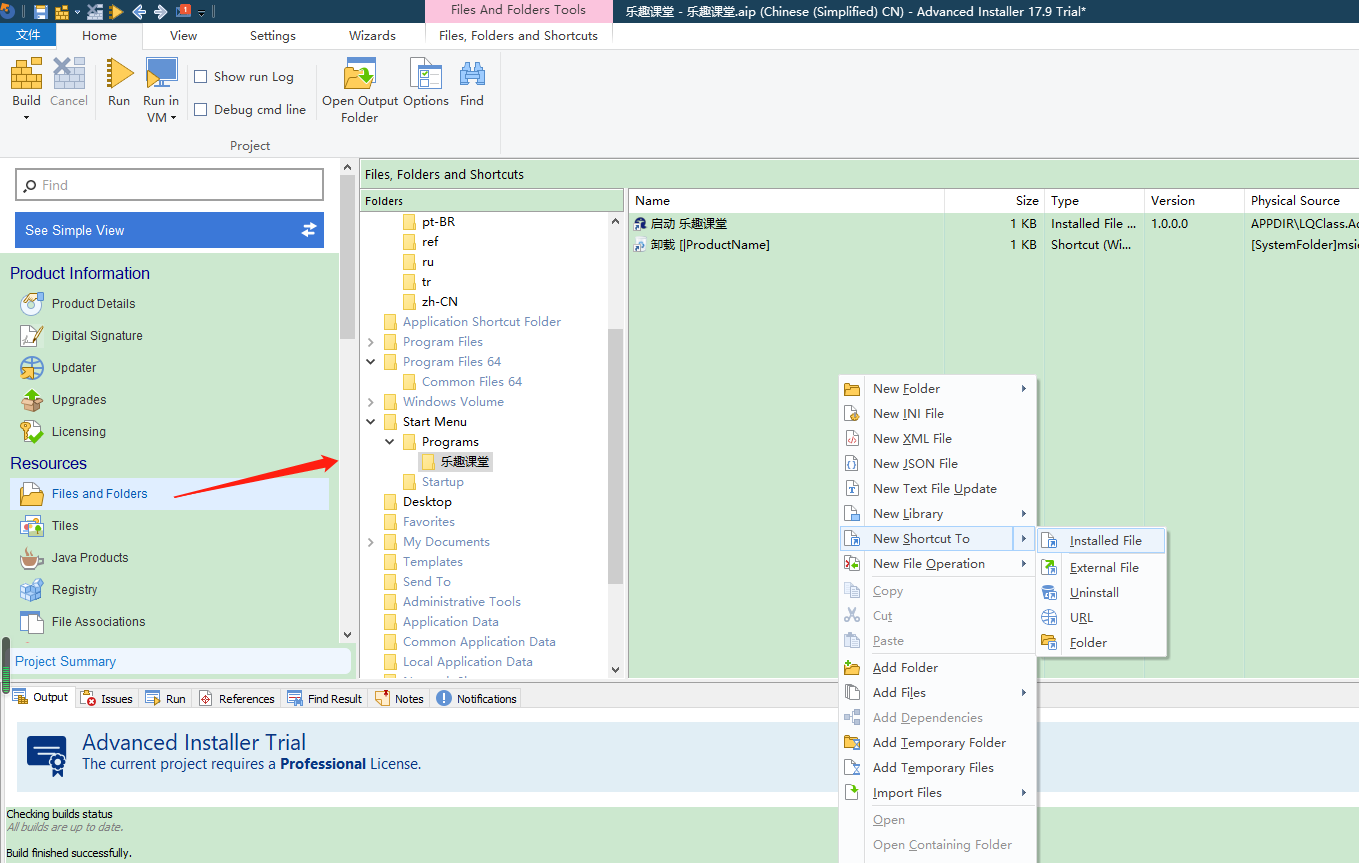
As shown below, select the "LeQu Classroom" directory in the middle (the same applies to the Desktop directory). Right-click in the right pane and choose to add a shortcut from the installation files:

Select the program to launch from the installation files

Select the program to launch from the installation files

The following interface shows a list of selected files. This list appears only after you have selected files in step 7. LQClass.AdminForWPF.exe is the main program's executable, so use it as the launch shortcut in the Start menu and desktop:

Select the program as the launch shortcut

Select the program as the launch shortcut

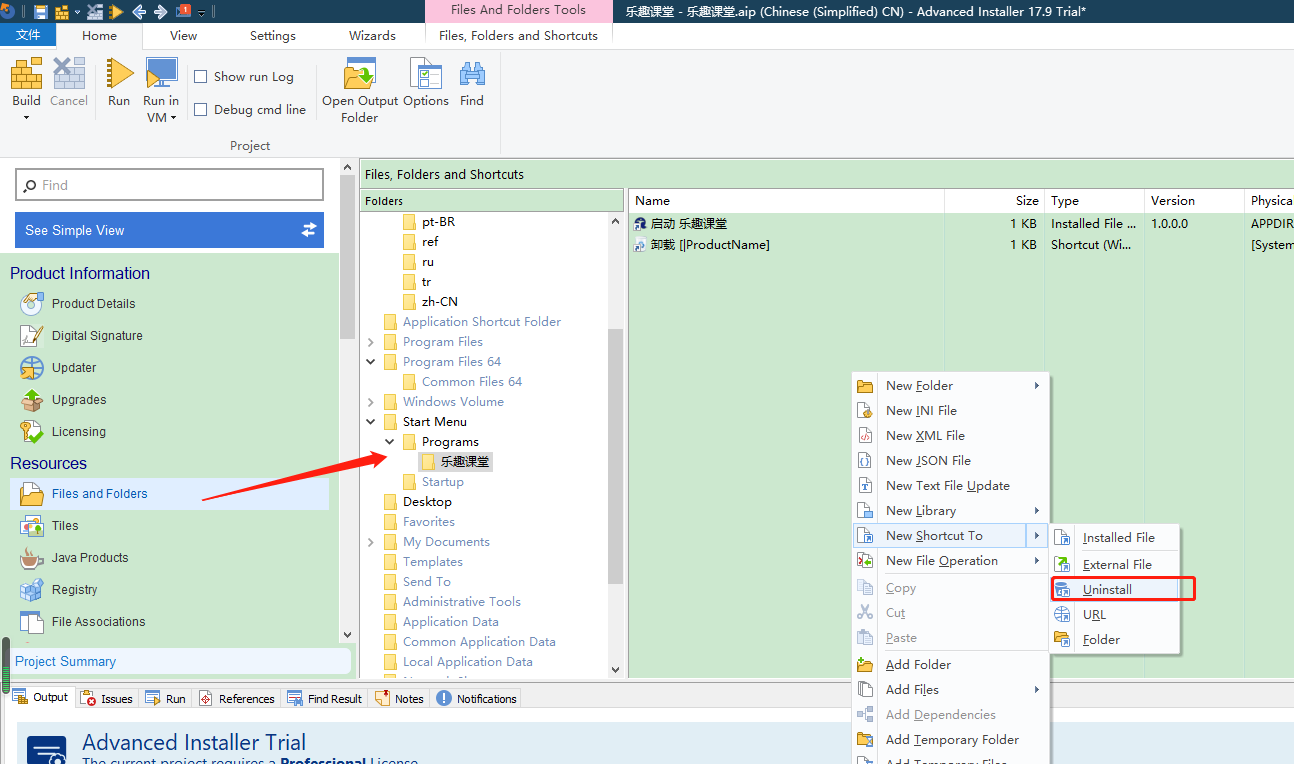
8.2 Add an uninstall shortcut

I notice that most programs do not have an uninstall shortcut in the Start menu, but we are confident enough to add it. Users can uninstall if they want:

Add an uninstall shortcut

Add an uninstall shortcut

In the uninstall shortcut editing interface that pops up, you can leave it unchanged. If you don't want to display the program version number, you can remove it: "Uninstall [ProductName]" appears as "Uninstall LeQu Classroom":

Edit uninstall shortcut popup

Edit uninstall shortcut popup

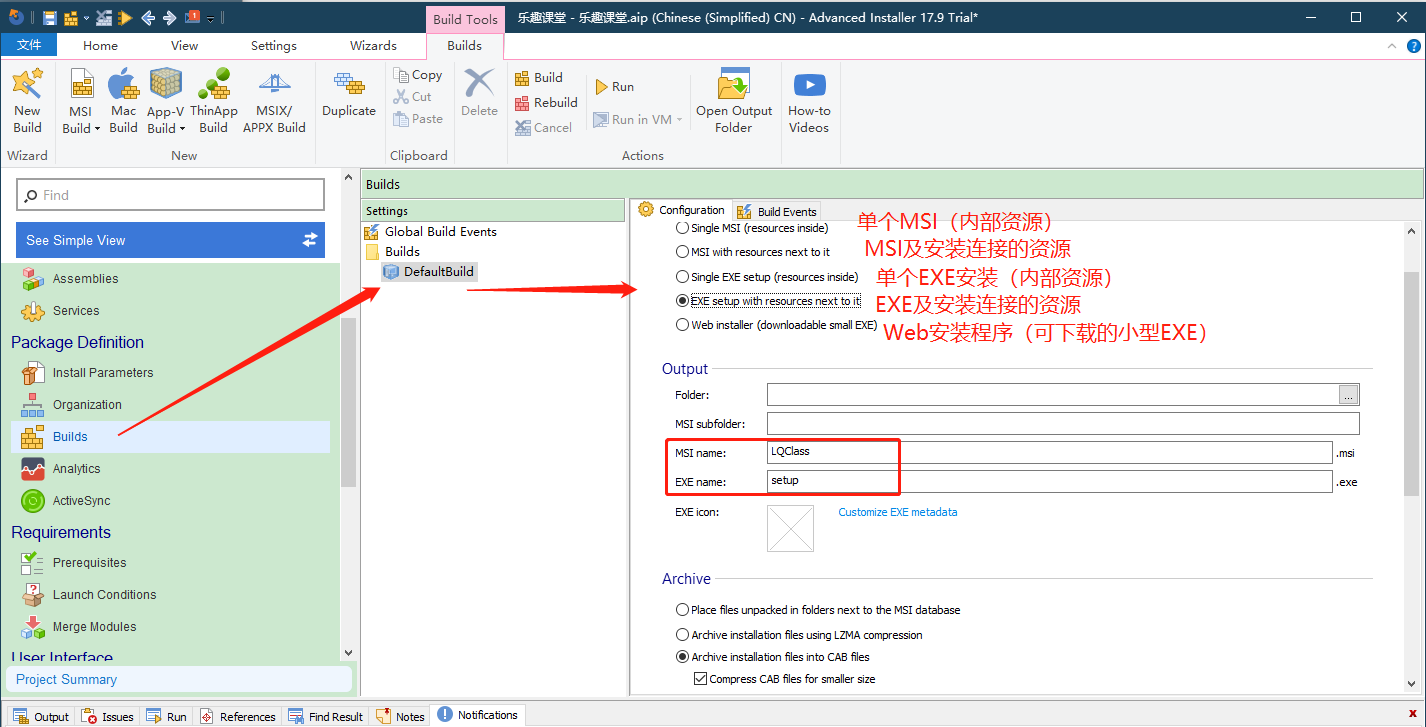
9. Set the output format of the packaged files

As noted in the image, choose the fourth option. During installation, the runtime can be downloaded and installed online. You can modify the names of the MSI installer file and the EXE installer file:

Packaged file output format

10. Configure the installation UI theme

This software offers many theme styles. The webmaster browsed through them, and the effect in the image looks clean. Choose according to personal preference:

Installation program theme

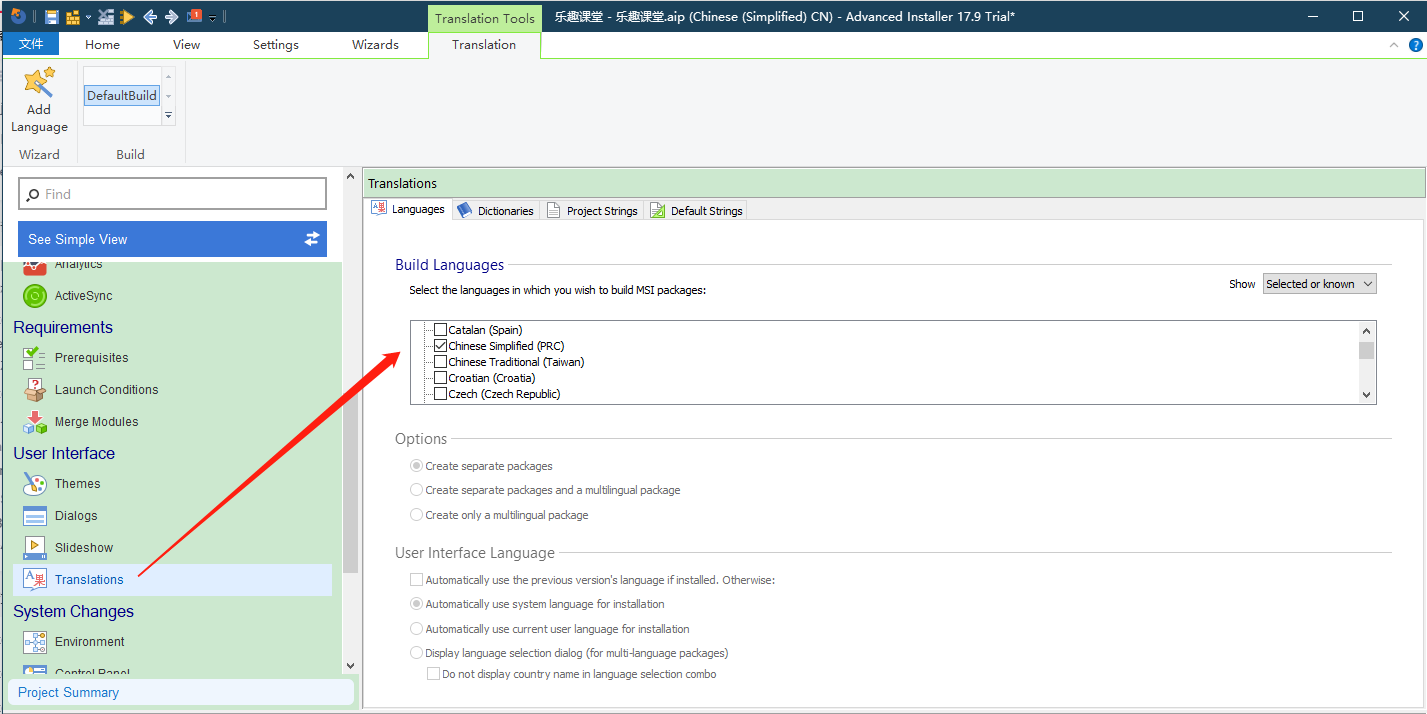
11. Set the interface language pack

Default is Simplified Chinese:

Language pack configuration

12. Almost done with the configuration. Let's preview the installation effect

You can view the effect at each installation step:

Installation step preview

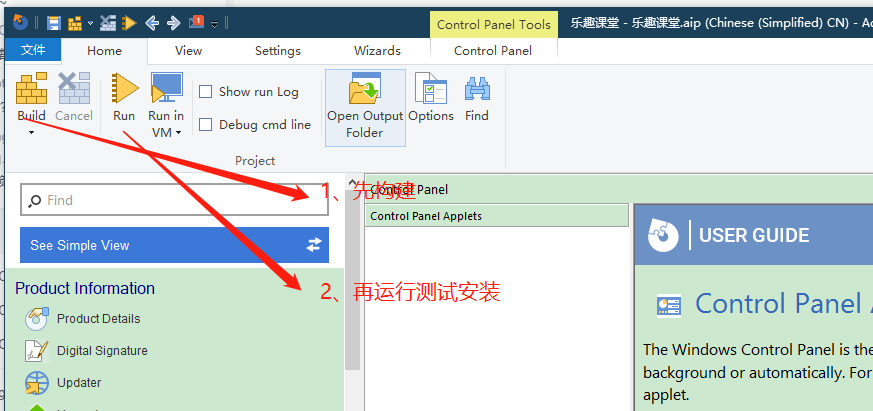
13. Build and run

Just like programming: the previous steps are just code writing. Once a simple function is complete, you need to compile the code to generate executable files. Creating a software installer is the same: first build, then click Run to test the installation. See the installation animation at the beginning:

Build and run menu

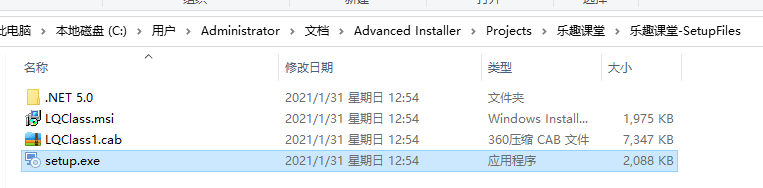
The files generated after building are shown below. The file names can be modified in step 9, or you can manually rename them now:

Installer files

That's it! The installer is ready. Feel free to leave comments if you have any questions.

Reference articles:

Keep Exploring

Related Reading

More Articles
Same tag 6/20/2024

CodeWF.EventBus: Lightweight Event Bus for Smoother Communication

CodeWF.EventBus is a flexible event bus library that enables decoupled communication between modules. It supports various .NET project types such as WPF, WinForms, ASP.NET Core, etc. With a clean design, it easily implements command publishing and subscribing, as well as requests and responses. Through orderly event handling, it ensures events are properly processed. Simplify your code and improve system maintainability.

Continue Reading