
有很多文章讨论绑定的概念,并讲解如何使用 StaticResources 和 DynamicResources 绑定属性。这些概念使用 WPF 提供的数据绑定表达式。在本文中,让我们研究 WPF 提供的不同类型的数据绑定表达式。
介绍
数据绑定是一种强大的技术,它允许数据在 UI 元素和业务模型之间流动。当业务模型中的数据发生变化时,它会自动将更改反映到 UI 元素上。
| Models | Description |
|---|---|
| OneWay | Source → Destination |
| TwoWay | Source ←→ Destination |
| OneWayToSource | Source ← Destination |
| OneTime | Source → Destination (only once) |
这可以通过 WPF 提供的不同类型的数据绑定表达式来实现。
数据绑定表达式的类型如下所示。
- DataContext 绑定
- RelativeSource 绑定
- ItemSource 绑定
1、DataContext 绑定
DataContext 是一个依赖属性,它是绑定的默认源。Datacontext 沿着逻辑树继承。因此,如果您设置一个 DataContext 来控制逻辑树中的所有子元素,它也将引用同一个 DataContext,除非并且直到显式指定了另一个源。
让我们举个例子来更详细地理解它。
1.1 创建一个类 Book,如下所示。
public class Book
{
    public string Name
    {
        get;
        set;
    }
    public string Author
    {
        get;
        set;
    }
}
1.2 添加一个 XAML 文件DataContextBinding.XAML并放置四个 TextBlock,如下所示。
<Grid VerticalAlignment="Center">
  <Grid.RowDefinitions>
    <RowDefinition Height="40" />
    <RowDefinition Height="40" />
  </Grid.RowDefinitions>
  <Grid.ColumnDefinitions>
    <ColumnDefinition Width="Auto" />
    <ColumnDefinition Width="Auto" />
  </Grid.ColumnDefinitions>
  <TextBlock Text="Book Name:" FontWeight="Bold" />
  <TextBlock Grid.Column="1" />
  <TextBlock Text="Author:" FontWeight="Bold" Grid.Row="1" />
  <TextBlock Grid.Row="1" Grid.Column="1" />
</Grid>
现在,让我们看看如何使用这个 DataContext 属性来显示数据。
它有两种用法,如下所示。
- 1.使用表达式
用于直接绑定 DataContext。
创建类 Book 的实例,初始化其属性,并将类的 Name 属性分配给 Window 的 DataContext 属性。
public partial class DataContextBinding: Window
{
    public DataContextBinding()
    {
        InitializeComponent();
        //Create the instance
        Book book = new Book();
        //initialize the properties
        book.Name = "Computer Networking";
        //Assign the Property as DataContext
        this.DataContext = book.Name;
    }
}
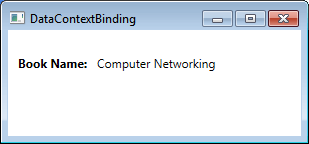
由于 DataContext 是沿着逻辑树和数据 book 继承的,因此 Name 被绑定到 Control Window。Window 的所有子元素也将引用同一个对象(book.Name)。
要显示数据,请将 DataContext 与 Textblock 绑定,如下所示。
<TextBlock Text="Book Name:" FontWeight="Bold" />
<TextBlock Text="{Binding}" Grid.Column="1" />
输出
- 使用表达式
绑定 Datacontext 的属性。
创建类 Book 的实例,初始化其属性并将类的实例(Book)分配给 Window 的 DataContext 属性。
Book book = new Book();
//initialize the properties
book.Name = "Computer Networking";
book.Author = "James F. Kurose";
//Assign the instance as DataContext
this.DataContext = book;
现在,让我们看看输出。
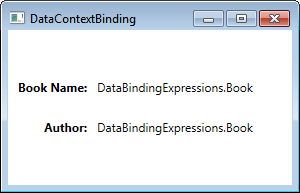
由于绑定表达式用于绑定 Book 类型的 DataContext 对象,因此调用 ToString()方法,并将数据显示为字符串。为了以正确的格式显示数据,我们必须将数据对象的属性与 TextBlock 绑定,如下所示:
<TextBlock Text="Book Name:" FontWeight="Bold" />
<TextBlock Text="{Binding Name}" Grid.Column="1" />
<TextBlock Text="Author:" FontWeight="Bold" Grid.Row="1" />
<TextBlock Text="{Binding Author}" Grid.Row="1" Grid.Column="1" />
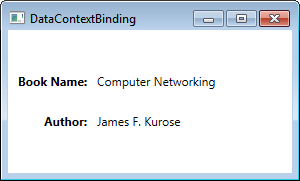
绑定表达式用于绑定 DataContext 绑定的 Name 属性。
输出
2、RelativeSource 绑定
RelativeSource 是一个属性,它用相对关系设置绑定源以绑定目标。此扩展主要用于必须将元素的一个属性绑定到同一元素的另一个属性时。
RelativeSource 有四种类型,如下所示。
- Self
- FindAncestor
- TemplatedParent
- PreviousData
让我们一个一个详细地探讨一下。
2.1 Self
Self 用于绑定源和绑定目标相同的场景中。对象的一个属性与同一对象的另一个属性绑定。
例如,让我们取一个高度和宽度相同的椭圆。
在 XAML 文件中添加下面给出的代码。宽度属性与高度属性相对绑定。
<Grid>
  <Ellipse
    Fill="Black"
    Height="100"
    Width="{Binding RelativeSource={RelativeSource Self},Path=Height}"
  >
  </Ellipse>
</Grid>
输出
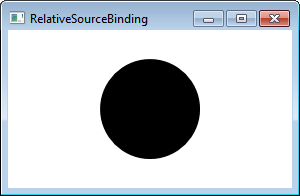
如果改变椭圆的高度,宽度也会相对变化。
2.2 FindAncestor
顾名思义,当绑定源是绑定目标的祖先(父级)之一时使用此选项。使用 FindAncestor 扩展,可以找到任何级别的祖先。
让我们举个例子来更清楚地理解它。
步骤
创建 XAML,它表示下面给出的元素的逻辑树。
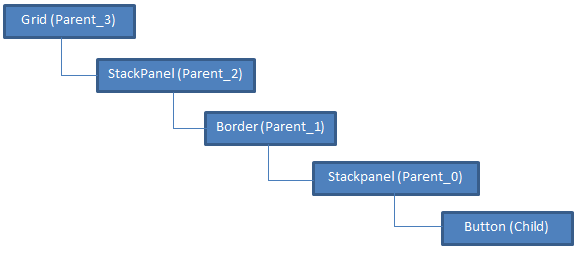
<Grid Name="Parent_3">
  <StackPanel Name="Parent_2">
    <Border Name="Parent_1">
      <StackPanel x:Name="Parent_0" Orientation="Vertical">
        <button></button>
      </StackPanel>
    </Border>
  </StackPanel>
</Grid>
现在,让我们使用 FindAncestor 扩展将祖先的 Name 属性绑定到子元素 button 的 Content 属性。
<Grid Name="Parent_3">
  <StackPanel
    Name="Parent_2"
    HorizontalAlignment="Center"
    VerticalAlignment="Center"
    Width="100"
  >
    <Border Name="Parent_1">
      <StackPanel x:Name="Parent_0" Orientation="Vertical">
        <button
          Height="50"
          Content="{Binding RelativeSource={RelativeSource FindAncestor,
AncestorType={x:Type StackPanel},
AncestorLevel=2},Path=Name}"
        ></button>
      </StackPanel>
    </Border>
  </StackPanel>
</Grid>
输出
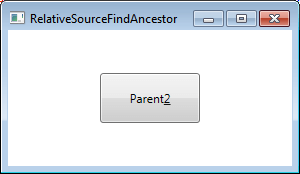
AncestorType 为“StackPanel”与 AcestorLevel 为“2”组合,将 button 的 content 属性与 StackPanel 的 Name 属性(Parent_2)绑定在一起。
2.3 TemplatedParent
TemplatedParent 是一个属性,它使您能够创建一个包含少量未知值的控件模板。这些值取决于应用 ControlTemplate 的控件的属性。
让我们举个例子来更详细地理解它
步骤
- 为按钮创建一个 ControlTemplate,如下所示。
<Window.Resources>
  <ControlTemplate x:Key="template">
    <canvas>
      <Ellipse Height="110" Width="155" Fill="Black" />
      <Ellipse
        Height="100"
        Width="150"
        Fill="{Binding RelativeSource={RelativeSource TemplatedParent},Path=Background}"
      >
      </Ellipse>
      <ContentPresenter
        Margin="35"
        Content="{Binding RelativeSource={RelativeSource TemplatedParent},Path=Content}"
      />
    </canvas>
  </ControlTemplate>
</Window.Resources>
在上面给出的代码中,椭圆的 Fill 属性和 ContentPresenter 的 Content 属性依赖于将应用此模板的控件的属性值。
- 添加一个按钮并对其应用模板。
<button
  Margin="50"
  Background="Beige"
  Template="{StaticResource template}"
  Height="0"
  Content="Click me"
  FontSize="22"
></button>
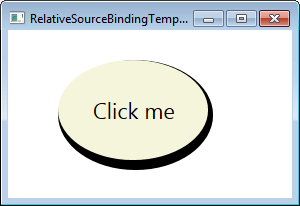
在应用模板时,按钮的 Background(Beige)与椭圆的 Fill 属性相对绑定,Content(Click me)与 ContentPresenter 的 Content 属性相对绑定。依赖值生效并给出以下输出。
输出
2.4 PreviousData
这是相对使用最少的方式。当数据被分析时,这就出现了,我们需要表示值相对于以前数据的变化。
让我们举个例子来更详细地理解它。
步骤
- 创建一个类 Data 并实现 INotifyPropertyChanged 接口,如下所示
public class Data: INotifyPropertyChanged
{
    public int DataValue
    {
        get;
        set;
    }
    public event PropertyChangedEventHandler PropertyChanged;
    protected void OnPropertyChanged(string PropertyName)
    {
        if (null != PropertyChanged)
        {
            PropertyChanged(this,
                new PropertyChangedEventArgs(PropertyName));
        }
    }
}
- 创建一个 Data 类型的列表并将其指定为 DataContext。
public RelativeSourcePreviousData()
{
    InitializeComponent();
    List < Data > data = new List < Data > ();
    data.Add(new Data()
    {
        DataValue = 60
    });
    data.Add(new Data()
    {
        DataValue = 100
    });
    data.Add(new Data()
    {
        DataValue = 120
    });
    this.DataContext = data;
}
- 在 XAML 文件中添加 ItemsControl。
<ItemsControl ItemsSource="{Binding}"></ItemsControl>
- 为其创建 ItemsPanel 模板,如下。
<ItemsControl ItemsSource="{Binding}">
  <ItemsControl.ItemsPanel>
    <ItemsPanelTemplate>
      <StackPanel Orientation="Vertical" />
    </ItemsPanelTemplate>
  </ItemsControl.ItemsPanel>
</ItemsControl>
- 现在,为了正确地表示数据,创建 DataTemplate,如下所示。
<ItemsControl.ItemTemplate>
  <DataTemplate>
    <StackPanel Orientation="Horizontal">
      <Grid Margin="30,20,0,0">
        <Rectangle Width="80" Height="{Binding DataValue}" Fill="Blue" />
        <TextBlock
          Foreground="White"
          Margin="35,0,0,0"
          Text="{Binding DataValue}"
        ></TextBlock>
      </Grid>
      <TextBlock Margin="30,20,0,0" Text="Previous Data:"></TextBlock>
      <TextBlock
        VerticalAlignment="Center"
        Margin="5,20,0,0"
        Text="{Binding
             RelativeSource={RelativeSource PreviousData}, Path=DataValue}"
      />
    </StackPanel>
  </DataTemplate>
</ItemsControl.ItemTemplate>
输出
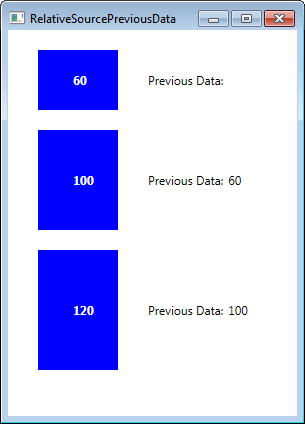
蓝色框的高度是列表中项目的值,旧数据显示在右侧。该项的第一个值为“60”。因此,第一项没有旧值。
3、ItemSource 绑定
在处理集合时使用。使用这个绑定表达式,您可以非常容易地读取 SelectedItem 的属性。斜杠是一种特殊运算符,用于处理集合中的当前项。
下面给出了三种表达式。
- {Binding / }
- {Binding Collection / }
- {Binding Collection / Property}
3.1 {Binding / }
此表达式用于绑定 DataContext 中的当前项。
让我们采取一个示例:
在下面给出的示例中,DataContext 是字符串类型的国家/地区的集合,并且与 Listbox 绑定在一起。
步骤
- 创建一个 Countries 类并添加一个 GetCountriesName()方法,该方法返回 string 数据类型的国家的集合,如下所示。
public class Countries
{
    public static List <string> GetCountriesName()
    {
        List <string> countries = new List <string> ();
        foreach(CultureInfo culture in CultureInfo.GetCultures(CultureTypes.SpecificCultures))
        {
            RegionInfo country = new RegionInfo(culture.LCID);
            if (!countries.Contains(country.EnglishName))
                countries.Add(country.EnglishName);
        }
        countries.Sort();
        return countries;
    }
}
- 添加一个 XAMl 文件,一个 ListBox 和 TextBlock,如下所示。
<DockPanel Name="Collection">
  <ListBox ItemsSource="{Binding}" IsSynchronizedWithCurrentItem="True">
  </ListBox>
  <TextBlock DockPanel.Dock="Top" />
</DockPanel>
- 创建类 Countries 的实例并将 Countries 集合指定为 DataContext。
public CurrentItemCollection()
{
    InitializeComponent();
    Countries countries = new Countries();
    this.DataContext = countries.GetCountriesName()
}
- 绑定 TextBlock 的 Text 属性以将其绑定到集合的当前选定项,如下所示。
<TextBlock DockPanel.Dock="Top" Text="{Binding /}" />
输出

一旦列表项被选中,它将在右侧显示所选国家/地区。
3.2 {Binding Collection /}
此表达式用于绑定 DataContext 中集合属性的当前项。
例如,
DataContext 是 Countries 类
Collection 属性是 CounriesList,它与 ListBox 绑定。
步骤
- 使用上面创建的类似的国家类,只是略有不同。创建返回类型为 RegionInfo 的方法。
public static List <RegionInfo> GetCountries()
{
    List <RegionInfo> countries = new List <RegionInfo> ();
    foreach(CultureInfo culture in CultureInfo.GetCultures(CultureTypes.SpecificCultures))
    {
        RegionInfo country = new RegionInfo(culture.LCID);
        if (countries.Where(p => p.Name == country.Name).Count() == 0)
            countries.Add(country);
    }
    return countries.OrderBy(p => p.EnglishName).ToList();
}
- 添加 RegionInfo 类型的 CountriesList 属性。
private List <RegionInfo> countries = null;
public List <RegionInfo> CountriesList
{
    get
    {
        if (countries == null)
            countries = GetCountries();
        return countries;
    }
}
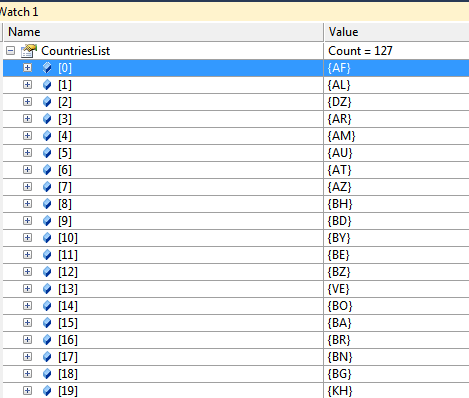
下面是 CountriesList 集合中的值的截图。
- 将类 Countries 指定为 DataContext,并将 Listbox 与 DataContext 的 CountriesList 属性绑定。
<Window.Resources>
  <vm:Countries x:Key="Countries"></vm:Countries>
</Window.Resources>
<Grid>
  <DockPanel Name="Collection" DataContext="{StaticResource Countries}">
    <ListBox
      ItemsSource="{Binding CountriesList}"
      IsSynchronizedWithCurrentItem="True"
    >
      <ListBox.ItemTemplate>
        <DataTemplate>
          <TextBlock Text="{Binding EnglishName}"></TextBlock>
        </DataTemplate>
      </ListBox.ItemTemplate>
    </ListBox>
  </DockPanel>
</Grid>
- 要计算 CountriesList 属性的当前项,请绑定 TextBlock 的 Text 属性,如下所示。
<TextBlock DockPanel.Dock="Top" Text="{Binding CountriesList/}" HorizontalAlignment="Center" FontSize="16" VerticalAlignment="Center" />
输出
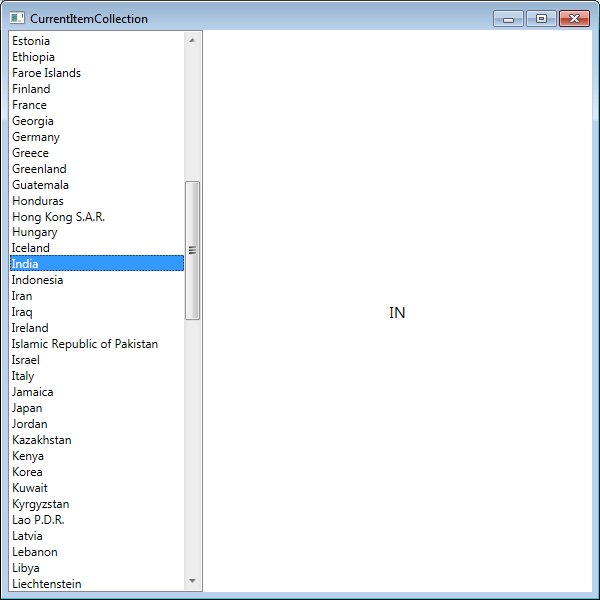
右侧显示 DataContext(CountriesList)中集合的当前项(CountriesList)。
3.3 {Binding Collection / Property}
此表达式用于绑定 DataContext 中集合的当前项的属性。
例如,如果必须计算 CountriesList 集合的当前项的特定属性。
在这个例子中,我想显示属性“EnglishName”的值。
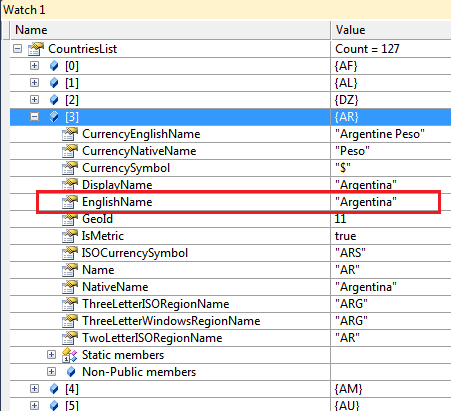
为此,绑定 TextBlock 的 Text 属性,如下所示。
<TextBlock DockPanel.Dock="Top" Text="{Binding CountriesList/EnglishName}" />
输出
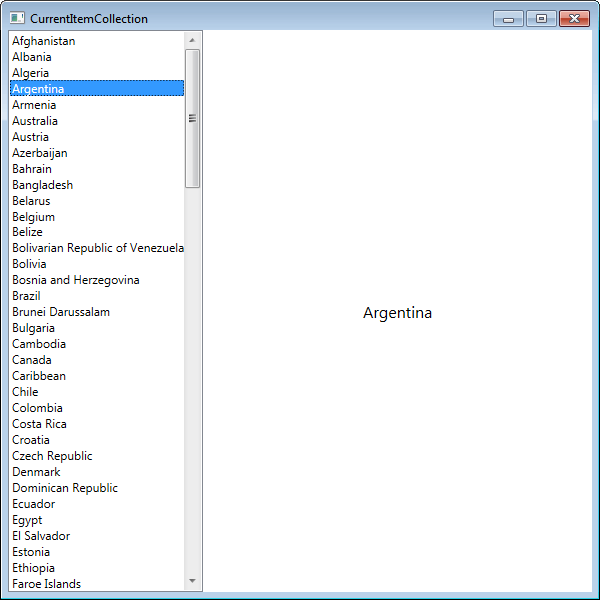
现在,当列表中的项被选中时,它显示属性“EnglishName”的值。
结论
我已经详细介绍了所有的数据绑定表达式。我希望这有助于您理解绑定的概念和 WPF 提供的表达式。
- 作者:Swati Gupta
- 原文标题:DataBinding Expressions In WPF
- 原文链接:https://www.c-sharpcorner.com/article/data-binding-expression-in-wpf/
- 编辑:沙漠之尽头的狼