Making a PowerPoint Series with WPF: Implementing PPT Text Outline Effect Based on OpenXML Parsing

Making a PowerPoint Series with WPF: Implementing PPT Text Outline Effect Based on OpenXML Parsing

This article is part of the 'Making a PowerPoint with WPF' series. It explains how to parse the text outline effect in PPT and render it in a WPF application to achieve pixel-level consistency.

Last updated 12/18/2021 6:24 PM
lindexi
7 min read
Category
WPF
Tags
.NET WPF OpenXML

This article is part of a series on using WPF to create a PowerPoint-like application. This post explains how to parse the text outline effect in PPT files and render it in a WPF application, achieving pixel-level consistency.

Background Knowledge

Before you start, you should have basic knowledge of PPT parsing. If you are unfamiliar with PPT parsing, please refer to C# dotnet - Using OpenXml to Parse PPT Files.

In PPT, you can set an outline effect on certain characters of text. In OpenXML terms, this is not an effect but rather a border property. In PPT, you can add an Outline border property to text to create a text outline.

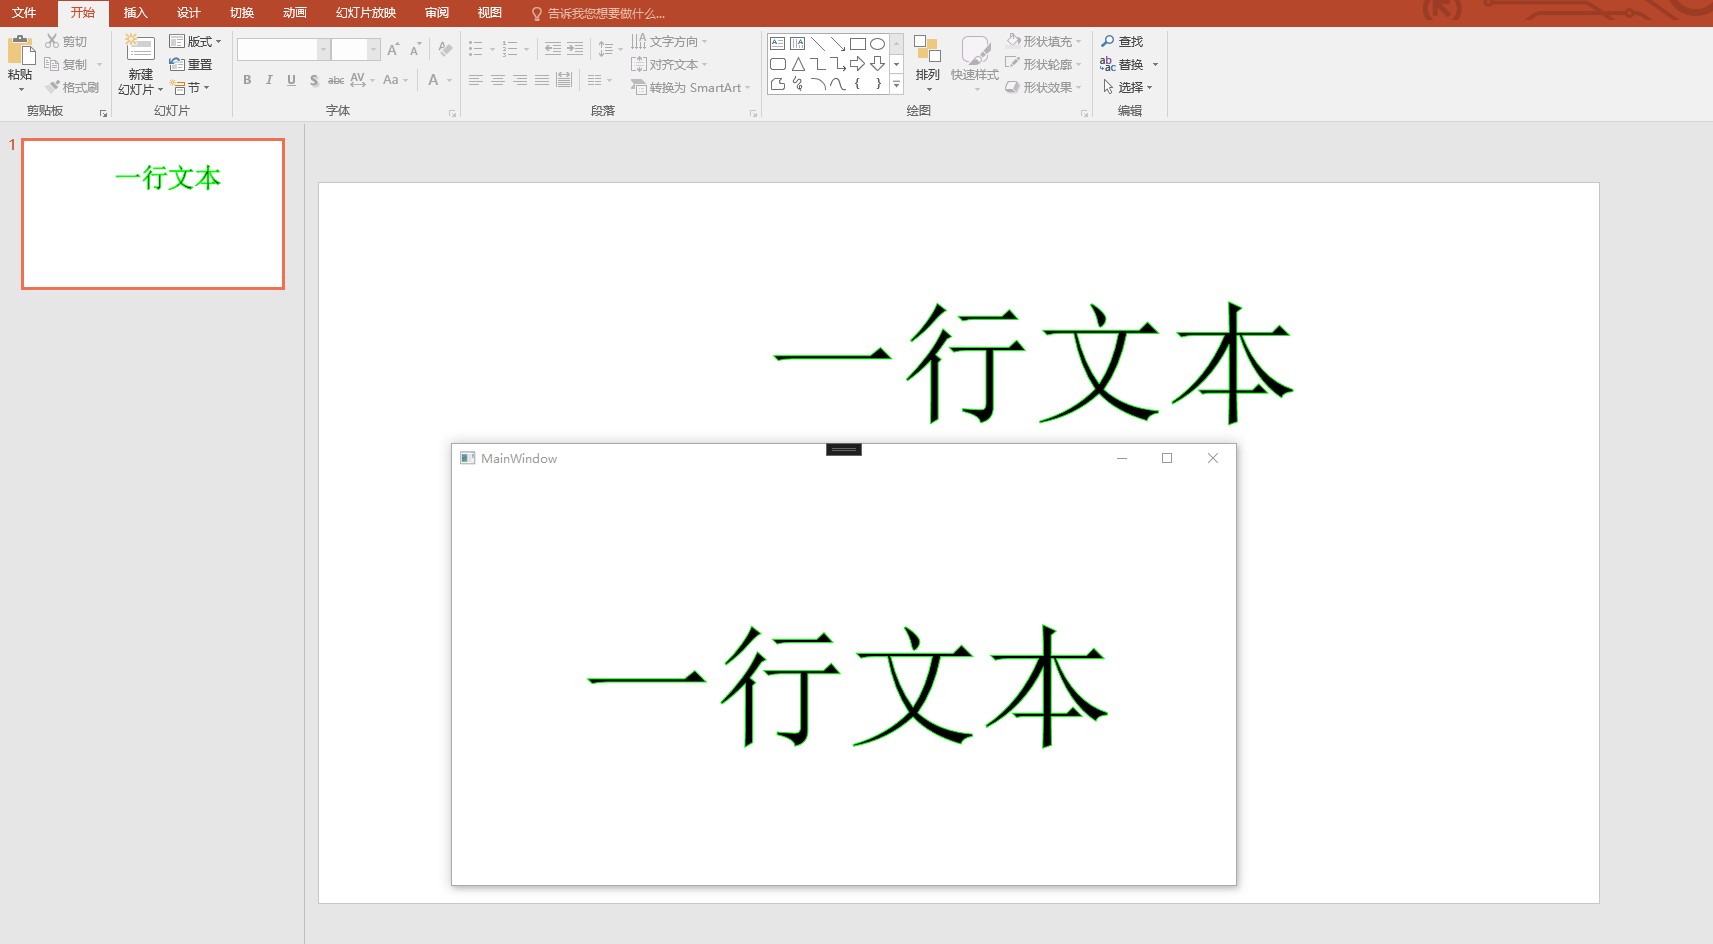
Effect

Before we begin, let’s take a look at the result.

Parsing

Before parsing, we first read the document. The code is as follows. The full code and test file can be obtained at the end of this article.

var file = new FileInfo("Test.pptx");

using var presentationDocument = PresentationDocument.Open(file.FullName, false);
var slide = presentationDocument.PresentationPart!.SlideParts.First().Slide;

The following code focuses on the core logic, ignoring many parameter checks for the sake of simplicity based on the Test.pptx document. In a real project, you should perform the necessary parameter checks yourself.

In this test document, the first slide contains only one element – the text with the outline effect. The code to obtain it is:

var shape = slide.CommonSlideData!.ShapeTree!.GetFirstChild<Shape>()!;

The OpenXML content of this Shape is approximately as follows:

<p:sp>
<p:spPr>
    <a:prstGeom prst="rect">
    </a:prstGeom>
    <a:noFill />
</p:spPr>
<p:txBody>
    <a:bodyPr wrap="square" rtlCol="0">
    <a:spAutoFit />
    </a:bodyPr>
    <a:lstStyle />
    <a:p>
    <a:r>
        <a:rPr lang="zh-CN" altLang="en-US" sz="10000">
        <a:ln w="9525">
            <a:solidFill>
            <a:srgbClr val="00FF00" />
            </a:solidFill>
        </a:ln>
        </a:rPr>
        <a:t>一行文本</a:t>
    </a:r>
    <a:endParaRPr lang="en-US" sz="10000" dirty="0" />
    </a:p>
</p:txBody>
</p:sp>

In PPT, a text box is also a shape, by default a rectangle.

var shapeProperties = shape.ShapeProperties!;
var presetGeometry = shapeProperties.GetFirstChild<PresetGeometry>()!;
// This is a text box
Debug.Assert(presetGeometry.Preset?.Value == ShapeTypeValues.Rectangle);
Debug.Assert(shapeProperties.GetFirstChild<NoFill>() is not null);

The above code is just to show how to retrieve a shape. In your own business logic, you need to add the appropriate checks.

To obtain the text in the text box, use the following code:

var textBody = shape.TextBody!;
Debug.Assert(textBody != null);

A text body contains multiple paragraphs. Within a paragraph, text can have different styles, for example, one part can be bold while another is not. Text with the same style is placed in one TextRun. Text with different styles is placed in separate TextRun elements.

Therefore, parsing requires first iterating over paragraphs and then over TextRun elements.

foreach (var paragraph in textBody.Elements<DocumentFormat.OpenXml.Drawing.Paragraph>())
{
    // This text paragraph has no properties; for simplicity, code is omitted
    //if (paragraph.ParagraphProperties != null)

    foreach (var run in paragraph.Elements<DocumentFormat.OpenXml.Drawing.Run>())
    {
    }
}

Obtain the properties of a TextRun as follows:

var runProperties = run.RunProperties!;

From these properties, you can get the font size of the current text:

var fontSize = new PoundHundredfold(runProperties.FontSize!.Value).ToPound();

Next, the core of this article: obtaining the Outline property:

var outline = runProperties.Outline!;

The corresponding OpenXML code is:

<a:ln w="9525">   <a:solidFill>
     <a:srgbClr val="00FF00" />
   </a:solidFill>
 </a:ln>

The main attributes we care about are the width and color. They can be obtained as follows:

var outlineWidth = new Emu(outline.Width!.Value);

And the color:

var solidFill = outline.GetFirstChild<SolidFill>()!;
var rgbColorModelHex = solidFill.GetFirstChild<RgbColorModelHex>()!;
var colorText = rgbColorModelHex.Val!;

Using the method from Win10 UWP Color Conversion, you can convert colorText to a SolidColorBrush object.

Then, retrieving the text content is roughly done:

// Default font foreground color is black

var text = run.Text!.Text;

Now, we move on to the rendering.

Rendering

As described in the WPF Text Outline blog, first use FormattedText to build a Geometry object, then render using the Geometry object.

The code is:

var formattedText = new FormattedText(text, CultureInfo.CurrentCulture,
FlowDirection.LeftToRight,
new Typeface
(
    // Default is SimSun
    new FontFamily("SimSun"),
    FontStyles.Normal,
    FontWeights.Normal,
    FontStretches.Normal
),
// In WPF, EM units are used, roughly equivalent to pixel units
    fontSize.ToPixel().Value,
Brushes.Black, 96);

The code to build the Geometry object from FormattedText is:

var geometry = formattedText.BuildGeometry(new ());

Then, use System.Windows.Shapes.Path to render the Geometry onto the UI.

var path = new System.Windows.Shapes.Path
{
    Data = geometry,
    Fill = Brushes.Black,
    Stroke = BrushCreator.CreateSolidColorBrush(colorText),
    StrokeThickness = outlineWidth.ToPixel().Value,

    HorizontalAlignment = HorizontalAlignment.Center,
    VerticalAlignment = VerticalAlignment.Center,
};

Root.Children.Add(path);

With the above code, you can draw an interface identical to the PPT.

Code

All the code and the test file in this article are available on github and gitee. Feel free to visit.

You can obtain the source code of this article using the following method: first create an empty folder, then use the command line to cd into that folder, and enter the following command in the command line to get the code:

git init
git remote add origin https://gitee.com/lindexi/lindexi_gd.git
git pull origin 71af5b0e47493ff7f5f43be33583265805da9d84

The above uses the gitee source. If gitee is inaccessible, replace it with the github source:

git remote remove origin
git remote add origin https://github.com/lindexi/lindexi_gd.git

After obtaining the code, enter the Pptx folder.

References

  1. WPF Text Outline
  2. For more information, see Office - Using OpenXML SDK to Parse Documents Blog Directory

The blog garden blog is only a backup; the blog will not be updated after publication. If you want to see the latest blog, please go to https://blog.lindexi.com/.

Knowledge Sharing License

This work is licensed under a Creative Commons Attribution-NonCommercial-ShareAlike 4.0 International License. You are free to share, adapt, and republish with attribution, but you must retain the author's name (Lin Dexi) and link (http://blog.csdn.net/lindexi_gd), not use for commercial purposes, and distribute any modifications under the same license. If you have any questions, please contact me.

Keep Exploring

Related Reading

More Articles
Same category / Same tag 9/13/2025

Migration Series from WPF to Avalonia: Why I Must Migrate My WPF Application to Avalonia

In the past few years, our host computer software has mainly been developed using WPF and WinForm . These technologies work well on the Windows platform and have accompanied us from small-scale trial production to the current stage of large-scale delivery. However, with business development and changes in customer requirements, the single Windows technology stack has gradually become a hurdle we must overcome.

Continue Reading
Same category / Same tag 1/26/2025

Implementing Internationalization in WPF Using Custom XML Files

This article details the method of implementing internationalization in WPF applications using custom XML files, including installing the necessary NuGet packages, dynamically retrieving the language list, dynamically switching languages, using translated strings in code and XAML interfaces, and provides a source code link to help developers easily achieve internationalization in WPF applications.

Continue Reading