

说明
权限认证是确定用户身份的过程, 可确定用户是否有访问资源的权力。
今天给大家分享一下类似 JWT 这种基于 token 的鉴权机制
基于 token 的鉴权机制,它不需要在服务端去保留用户的认证信息或者会话信息。这就意味着基于 token 认证机制的应用,不需要去考虑用户在哪一台服务器登录了,这就为应用的扩展提供了便利。
流程上是这样的:
- 用户使用用户名密码来请求服务器
- 服务器进行验证用户的信息
- 服务器通过验证发送给用户一个 token
- 客户端存储 token,并在每次请求时附送上这个 token 值
- 服务端验证 token 值,并返回数据
那我今天给大家手撸一个类似 Jwt 的权限认证
演示
新建一个授权筛选器继承 IAuthorizationFilter
public class ApiAuthorize : IAuthorizationFilter
{}
新建一个需要应用授权的特性和允许未通过身份验证也可以访问的特性
public class MyAuthentication:Attribute, IFilterMetadata
{
}

public class MyNoAuthentication : Attribute, IFilterMetadata
{
}
我们需要在我们的授权过滤器判断请求头是否带有应用授权的特性和允许未通过身份验证也可以访问的特性,如果有允许未通过身份验证也可以访问的特性就直接进入下一个管道 ,如果带有应用授权的特性则进行 token 判断
public class ApiAuthorize : IAuthorizationFilter
{
    public void OnAuthorization(AuthorizationFilterContext context)
    {
        if (context.Filters.Contains(new MyNoAuthentication()))
        {
            return;
        }
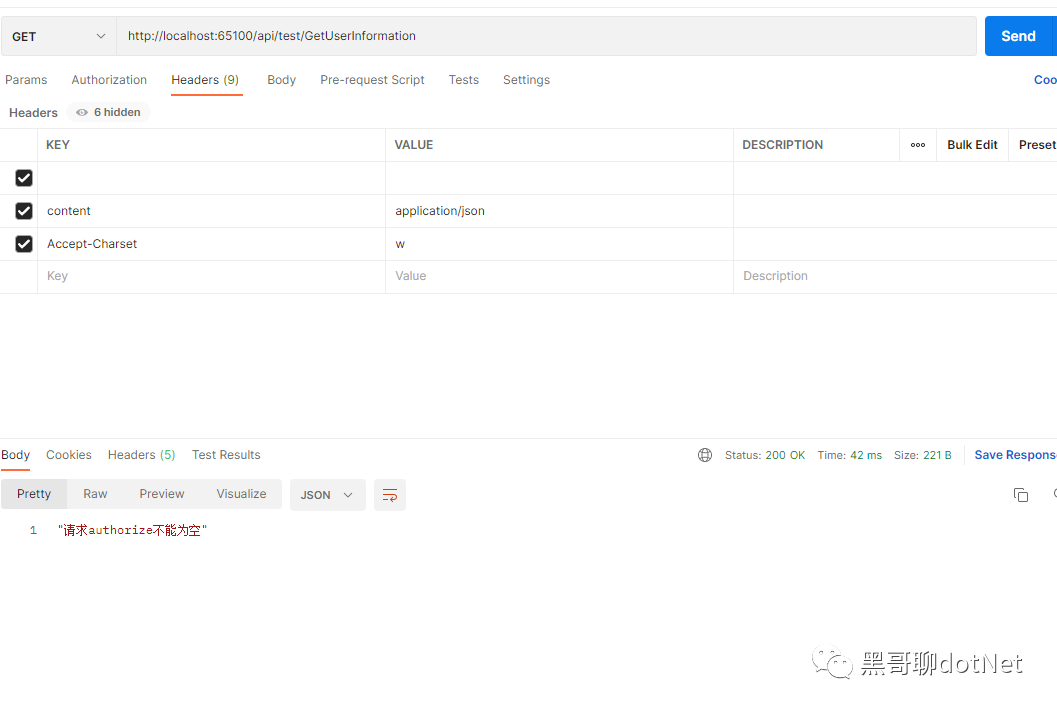
        var authorize = context.HttpContext.Request.Headers["MyAuthentication"];
        if (string.IsNullOrWhiteSpace(authorize))
        {
            context.Result = new JsonResult("请求authorize不能为空");
            return;
        }
        if (!MemoryCacheHelper.Exists(authorize))
        {
            context.Result = new JsonResult("无效的授权信息或授权信息已过期");
            return;
        }
    }
}
可能有的小伙伴发现了,那我们 Token 怎么去存取呢,一般的方案是使用 Cache 来处理,这里就不做过多讨论了,有想了解的小伙伴可以看我上一篇文章!
CacheHelper 代码
public class MemoryCacheHelper
{

    public static MemoryCache _cache = new MemoryCache(new MemoryCacheOptions());

    /// <summary>
    /// 验证缓存项是否存在
    /// </summary>
    /// <param name="key">缓存Key</param>
    /// <returns></returns>
    public static bool Exists(string key)
    {
        if (key == null)
        {
            throw new ArgumentNullException(nameof(key));
        }
        return _cache.TryGetValue(key, out _);
    }

    /// <summary>
    /// 获取缓存
    /// </summary>
    /// <param name="key">缓存Key</param>
    /// <returns></returns>
    public static object Get(string key)
    {
        if (key == null)
        {
            throw new ArgumentNullException(nameof(key));
        }
        if (!Exists(key))
            throw new ArgumentNullException(nameof(key));
        return _cache.Get(key);
    }

    /// <summary>
    /// 添加缓存
    /// </summary>
    /// <param name="key">缓存Key</param>
    /// <param name="value">缓存Value</param>
    /// <param name="expiresSliding">滑动过期时长(如果在过期时间内有操作,则以当前时间点延长过期时间)</param>
    /// <param name="expiressAbsoulte">绝对过期时长</param>
    /// <returns></returns>
    public static bool AddMemoryCache(string key, object value)
    {
        if (key == null)
        {
            throw new ArgumentNullException(nameof(key));
        }
        if (value == null)
        {
            throw new ArgumentNullException(nameof(value));
        }

        _cache.Set(key, value,
        new MemoryCacheEntryOptions()
        {
            SlidingExpiration = new TimeSpan(0, 0, 10),
            Priority = CacheItemPriority.NeverRemove,
            AbsoluteExpiration = DateTime.Now.AddMinutes(1)
        });
        return Exists(key);
    }
}
权限认证代码基本完成了,我们回到刚刚的流程
用户使用用户名密码来请求服务器, 服务器进行验证用户的信息,服务器通过验证发送给用户一个 token
对于一个商用软件来说绝大多数接口都需要应用授权后才能使用,所以我们注册到全局, 在 StartUp 类里面注册
public void ConfigureServices(IServiceCollection services)
{
    services.AddControllers(o=>
    {
        o.Filters.Add<ApiAuthorize>();
        o.Filters.Add<MyAuthentication>();
    });
}
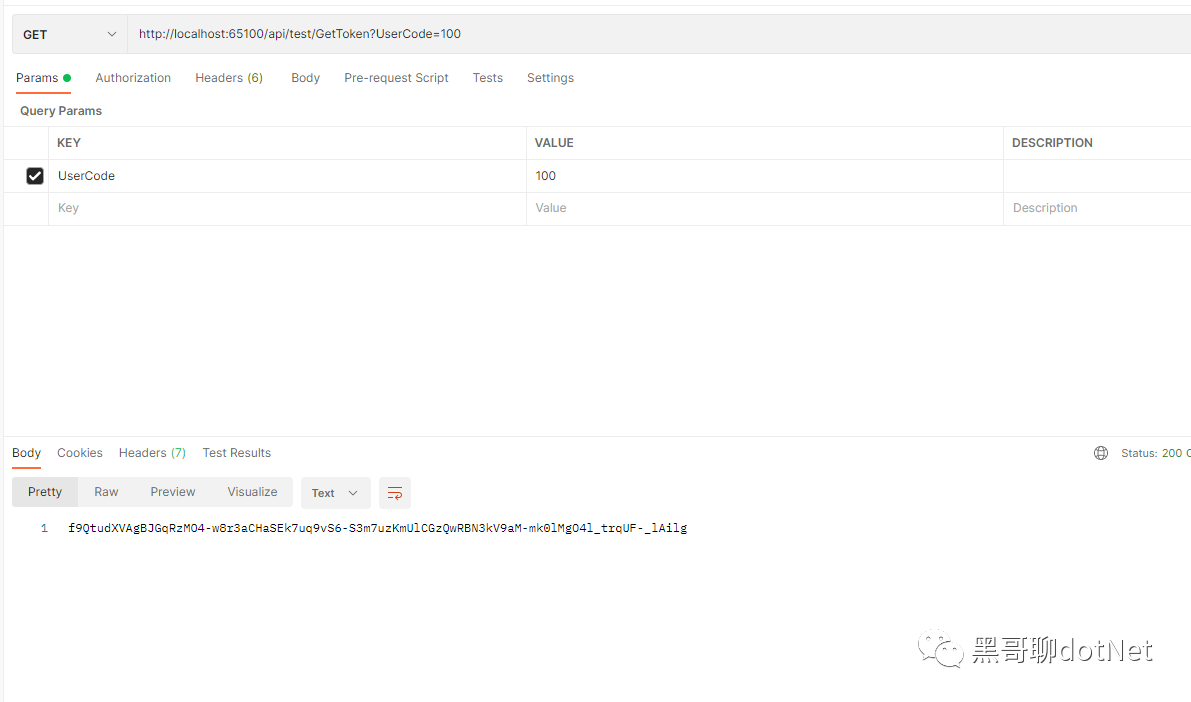
Token 生成原理我这里就不做过多解读了,本例子使用 AES 加密生成 Token 在我们服务端的请求 token 接口加上允许未通过身份验证也可以访问的特性,然后颁发一个 Token
[HttpGet("GetToken")]
[MyNoAuthentication]
public IActionResult GetToken(string UserCode)
{
   string token=  AESEncrypt.Encrypt(UserCode);
   MemoryCacheHelper.AddMemoryCache(token, User);
   eturn Ok(token);
}
使用 Postman 请求生成 token,如图所示
然后我们在新增一个需要应用授权的接口,由于我们注册了全局的应用授权特性就不需要在带上该特性了
[HttpGet("GetUserInformation")]
public IActionResult GetUserInformation()
{
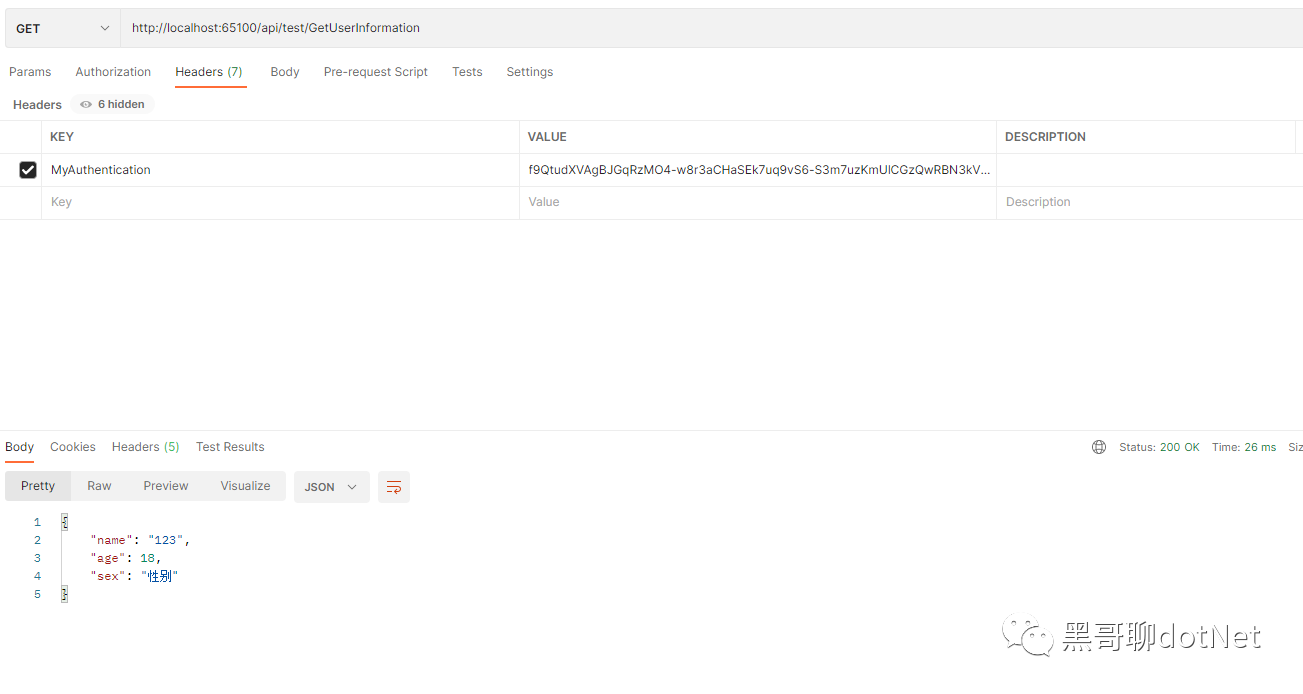
    return Ok(new { Name="123",Age=18,Sex="性别"});
}
不带 token 使用 postman 请求该接口,如图所示
带上 token 使用 postman 请求该接口,如图所示
通过刚才的例子我们清楚了解了权限认证的过程,今天的介绍就到此结束了!
最后大家如果喜欢我的文章,还麻烦给个关注并点个赞, 希望 net 生态圈越来越好!