(17/30)Learning Blazor Together: Establishing the Relationship Between Blog and Post

(17/30)Learning Blazor Together: Establishing the Relationship Between Blog and Post

Next, we will talk about database-related content, focusing on ASP.NET Core and EF Core. Only if there is a need to modify the page, we will mention Blazor. This part will take up more space.

Last updated 12/19/2021 6:56 PM
StrayaWorker
8 min read
Category
Blazor
Topic
Learning Blazor Together Series
Tags
.NET C# ASP.NET Core Blazor EF Core

Next, we'll cover database-related content, with emphasis on ASP.NET Core and EF Core. Blazor will be mentioned only when page modifications are needed, and this section will be more detailed.

Blog

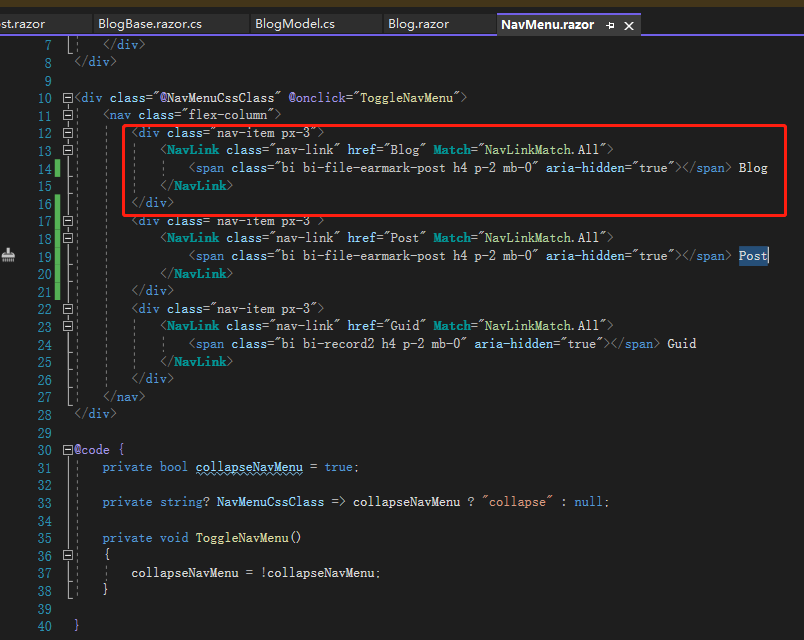
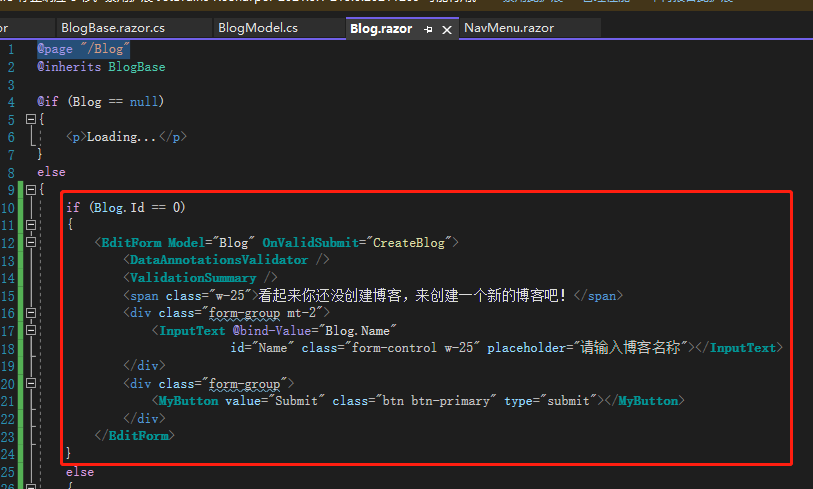
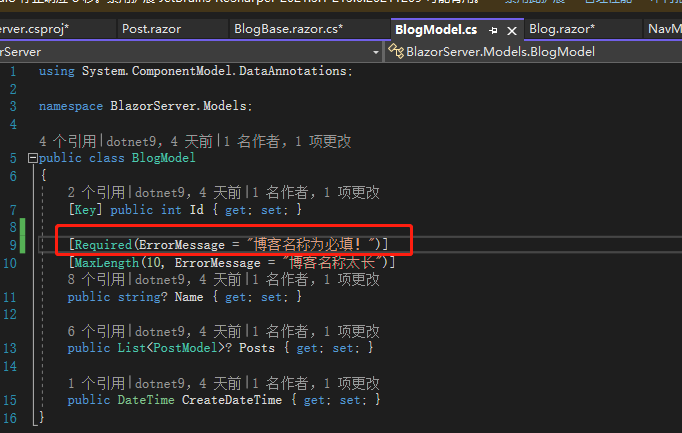
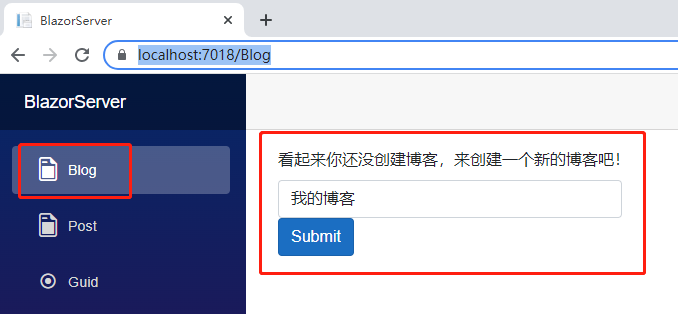
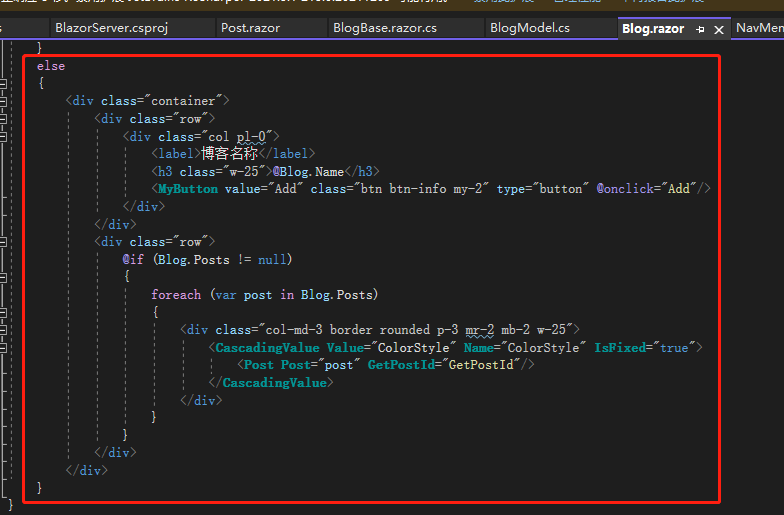
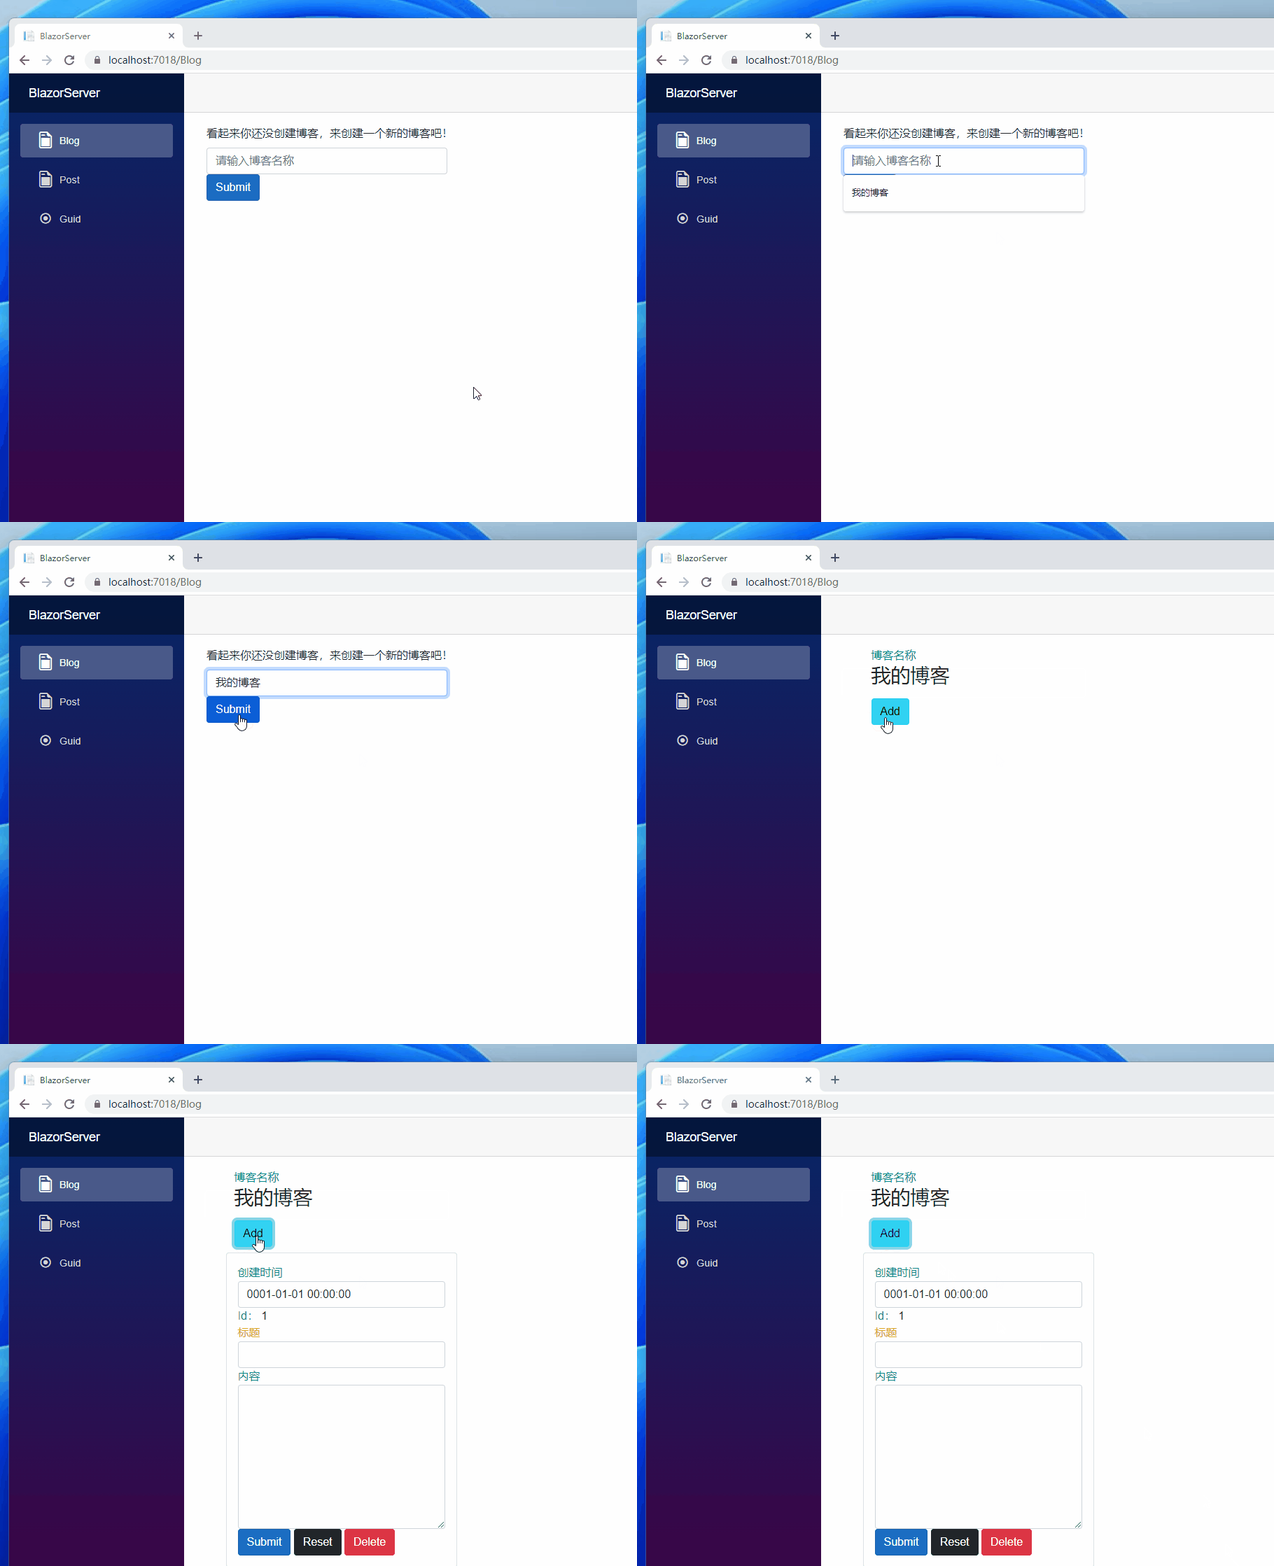
First, we need to separate Blog and Post. Add a link to Blog in NavMenu.razor, then modify Blog.razor. Since Blog.Id must have a value and be greater than 0 for it to be a valid blog entry, we display a form for the user to enter the blog name when Blog.Id equals 0. Additionally, add the Required attribute to the Name property in BlogModel, because a blog should have a name.

If it is not equal to 0, display the blog name and its posts, and change the blog name to use the <h3> element.

Line 12 has a parameter OnValidSubmit="CreateBlog", meaning that if form validation passes, the specified method CreateBlog will be executed. I have written a placeholder for it; once I finish explaining how to retrieve data, I'll elaborate further.

(Note: To trigger OnValidSubmit, there must be a button with type="submit"; otherwise, clicking won't have any effect.)

Someone might ask: what if Blog.Id is less than 0? Since this field is auto-incremented by the database starting from 1, this issue shouldn't normally occur unless someone tampers with the database. If you're concerned, you can add a constraint in the database to prevent values less than 0.

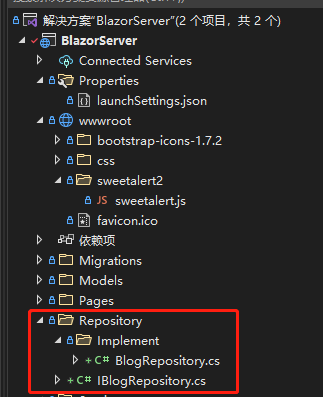
Now that we have the page, let's retrieve data. Create a folder Repository in the root directory, and within it create an interface IBlogRepository. Then create a subfolder Implement inside Repository and add a class BlogRepository. Folder structures vary; I use this approach because I've seen colleagues do it, and it helps quickly locate interfaces and implementations.

The interface (IBlogRepository) is simple: it defines methods. In the implementation (BlogRepository), lines 8–13 handle dependency injection of AppDbContext; lines 29–33 retrieve the first blog. On line 31, Include() is what we discussed yesterday—it avoids manually joining tables. The full name is Eager loading. As long as the relationships are properly defined when creating the tables, this saves time. Other approaches include Explicit loading and Lazy loading, all convenient features provided by Entity Framework Core. For one-to-one relationships, the SQL translates to Inner Join; for one-to-many, it becomes Left Join.

using BlazorServer.Models;

namespace BlazorServer.Repository;

public interface IBlogRepository
{
    Task<ResultViewModel> CreateBlog(BlogModel blog);
    Task<BlogModel> GetBlog();
}
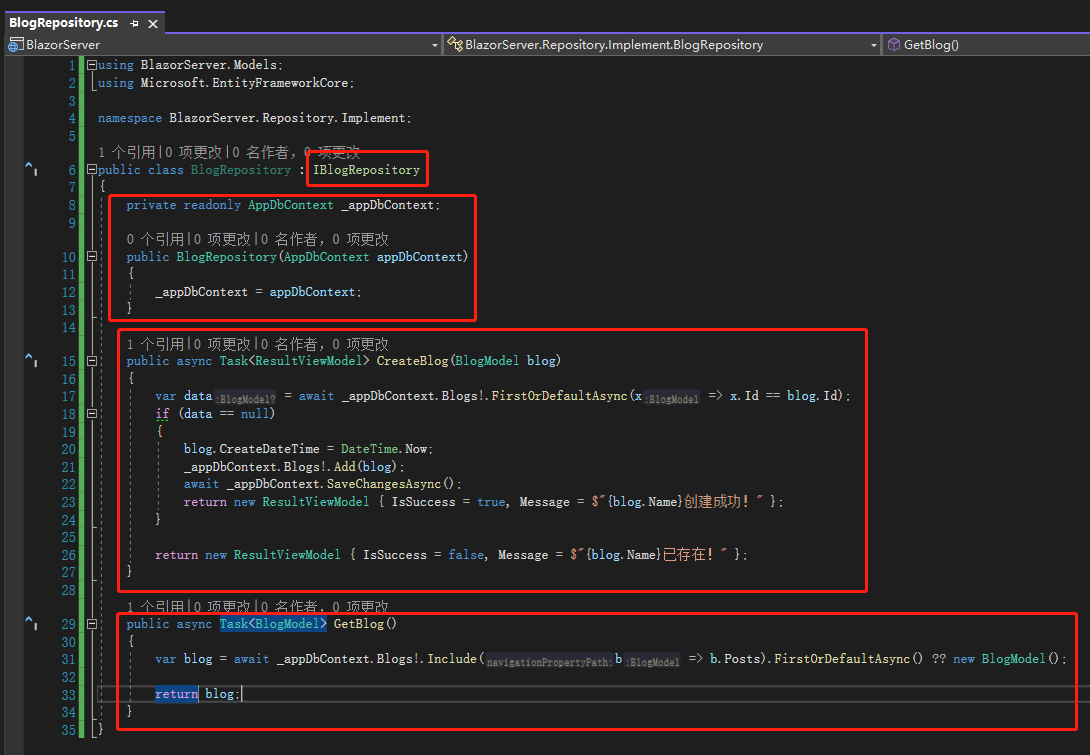
Normally, a Blog would be associated with a logged-in user (User), possibly with a table recording BlogId and UserId. But since we haven't implemented the login mechanism yet, we simply retrieve the first record. If there is no first record, meaning no blog has been created, return an empty Blog. Lines 15–27 handle the method for creating a blog. Line 17 checks whether the blog already exists; if not, it creates one. Regardless of existence, it returns an instance of ResultViewModel, which contains only two properties: IsSuccess and Message. Whether the frontend chooses to act based on IsSuccess is up to it.

namespace BlazorServer.Models;

public class ResultViewModel
{
    public bool IsSuccess { get; set; }
    public string? Message { get; set; }
}

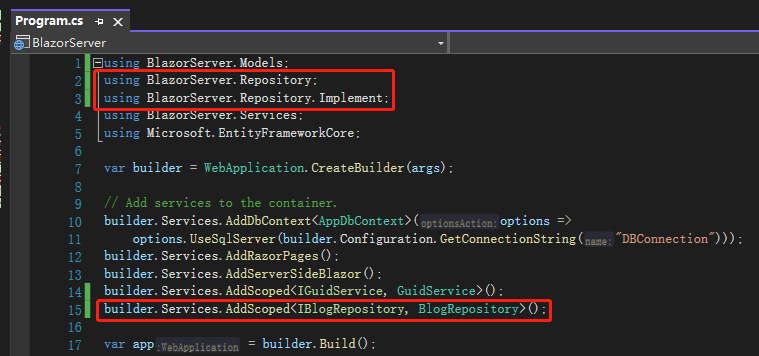
Next, register the newly created Repository in Program.cs. Some may ask: why are the GuidService and PostService from before called Service, while this one is called Repository? That's just my habit. In my previous Blazor projects, I used a multi-layer architecture: Backend API, Middle Model, Frontend Blazor. Files that handle data processing on the backend are suffixed with Repository, while files that retrieve data on the frontend are suffixed with Service. The division depends on the company's development model. Later, I extracted Service into a separate project, and later still, I extracted DbContext into another project—all to make it easier for other projects to reference Model or simply call Service without needing to reference the entire Blazor or API project.

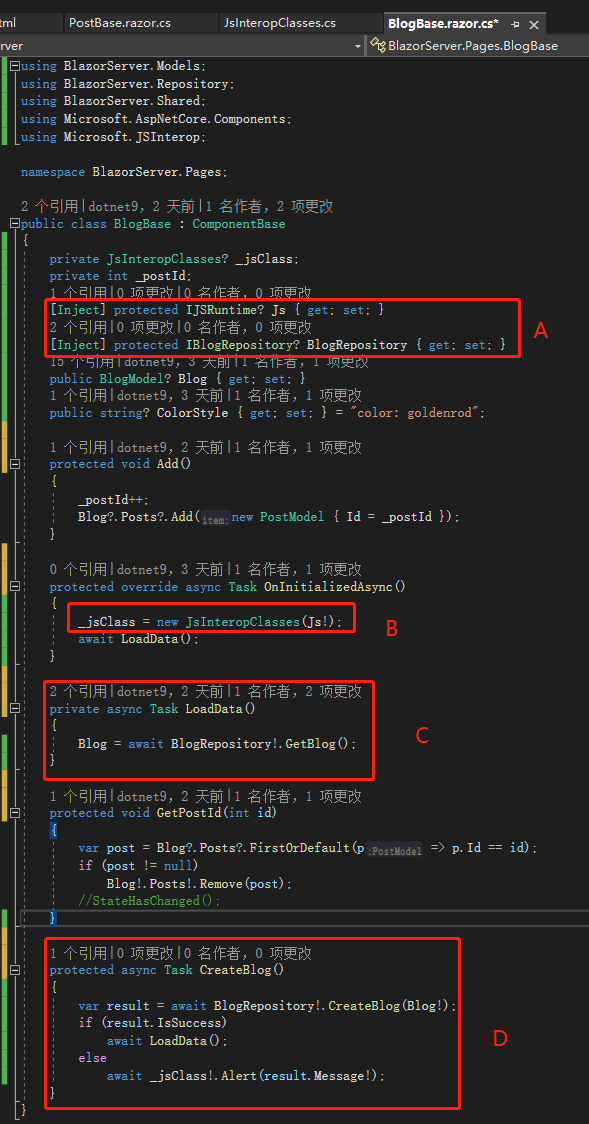
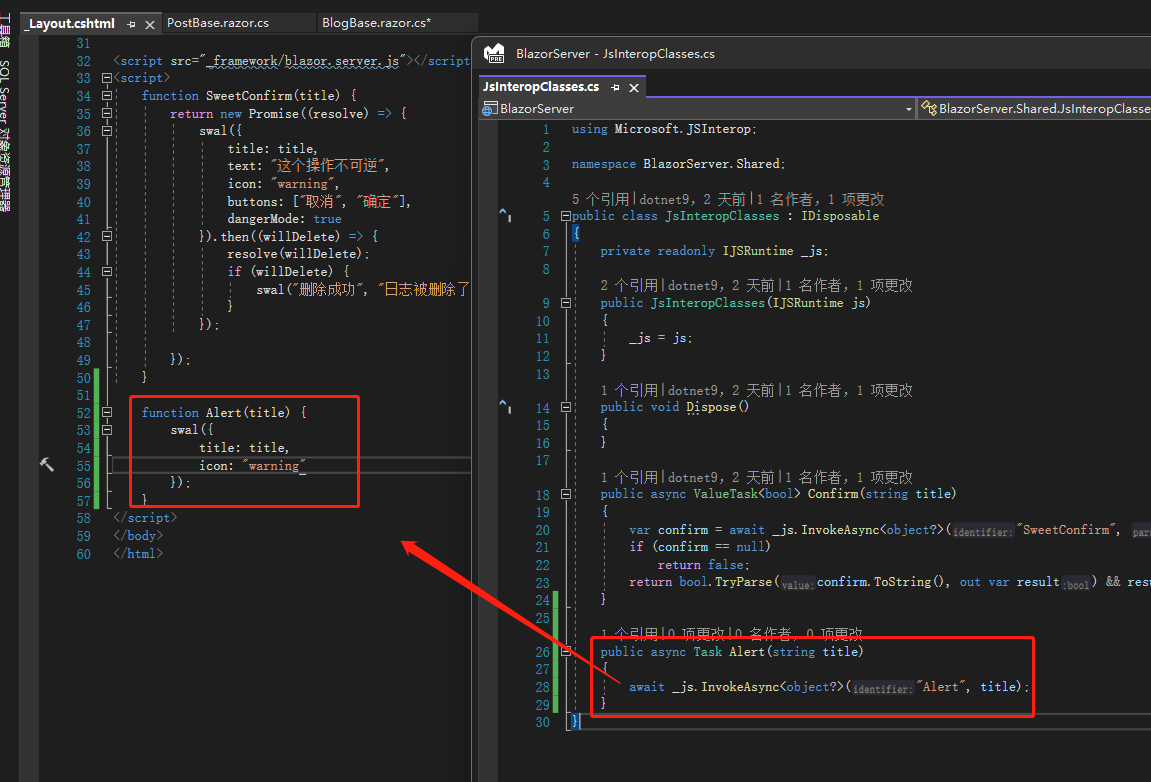
Finally, we have BlogBase.razor.cs. In Code Block A, inject IBlogRepository and IJSRuntime. In Code Block B, change the method OnInitializedAsync() to async, since data retrieval and storage are both asynchronous, so we need to follow suit. Code Block C calls the previously written GetBlog() method to retrieve the blog. Code Block D is the CreateBlog() method mentioned at the beginning of this section. If successful, it retrieves the blog data; if not, it uses the previously discussed JsInteropClasses to display the Message from the backend.

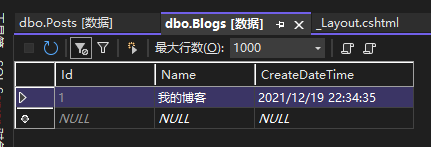
Now let's enter a blog name, submit it, and see the page change. Check the database—there should be a record in the Blog table.

Post

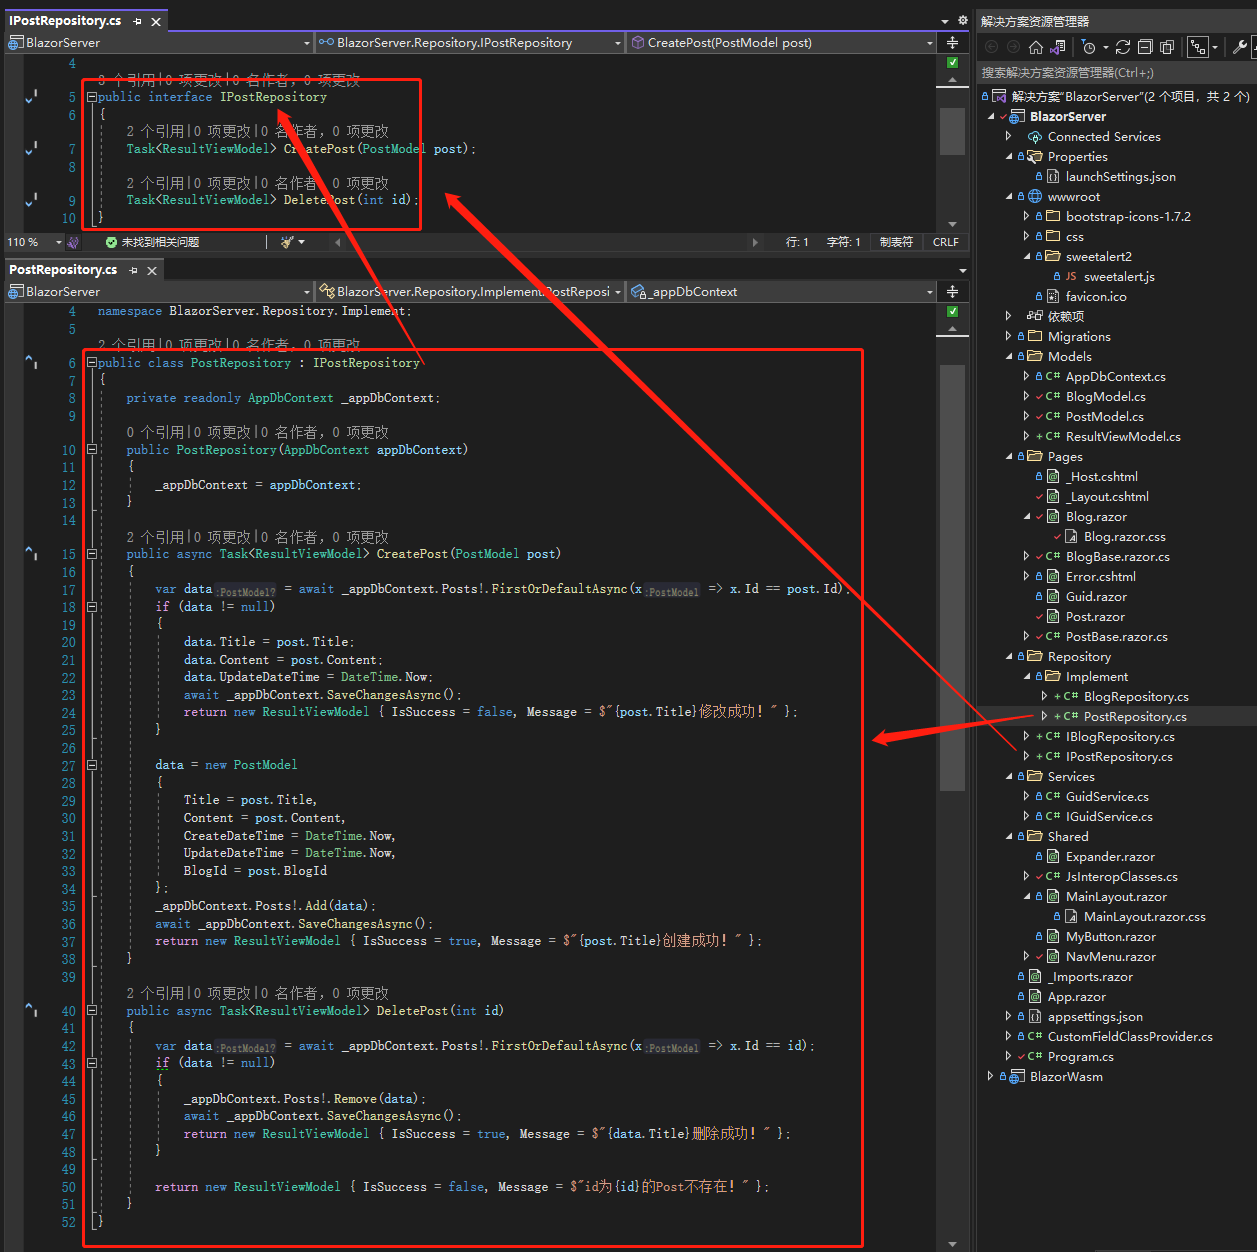
After covering Blog, today let's discuss Post. First, create IPostRepository and PostRepository, which contain only two methods: CreatePost() and DeletePost(). Why aren't there methods like GetPost() for a single post or GetPosts() for multiple posts? Because GetBlog() already includes Posts, so GetPosts() is unnecessary. If we later need to view a single post, we can add GetPost().

(Note: I haven't been involved in many systems, so I'm not sure if this design approach is common. It's only because we didn't have a complete design from the start that we're doing it this way.)

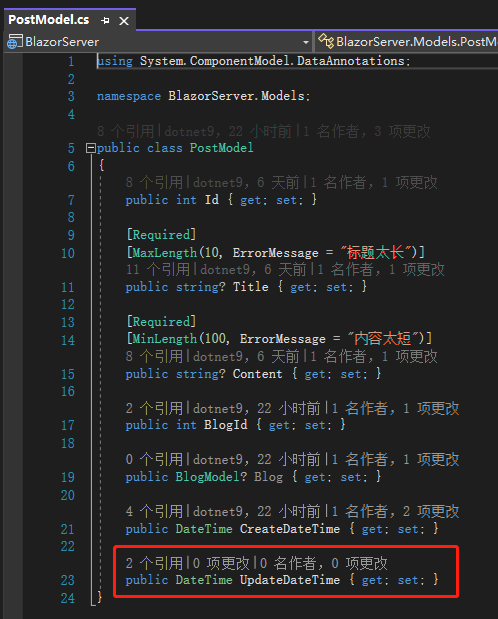
CreatePost() will add a new post if it doesn't exist in the database; if it does, it updates the existing one. Since updates require a modification timestamp, we add a UpdateDateTime field to PostModel.cs. Use the command Add-Migration to create a new migration, then Update-Database to update the database. Then register this newly created Repository in Program.cs.

(Note: I won't include screenshots for content already covered to save space.)

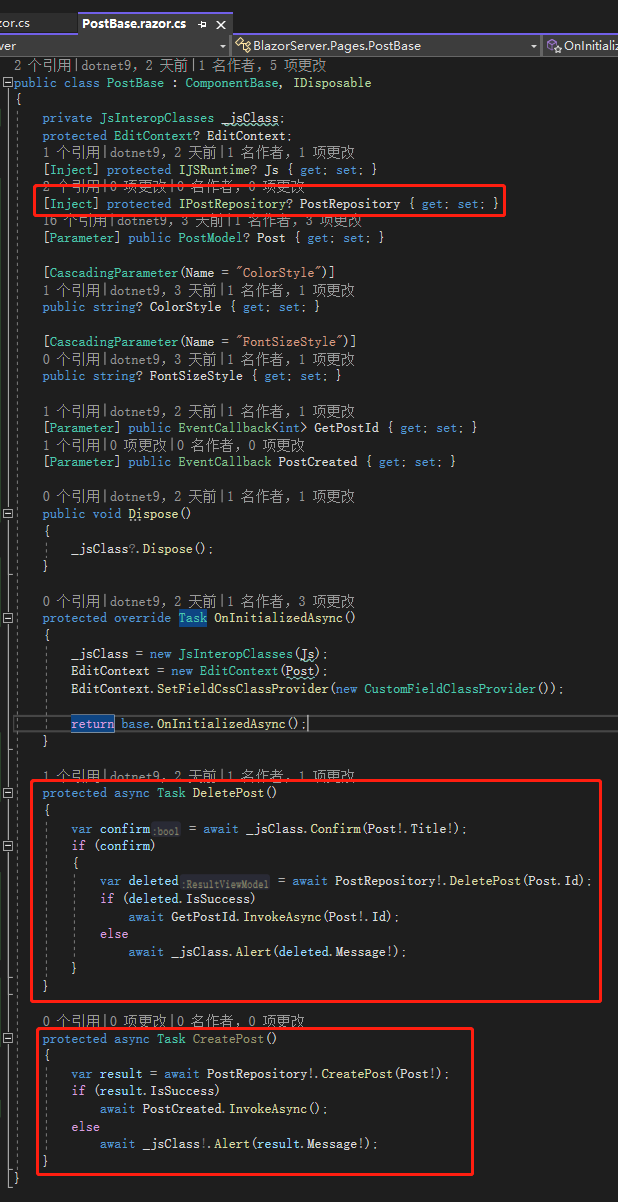
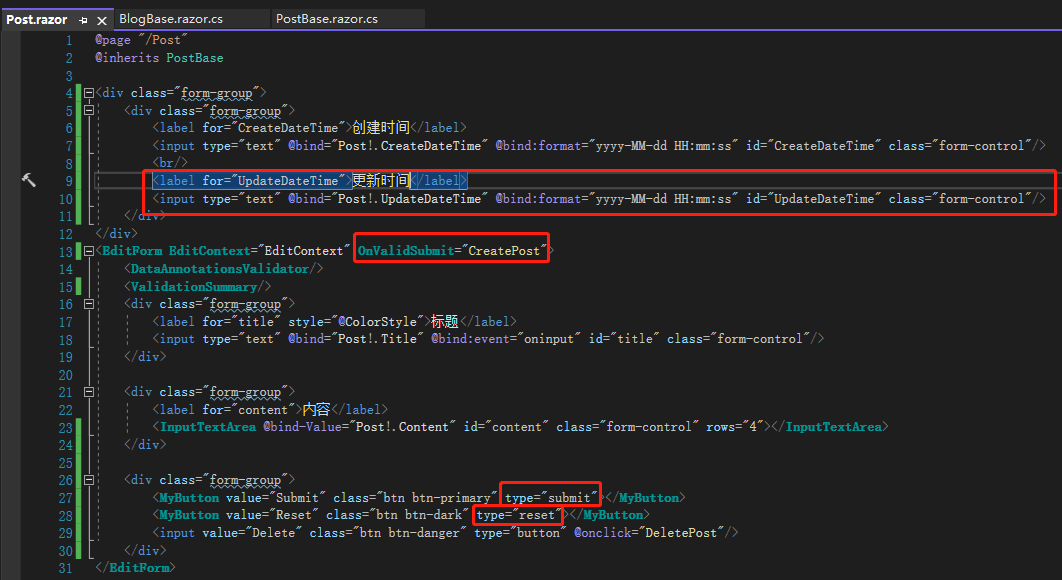
Next, go to PostBase.razor.cs and inject PostRepository. Modify DeletePost(), and add an event CreatePost() triggered by pressing the Submit button. In PostBase.razor, add the previously added update time UpdateDateTime and OnValidSubmit="CreatePost". Change the Submit button's type to submit so the form actually submits.

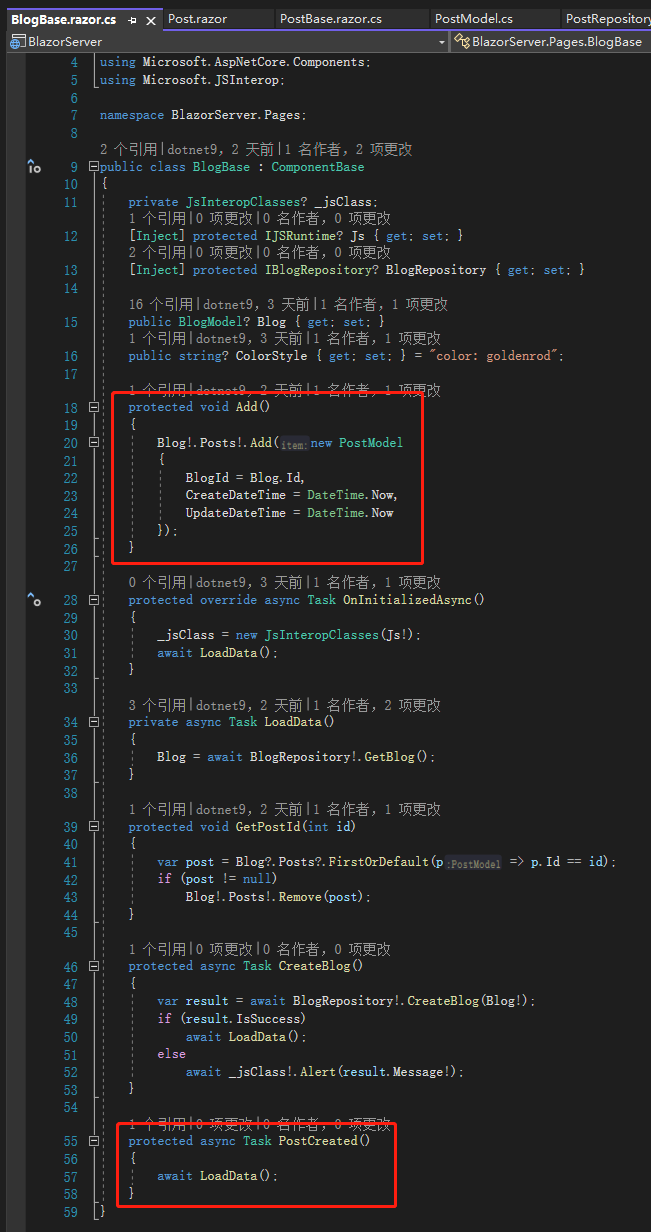
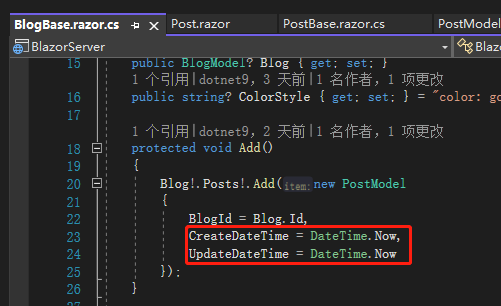
Now for the main part: go back to BlogBase.razor.cs, remove postId since it's no longer needed. Change Add() to pass BlogId and CreateDateTime to the new PostModel, so the post knows which blog it belongs to.

There are two choices for generating CreateDateTime and UpdateDateTime: on the frontend or backend. Which side to use depends on the system design. Since we want to avoid seeing an awkward timestamp like 0001-01-01 12:00:00 when adding a post, we provide DateTime.Now on the frontend. Whether the backend overwrites the incoming time is a design decision.

After entering content and clicking the Submit button, our first post is successfully created!

(Note: I learned these operations a while ago and don't remember where I saw them, so I'll include the learning sources.)

  1. Blazor tutorial for beginners
  2. Loading Related Data

Note: The code in this article has been refactored using .NET 6 + Visual Studio 2022. You can click the original article link to compare the refactored code. Thank you for reading, and support the original author.

Keep Exploring

Related Reading

More Articles
Same category / Same tag 12/25/2021

(29/30)Learn Blazor Together: Blazor Unit Testing

The most boring part of developing a system is probably fixing bugs, especially errors like trying to access a null object (`Object reference not set to an instance of an object.`), which is the most common problem most people encounter when they first step into programming. To break free from the tedious bug-fixing process, this article introduces `unit testing`.

Continue Reading
Same category / Same tag 12/25/2021

(28/30) Learning Blazor Together: Policy-based Authorization

It was mentioned earlier that `ASP.NET Core Identity` uses `Claim`-based authentication. In fact, `ASP.NET Core Identity` has different types of authorization methods, the simplest being `Login Authorization`, `Role Authorization`, and `Claim Authorization`. However, all of the above are implemented in one way: Policy-based Authorization.

Continue Reading