

学习 WPF 如果不学 MVVM,仿佛缺少了灵魂。那什么是 MVVM 呢?为什么要学 MVVM 呢,本以一个简单的增删改查的小例子,简述 MVVM 的基本知识及如何通过进行 MVVM 架构的程序开发,仅供学习分享使用,如有不足之处,还请指正。
什么是 MVVM?
MVVM 是 Model-View-ViewModel 的简写。它本质上就是 MVC (Model-View- Controller)的改进版。即模型-视图-视图模型。分别定义如下:
- 【模型】指的是后端传递的数据。
- 【视图】指的是所看到的页面。
- 【视图模型】mvvm 模式的核心,它是连接 view 和 model 的桥梁。它有两个方向:
- 一是将【模型】转化成【视图】,即将后端传递的数据转化成所看到的页面。实现的方式是:数据绑定。
- 二是将【视图】转化成【模型】,即将所看到的页面转化成后端的数据。实现的方式是:DOM 事件监听。这两个方向都实现的,我们称之为数据的双向绑定。
MVVM 示意图如下所示:

安装 MvvmLight 插件
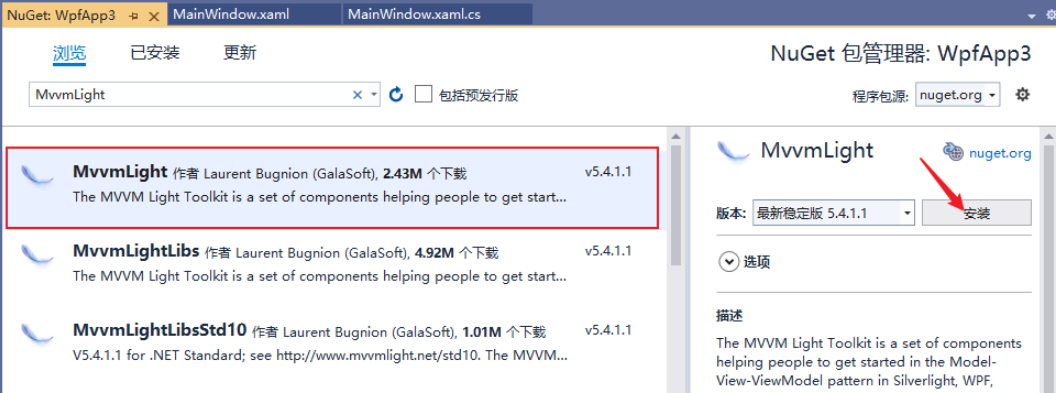
项目名称右键-->管理 NuGet 程序包-->搜索 MvvmLight-->安装。如下所示:
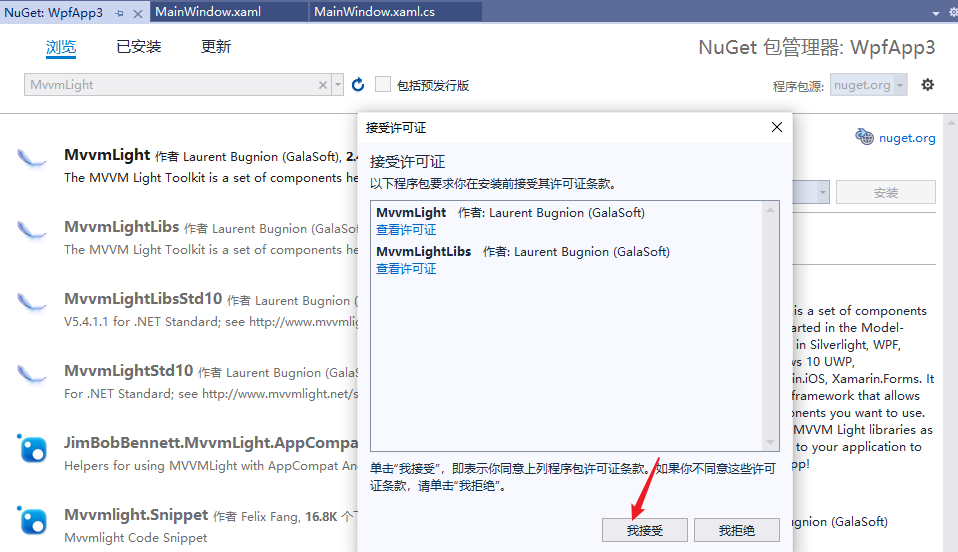
弹出接受许可证窗口,点击【接受】如下所示:
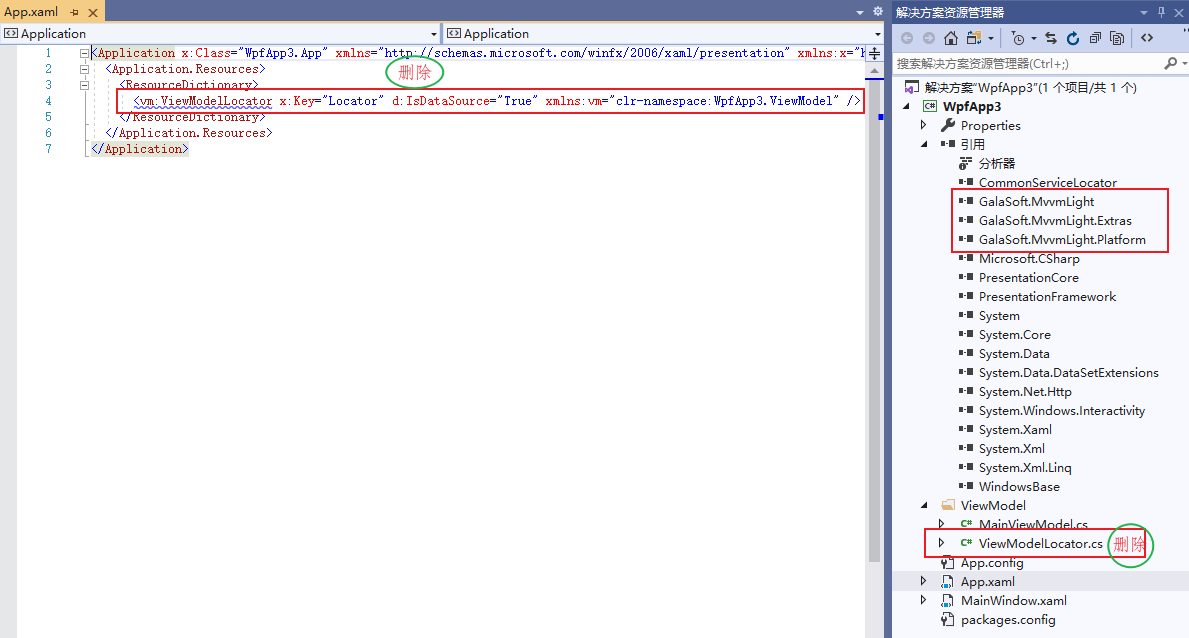
MvvmLight 安装成功后,自动引用需要的第三方库,并默认生成示例内容,有些不需要的需要删除,如下所示:
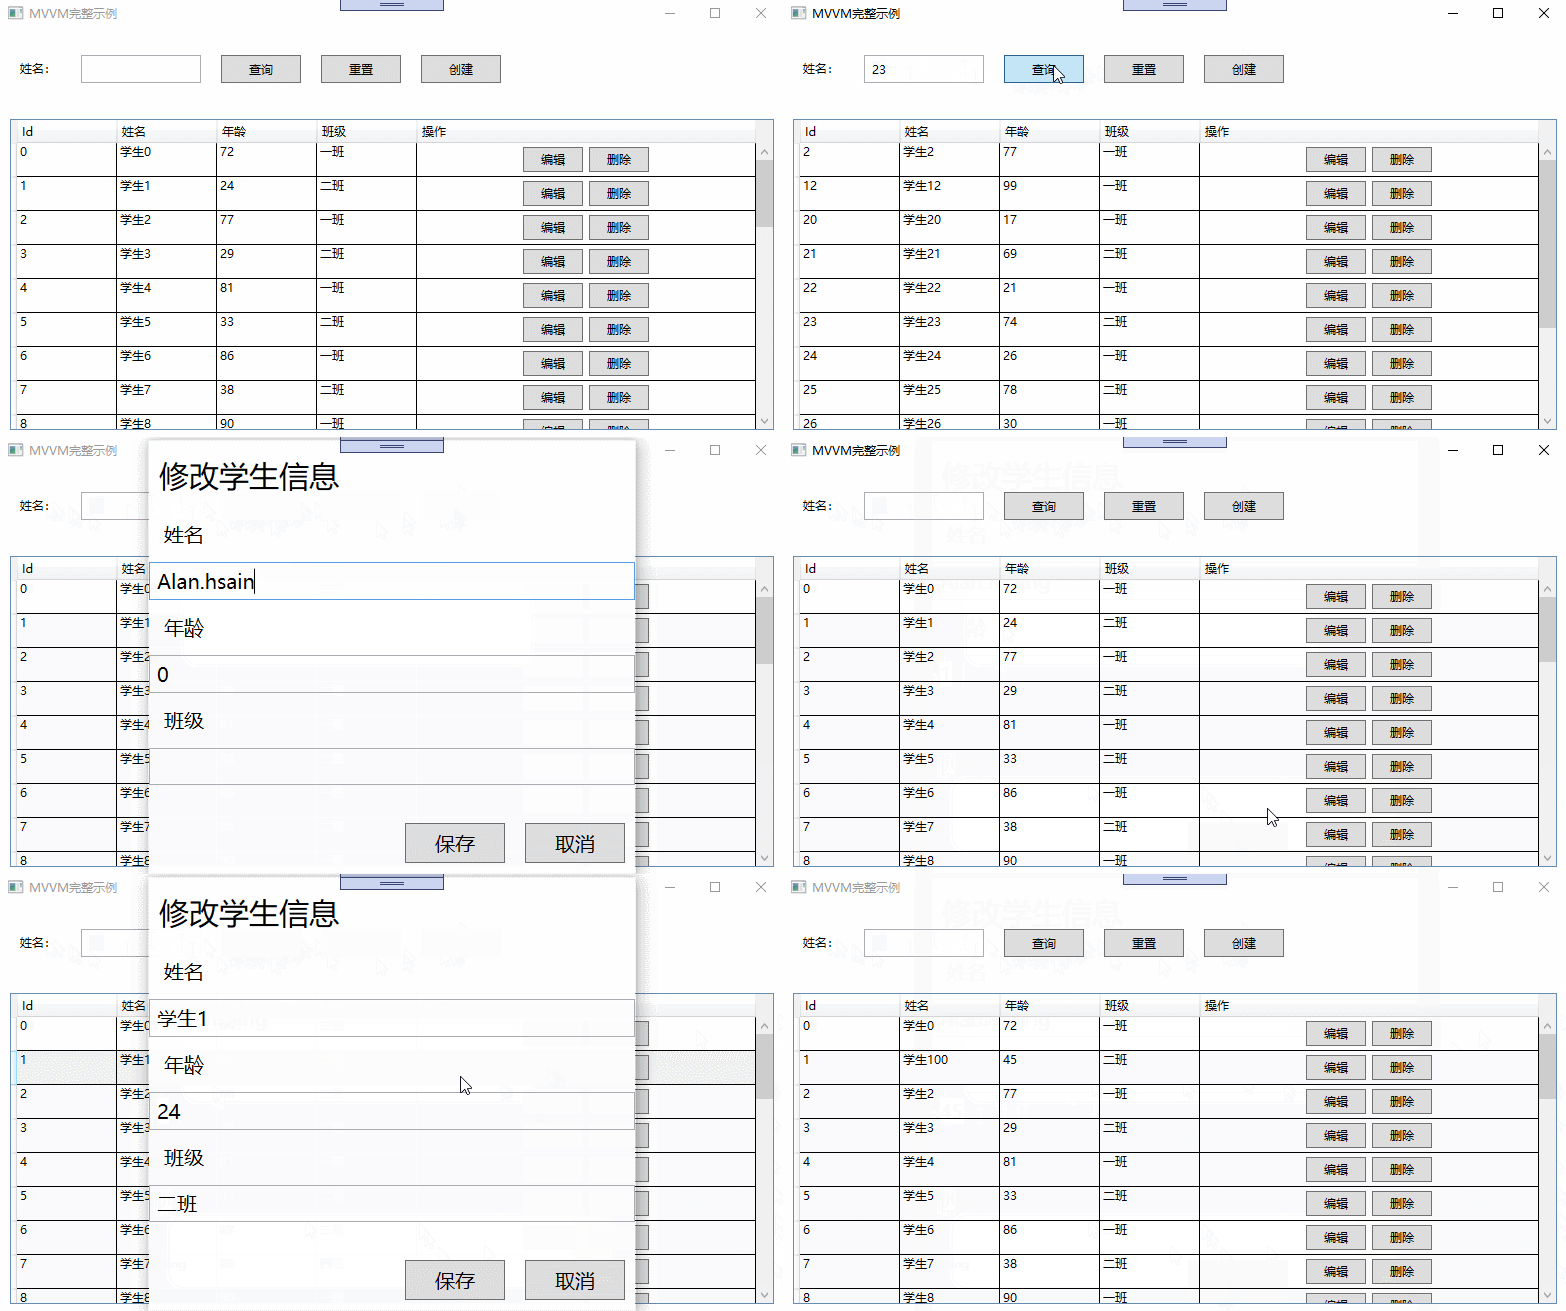
MVVM 示例截图
主要通过 MVVM 实现数据的 CRUD【增删改查】基础操作,如下所示:
MVVM 开发步骤
- 创建 Model 层
本例主要是对学生信息的增删改查,所以创建 Student 模型类,如下所示:
using System;
using System.Collections.Generic;
using System.Linq;
using System.Text;
using System.Threading.Tasks;

namespace WpfApp3.Models
{
    /// <summary>
    /// 学生类
    /// </summary>
    public class Student
    {
        /// <summary>
        /// 唯一标识
        /// </summary>
        public int Id { get; set; }

        /// <summary>
        /// 学生姓名
        /// </summary>
        public string Name { get; set; }

        /// <summary>
        /// 年龄
        /// </summary>
        public int Age { get; set; }

        /// <summary>
        /// 班级
        /// </summary>
        public string Classes { get; set; }
    }
}
- 创建 DAL 层
为了简化示例,模拟数据库操作,构建基础数据,如下所示:
using System;
using System.Collections.Generic;
using System.Linq;
using System.Text;
using System.Threading.Tasks;
using WpfApp3.Models;

namespace WpfApp3.DAL
{
    public class LocalDb
    {
        private List<Student> students;

        public LocalDb() {
            init();
        }

        /// <summary>
        /// 初始化数据
        /// </summary>
        private void init() {
            students = new List<Student>();
            for (int i = 0; i < 30; i++)
            {
                students.Add(new Student()
                {
                    Id=i,
                    Name=string.Format("学生{0}",i),
                    Age=new Random(i).Next(0,100),
                    Classes=i%2==0?"一班":"二班"
                });
            }
        }

        /// <summary>
        /// 查询数据
        /// </summary>
        /// <returns></returns>
        public List<Student> Query()
        {
            return students;
        }

        /// <summary>
        /// 按名字查询
        /// </summary>
        /// <param name="name"></param>
        /// <returns></returns>
        public List<Student> QueryByName(string name)
        {
            return students.Where((t) => t.Name.Contains(name)).ToList();//FindAll((t) => t.Name.Contains(name));
        }

        public Student QueryById(int Id)
        {
            var student = students.FirstOrDefault((t) => t.Id == Id);
            if (student != null)
            {
                return new Student() {
                    Id=student.Id,
                    Name=student.Name,
                    Age=student.Age,
                    Classes=student.Classes
                };
            }
            return null;
        }


        /// <summary>
        /// 新增学生
        /// </summary>
        /// <param name="student"></param>
        public void AddStudent(Student student)
        {
            if (student != null)
            {
                students.Add(student);
            }
        }

        /// <summary>
        /// 删除学生
        /// </summary>
        /// <param name="Id"></param>
        public void DelStudent(int Id)
        {
            var student = students.FirstOrDefault((t) => t.Id == Id); //students.Find((t) => t.Id == Id);
            if (student != null)
            {
                students.Remove(student);
            }

        }
    }


}
- 创建 View 层
View 层与用户进行交互,用户数据的展示,及事件的响应。在本例中,View 层主要有数据查询展示,新增及编辑页面。
在 View 层,主要是命令的绑定,及数据的绑定。
- 在 DataGridTextColumn 中通过 Binding=""的形式绑定要展示的列属性名。
- 在 Button 按钮上通过 Command=""的形式绑定要响应的命令。
- 在 TextBox 文本框中通过 Text=""的形式绑定查询条件属性。
数据展示窗口,如下所示:
<Window
  x:Class="WpfApp3.MainWindow"
  xmlns="http://schemas.microsoft.com/winfx/2006/xaml/presentation"
  xmlns:x="http://schemas.microsoft.com/winfx/2006/xaml"
  xmlns:d="http://schemas.microsoft.com/expression/blend/2008"
  xmlns:mc="http://schemas.openxmlformats.org/markup-compatibility/2006"
  xmlns:local="clr-namespace:WpfApp3"
  mc:Ignorable="d"
  Title="MainWindow"
  Height="450"
  Width="800"
>
  <Grid>
    <Grid.RowDefinitions>
      <RowDefinition Height="80"></RowDefinition>
      <RowDefinition Height="*"></RowDefinition>
    </Grid.RowDefinitions>
    <StackPanel
      Orientation="Horizontal"
      Grid.Row="0"
      Margin="5"
      VerticalAlignment="Center"
    >
      <TextBlock Text="姓名:" Margin="10" Padding="5"></TextBlock>
      <TextBox
        x:Name="sname"
        Text="{Binding Search}"
        Width="120"
        Margin="10"
        Padding="5"
      ></TextBox>
      <button
        x:Name="btnQuery"
        Content="查询"
        Margin="10"
        Padding="5"
        Width="80"
        Command="{Binding QueryCommand}"
      ></button>
      <button
        x:Name="btnReset"
        Content="重置"
        Margin="10"
        Padding="5"
        Width="80"
        Command="{Binding ResetCommand}"
      ></button>
      <button
        x:Name="btnAdd"
        Content="创建"
        Margin="10"
        Padding="5"
        Width="80"
        Command="{Binding AddCommand}"
      ></button>
    </StackPanel>
    <DataGrid
      x:Name="dgInfo"
      Grid.Row="1"
      AutoGenerateColumns="False"
      CanUserAddRows="False"
      CanUserSortColumns="False"
      Margin="10"
      ItemsSource="{Binding GridModelList}"
    >
      <DataGrid.Columns>
        <DataGridTextColumn
          Header="Id"
          Width="100"
          Binding="{Binding Id}"
        ></DataGridTextColumn>
        <DataGridTextColumn
          Header="姓名"
          Width="100"
          Binding="{Binding Name}"
        ></DataGridTextColumn>
        <DataGridTextColumn
          Header="年龄"
          Width="100"
          Binding="{Binding Age}"
        ></DataGridTextColumn>
        <DataGridTextColumn
          Header="班级"
          Width="100"
          Binding="{Binding Classes}"
        ></DataGridTextColumn>
        <DataGridTemplateColumn Header="操作" Width="*">
          <DataGridTemplateColumn.CellTemplate>
            <DataTemplate>
              <StackPanel
                Orientation="Horizontal"
                VerticalAlignment="Center"
                HorizontalAlignment="Center"
              >
                <button
                  x:Name="edit"
                  Content="编辑"
                  Width="60"
                  Margin="3"
                  Height="25"
                  CommandParameter="{Binding Id}"
                  Command="{Binding DataContext.EditCommand, RelativeSource={RelativeSource Mode=FindAncestor, AncestorType=DataGrid}}"
                ></button>
                <button
                  x:Name="delete"
                  Content="删除"
                  Width="60"
                  Margin="3"
                  Height="25"
                  CommandParameter="{Binding Id}"
                  Command="{Binding DataContext.DeleteCommand, RelativeSource={RelativeSource Mode=FindAncestor, AncestorType=DataGrid}}"
                ></button>
              </StackPanel>
            </DataTemplate>
          </DataGridTemplateColumn.CellTemplate>
        </DataGridTemplateColumn>
      </DataGrid.Columns>
    </DataGrid>
  </Grid>
</Window>
新增及编辑页面,如下所示:
<Window
  x:Class="WpfApp3.Views.StudentWindow"
  xmlns="http://schemas.microsoft.com/winfx/2006/xaml/presentation"
  xmlns:x="http://schemas.microsoft.com/winfx/2006/xaml"
  xmlns:d="http://schemas.microsoft.com/expression/blend/2008"
  xmlns:mc="http://schemas.openxmlformats.org/markup-compatibility/2006"
  xmlns:local="clr-namespace:WpfApp3.Views"
  mc:Ignorable="d"
  Title="StudentWindow"
  Height="440"
  Width="500"
  AllowsTransparency="False"
  WindowStartupLocation="CenterScreen"
  WindowStyle="None"
>
  <Grid>
    <Grid.RowDefinitions>
      <RowDefinition Height="60"></RowDefinition>
      <RowDefinition></RowDefinition>
      <RowDefinition Height="60"></RowDefinition>
    </Grid.RowDefinitions>
    <TextBlock FontSize="30" Margin="10">修改学生信息</TextBlock>
    <StackPanel Grid.Row="1" Orientation="Vertical">
      <TextBlock FontSize="20" Margin="10" Padding="5">姓名</TextBlock>
      <TextBox
        x:Name="txtName"
        FontSize="20"
        Padding="5"
        Text="{Binding Model.Name}"
      ></TextBox>
      <TextBlock FontSize="20" Margin="10" Padding="5">年龄</TextBlock>
      <TextBox
        x:Name="txtAge"
        FontSize="20"
        Padding="5"
        Text="{Binding Model.Age}"
      ></TextBox>
      <TextBlock FontSize="20" Margin="10" Padding="5">班级</TextBlock>
      <TextBox
        x:Name="txtClasses"
        FontSize="20"
        Padding="5"
        Text="{Binding Model.Classes}"
      ></TextBox>
    </StackPanel>
    <StackPanel
      Grid.Row="2"
      Orientation="Horizontal"
      HorizontalAlignment="Right"
    >
      <button
        x:Name="btnSave"
        Content="保存"
        Margin="10"
        FontSize="20"
        Width="100"
        Click="btnSave_Click"
      ></button>
      <button
        x:Name="btnCancel"
        Content="取消"
        Margin="10"
        FontSize="20"
        Width="100"
        Click="btnCancel_Click"
      ></button>
    </StackPanel>
  </Grid>
</Window>
- 创建 ViewModel 层
ViewModel 层是 MVVM 的核心所在,起到承上启下的作用。ViewModel 需要继承 GalaSoft.MvvmLight.ViewModelBase 基类。
ViewModel 中属性实现数据的绑定,命令实现用户交互的响应。如下所示:
using GalaSoft.MvvmLight;
using GalaSoft.MvvmLight.Command;
using System.Collections.Generic;
using System.Collections.ObjectModel;
using System.Linq;
using System.Windows;
using WpfApp3.DAL;
using WpfApp3.Models;
using WpfApp3.Views;

namespace WpfApp3.ViewModel
{
    /// <summary>
    ///
    /// </summary>
    public class MainViewModel : ViewModelBase
    {
        #region 属性及构造函数

        private LocalDb localDb;

        private ObservableCollection<Student> gridModelList;

        public ObservableCollection<Student> GridModelList
        {
            get { return gridModelList; }
            set
            {
                gridModelList = value;
                RaisePropertyChanged();
            }
        }

        /// <summary>
        /// 查询条件
        /// </summary>
        private string search;

        public string Search
        {
            get { return search; }
            set
            {
                search = value;
                RaisePropertyChanged();
            }
        }


        /// <summary>
        ///
        /// </summary>
        public MainViewModel()
        {
            localDb = new LocalDb();
            QueryCommand = new RelayCommand(this.Query);
            ResetCommand = new RelayCommand(this.Reset);
            EditCommand = new RelayCommand<int>(this.Edit);
            DeleteCommand = new RelayCommand<int>(this.Delete);
            AddCommand = new RelayCommand(this.Add);
        }

        #endregion

        #region command

        /// <summary>
        /// 查询命令
        /// </summary>
        public RelayCommand QueryCommand { get; set; }

        /// <summary>
        /// 重置命令
        /// </summary>
        public RelayCommand ResetCommand { get; set; }

        /// <summary>
        /// 编辑
        /// </summary>
        public RelayCommand<int> EditCommand { get; set; }

        /// <summary>
        /// 删除
        /// </summary>
        public RelayCommand<int> DeleteCommand { get; set; }

        /// <summary>
        /// 新增
        /// </summary>
        public RelayCommand AddCommand { get; set; }

        #endregion

        public void Query()
        {
            List<Student> students;
            if (string.IsNullOrEmpty(search))
            {
                students = localDb.Query();
            }
            else
            {
                students = localDb.QueryByName(search);
            }

            GridModelList = new ObservableCollection<Student>();
            if (students != null)
            {
                students.ForEach((t) =>
                {
                    GridModelList.Add(t);
                });
            }
        }

        /// <summary>
        /// 重置
        /// </summary>
        public void Reset()
        {
            this.Search = string.Empty;
            this.Query();
        }

        /// <summary>
        /// 编辑
        /// </summary>
        /// <param name="Id"></param>
        public void Edit(int Id)
        {
            var model = localDb.QueryById(Id);
            if (model != null)
            {
                StudentWindow view = new StudentWindow(model);
                var r = view.ShowDialog();
                if (r.Value)
                {
                    var newModel = GridModelList.FirstOrDefault(t => t.Id == model.Id);
                    if (newModel != null)
                    {
                        newModel.Name = model.Name;
                        newModel.Age = model.Age;
                        newModel.Classes = model.Classes;
                    }
                    this.Query();
                }
            }
        }

        /// <summary>
        /// 删除
        /// </summary>
        /// <param name="Id"></param>
        public void Delete(int Id)
        {
            var model = localDb.QueryById(Id);
            if (model != null)
            {
                var r = MessageBox.Show($"确定要删除吗【{model.Name}】?","提示",MessageBoxButton.YesNo);
                if (r == MessageBoxResult.Yes)
                {
                    localDb.DelStudent(Id);
                    this.Query();
                }
            }
        }

        /// <summary>
        /// 新增
        /// </summary>
        public void Add()
        {
            Student model = new Student();
            StudentWindow view = new StudentWindow(model);
            var r = view.ShowDialog();
            if (r.Value)
            {
                model.Id = GridModelList.Max(t => t.Id) + 1;
                localDb.AddStudent(model);
                this.Query();
            }
        }
    }
}
- 数据上下文
当各个层分别创建好后,那如何关联起来呢?答案就是 DataContext【数据上下文】。
查询页面上下文,如下所示:
namespace WpfApp3
{
    /// <summary>
    /// MainWindow.xaml 的交互逻辑
    /// </summary>
    public partial class MainWindow : Window
    {
        public MainWindow()
        {
            InitializeComponent();
            MainViewModel viewModel = new MainViewModel();
            viewModel.Query();
            this.DataContext = viewModel;
        }
    }
}
新增页面上下文,如下所示:
namespace WpfApp3.Views
{
    /// <summary>
    /// StudentWindow.xaml 的交互逻辑
    /// </summary>
    public partial class StudentWindow : Window
    {
        public StudentWindow(Student student)
        {
            InitializeComponent();
            this.DataContext = new
            {
                Model = student
            };
        }

        private void btnSave_Click(object sender, RoutedEventArgs e)
        {
            this.DialogResult = true;
        }

        private void btnCancel_Click(object sender, RoutedEventArgs e)
        {
            this.DialogResult = false;
        }
    }
}
总结
MVVM 具有低耦合,可重用,可测试,独立开发的优点,核心要素就两个:
- 属性发生变化时的通知,即可达到数据的实时更新。
- 命令是实现用户与程序之间数据和算法的桥梁。
备注
本文作为 MVVM 的简单入门示例,旨在抛砖引玉,一起学习,共同进步。如果对 WPF 的其他入门知识,不是很了解,可以参考其他博文。
玉楼春·别后不知君远近
欧阳修 〔宋代〕
别后不知君远近,触目凄凉多少闷。渐行渐远渐无书,水阔鱼沉何处问。
夜深风竹敲秋韵,万叶千声皆是恨。故攲单枕梦中寻,梦又不成灯又烬。注:攲(yǐ)
