
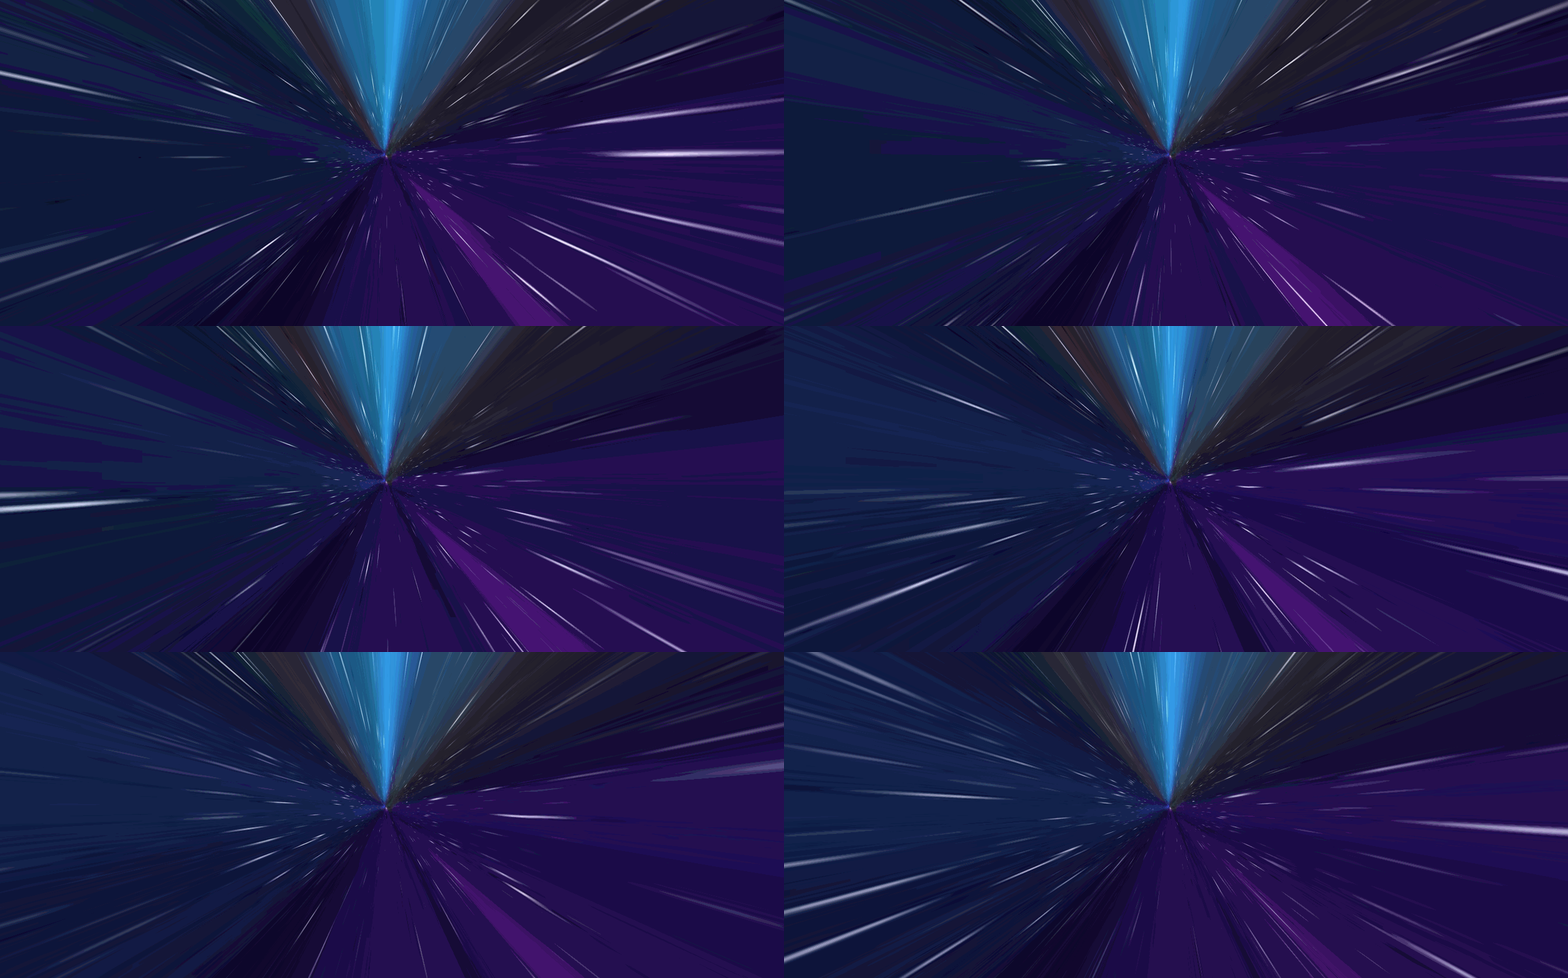
CSS 效果博客地址:
3D 穿梭效果?使用 CSS 轻松搞定 - ChokCoco - 博客园 (cnblogs.com)
UWP 效果博客地址
3D 穿梭效果?使用 UWP 也能搞定 - dino.c - 博客园 (cnblogs.com)
大佬们真实登峰造极啊。
真是能学到很多东西啊。
我也就凑凑热闹,用 WPF 来试试,效果不算太好,勉强过得去吧。

相对 CSS 和 UWP,老牌的 WPF 对于 3D 效果的操作是相对繁琐的。 要首先做出 3D 模型,接着旋转 XY 轴,其次调整 Z 轴拉伸,最后一步调整 FOV。 穿梭效果要靠这 Z 轴拉伸的数字决定,图中是 10-20。
当然最难的是动画的首尾衔接。
我们来一步一步的做。
制作 3D 模型
这一块可以直接用不用 2D 控件其实没啥可以研究,所以就直接是 3D 模型,让图片以贴图的形式存在。
至于 3D 模型制作,总结一点就是由左到右开始。
- Positions
3D 模型是三角组成,所以描述一个物体的样子时候,尽可能画三角形。每个点就是顶点,如果存在相同的顶点,选择一个就行。
描述顶点的时候是 XYZ,当你正面看物体,物体的 Z 轴是指向你的方向为正方向。Y 轴是向上为正,X 轴是向右为正。
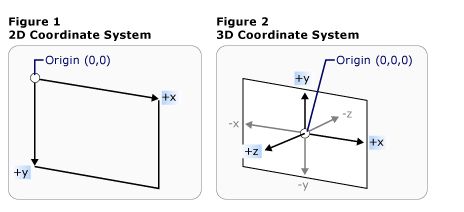
这里值得注意的是,为了方便 ,建议使用左 左下 右下 右上的顺序去定义点。
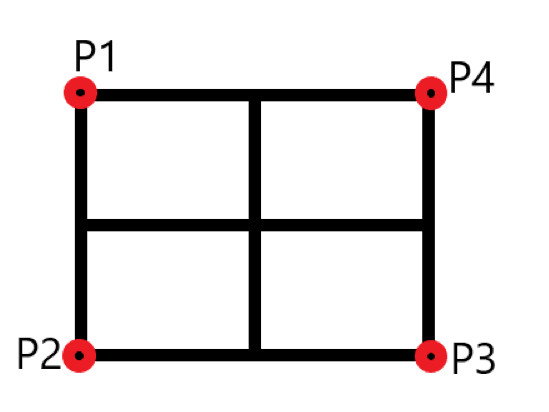
这个模型的顶点定义就是 P1(x,y,z), P2(x,y,z) ,P3(x,y,z) ,P4(x,y,z)
- TriangleIndices
这个就是 描述 这些顶点是如何组成三角形。当我们认为一个面是正面时,要记得逆时针定义顶点集合下标。顶点集合就是 Positions,内容就是你输入的坐标点,下标由 0 开始。
背面为顺时针。
- TextureCoordinates
这个是材质的定位顺序,这个比较 2D 坐标系,和其他的不同。也就是左上角为 0,0 右下角为 1,1,也就是普通的屏幕坐标系
做好模型,要做四个哦。
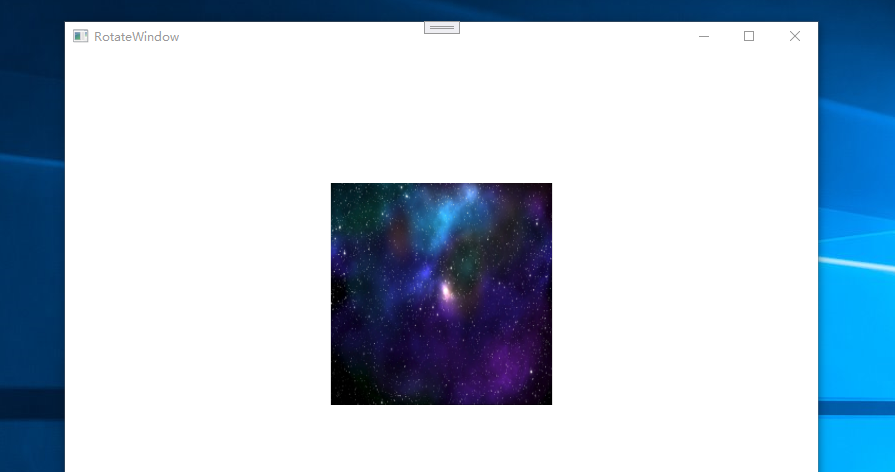
旋转 3d 模型
这个就比较有意思了,上面模型做好了四个,我们要组成四个面,也就是旋转 Y 轴,旋转 X 轴,但是方向是不一样的。旋转我们使用 Transform 就可以了。

看起来还行。
我们来做四个图片并试试。
方便调试,我们带着进度条。
资源
<MeshGeometry3D x:Key="Rect3D_O">
  <MeshGeometry3D.Positions>
    -50, 50, 0, -50, -50, 0, 50, -50, 0, 50, 50, 0
  </MeshGeometry3D.Positions>
  <MeshGeometry3D.TriangleIndices> 0 1 2 2 3 0 </MeshGeometry3D.TriangleIndices>
  <MeshGeometry3D.TextureCoordinates>
    0,0 0,1 1,1 1,0
  </MeshGeometry3D.TextureCoordinates>
  <MeshGeometry3D.Normals> 0,0,1, 0,0,1, 0,0,1, 0,0,1 </MeshGeometry3D.Normals>
</MeshGeometry3D>
<DiffuseMaterial x:Key="Img">
  <DiffuseMaterial.Brush>
    <ImageBrush ImageSource="start.jpg" />
  </DiffuseMaterial.Brush>
</DiffuseMaterial>
<Viewport3D x:Name="View3D_2">
  <Viewport3D.Camera>
    <PerspectiveCamera
      FieldOfView="{Binding ElementName=FOV, Path=Value}"
      Position="0,0,100"
      LookDirection="0,0,-1"
    />
  </Viewport3D.Camera>
  <ModelVisual3D>
    <ModelVisual3D.Content>
      <Model3DGroup>
        <AmbientLight Color="White" />
        <GeometryModel3D
          Geometry="{StaticResource Rect3D_O}"
          Material="{StaticResource Img}"
          BackMaterial="{StaticResource Img}"
        >
          <GeometryModel3D.Transform>
            <Transform3DGroup>
              <RotateTransform3D CenterX="0" CenterY="1" CenterZ="0">
                <RotateTransform3D.Rotation>
                  <AxisAngleRotation3D
                    Angle="{Binding ElementName=Left_Top_Z, Path=Value}"
                    Axis="0 1 0"
                  />
                </RotateTransform3D.Rotation>
              </RotateTransform3D>
              <ScaleTransform3D
                ScaleZ="{Binding  ElementName=ScaleZ_2, Path=Value}"
              />
            </Transform3DGroup>
          </GeometryModel3D.Transform>
        </GeometryModel3D>
        <GeometryModel3D
          Geometry="{StaticResource Rect3D_O}"
          Material="{StaticResource Img}"
          BackMaterial="{StaticResource Img}"
        >
          <GeometryModel3D.Transform>
            <Transform3DGroup>
              <RotateTransform3D CenterX="0" CenterY="1" CenterZ="0">
                <RotateTransform3D.Rotation>
                  <AxisAngleRotation3D
                    Angle="{Binding ElementName=Left_Top_Z, Path=Value}"
                    Axis="1 0 0"
                  />
                </RotateTransform3D.Rotation>
              </RotateTransform3D>
              <ScaleTransform3D
                ScaleZ="{Binding  ElementName=ScaleZ_2, Path=Value}"
              />
            </Transform3DGroup>
          </GeometryModel3D.Transform>
        </GeometryModel3D>
        <GeometryModel3D
          Geometry="{StaticResource Rect3D_O}"
          Material="{StaticResource Img}"
          BackMaterial="{StaticResource Img}"
        >
          <GeometryModel3D.Transform>
            <Transform3DGroup>
              <RotateTransform3D CenterX="0" CenterY="1" CenterZ="0">
                <RotateTransform3D.Rotation>
                  <AxisAngleRotation3D
                    Angle="{Binding ElementName=Right_Bottom_Z, Path=Value}"
                    Axis="0 1 0"
                  />
                </RotateTransform3D.Rotation>
              </RotateTransform3D>
              <ScaleTransform3D
                ScaleZ="{Binding  ElementName=ScaleZ_2, Path=Value}"
              />
            </Transform3DGroup>
          </GeometryModel3D.Transform>
        </GeometryModel3D>
        <GeometryModel3D
          Geometry="{StaticResource Rect3D_O}"
          Material="{StaticResource Img}"
          BackMaterial="{StaticResource Img}"
        >
          <GeometryModel3D.Transform>
            <Transform3DGroup>
              <RotateTransform3D CenterX="0" CenterY="1" CenterZ="0">
                <RotateTransform3D.Rotation>
                  <AxisAngleRotation3D
                    Angle="{Binding ElementName=Right_Bottom_Z, Path=Value}"
                    Axis="1 0 0"
                  />
                </RotateTransform3D.Rotation>
              </RotateTransform3D>
              <ScaleTransform3D
                ScaleZ="{Binding  ElementName=ScaleZ_2, Path=Value}"
              />
            </Transform3DGroup>
          </GeometryModel3D.Transform>
        </GeometryModel3D>
      </Model3DGroup>
    </ModelVisual3D.Content>
  </ModelVisual3D>
</Viewport3D>

<Slider
  Grid.Row="1"
  x:Name="Left_Top_Z"
  Minimum="-90"
  Value="12"
  Maximum="90"
  ToolTip="{Binding  RelativeSource={RelativeSource Mode=Self}, Path=Value}"
/>
<Slider
  Grid.Row="2"
  x:Name="Right_Bottom_Z"
  Minimum="-90"
  Value="-12"
  Maximum="0"
  ToolTip="{Binding  RelativeSource={RelativeSource Mode=Self}, Path=Value}"
/>
<Slider
  Grid.Row="3"
  x:Name="ScaleZ_2"
  Background="Red"
  Minimum="10"
  Maximum="100"
  ToolTip="{Binding  RelativeSource={RelativeSource Mode=Self}, Path=Value}"
>
  <Slider.Style>
    <style TargetType="Slider">
      <Style.Triggers>
          <Trigger Property="Tag" Value="1">
              <Trigger.EnterActions>
                  <BeginStoryboard >
                      <Storyboard>
                          <DoubleAnimation  RepeatBehavior="Forever"  Storyboard.TargetProperty="Value"   From="11" To="20" BeginTime="0:0:0"   Duration="0:0:10" />
                      </Storyboard>
                  </BeginStoryboard>
              </Trigger.EnterActions>
          </Trigger>
      </Style.Triggers>
    </style>
  </Slider.Style>
</Slider>
<Slider
  Grid.Row="4"
  x:Name="FOV"
  Minimum="0"
  Maximum="180"
  Value="176"
  ToolTip="{Binding  RelativeSource={RelativeSource Mode=Self}, Path=Value}"
/>
运行,看看

看起来,有点味道了。
剩下就是调试动画了。
我们想要首尾衔接的动画,实际上就是要两段动画看不出首尾的区别。参考大佬们的基本思路,依靠透明度,延迟播放让首尾看不出区别。
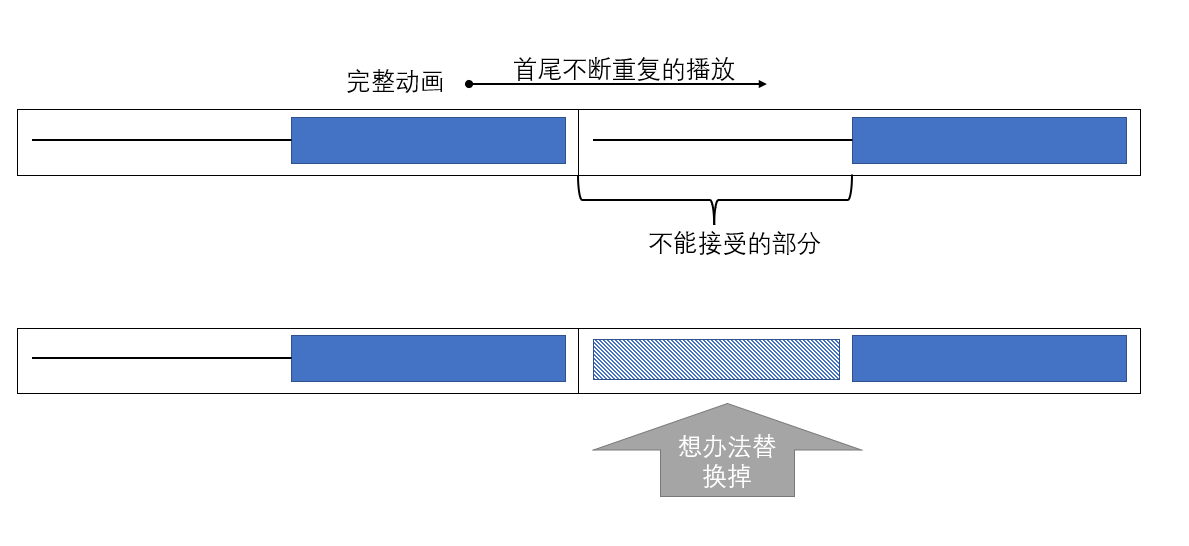
也就是说要
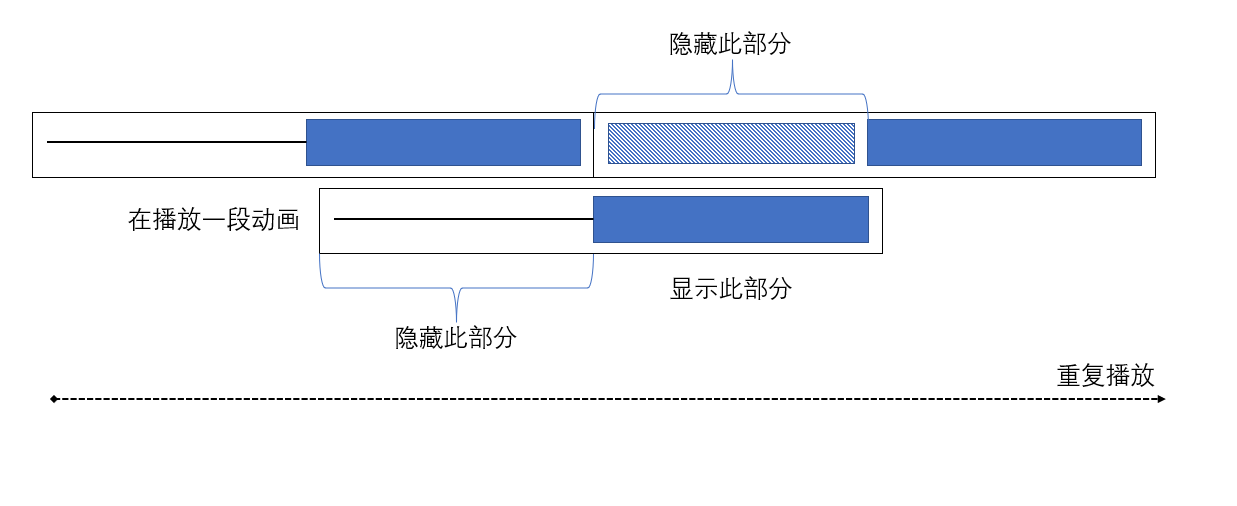
这里呢,我们纯用 XAML 来实现这个方案。
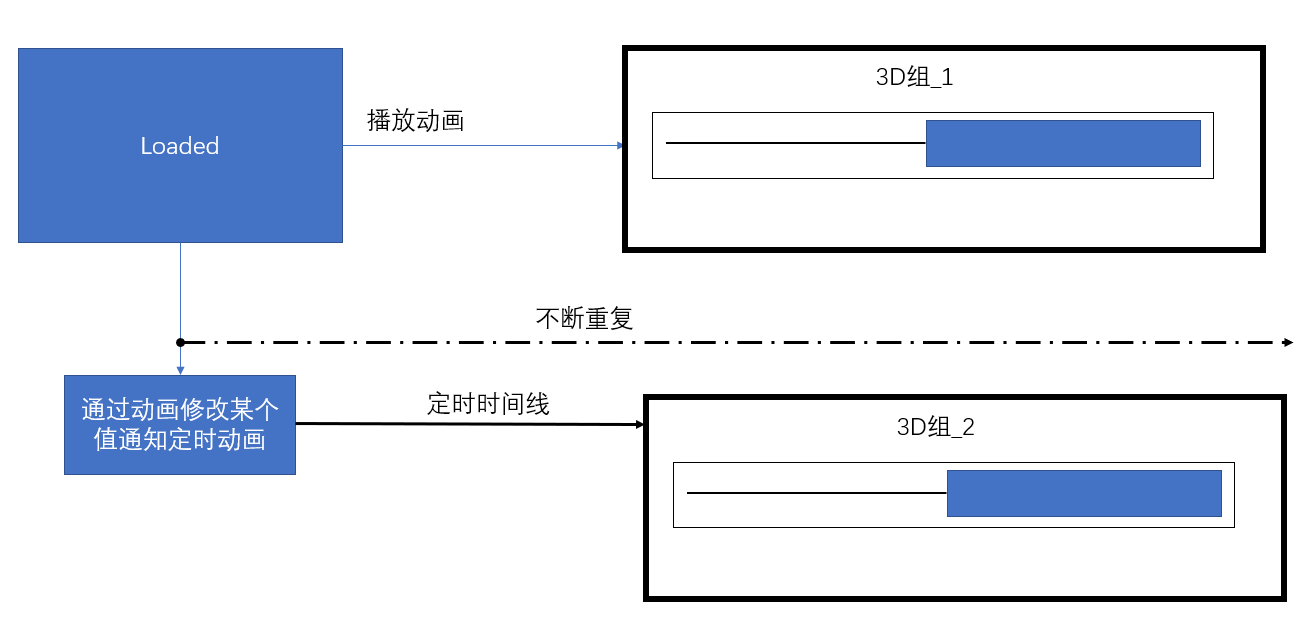
首先要解决定时问题,首先页面加载时,我们通过动画修改某个对象的某个值 ,这个对象上存在一个触发器,监控这个对象并开始定时,之后播放动画。
修改值,我们要用 ObjectAnimationUsingKeyFrames 动画。
触发器,数值触发器,因为可以绑定。
整个过程中,最重要的就是时间线,两组动画再何时出现,何时隐藏。
最终代码
<Window.Resources>
  <Storyboard
    RepeatBehavior="Forever"
    Storyboard.TargetName="ScaleZ_2"
    Duration="0:0:10"
    x:Key="sb"
  >
    <DoubleAnimation
      Storyboard.TargetName="ScaleZ_2"
      Storyboard.TargetProperty="Value"
      From="11"
      To="20"
      BeginTime="0:0:0"
      Duration="0:0:10"
    />
    <DoubleAnimationUsingKeyFrames
      Storyboard.TargetProperty="Opacity"
      Storyboard.TargetName="View3D_2"
      BeginTime="0:0:0"
    >
      <LinearDoubleKeyFrame KeyTime="0:0:0" Value="0" />
      <LinearDoubleKeyFrame KeyTime="0:0:2" Value="1" />
      <LinearDoubleKeyFrame KeyTime="0:0:6" Value="1" />
      <LinearDoubleKeyFrame KeyTime="0:0:10" Value="0" />
    </DoubleAnimationUsingKeyFrames>
  </Storyboard>
  <MeshGeometry3D x:Key="Rect3D_O">
    <MeshGeometry3D.Positions>
      -50, 50, 0, -50, -50, 0, 50, -50, 0, 50, 50, 0
    </MeshGeometry3D.Positions>
    <MeshGeometry3D.TriangleIndices>
      0 1 2 2 3 0
    </MeshGeometry3D.TriangleIndices>
    <MeshGeometry3D.TextureCoordinates>
      0,0 0,1 1,1 1,0
    </MeshGeometry3D.TextureCoordinates>
    <MeshGeometry3D.Normals>
      0,0,1, 0,0,1, 0,0,1, 0,0,1
    </MeshGeometry3D.Normals>
  </MeshGeometry3D>
  <DiffuseMaterial x:Key="Img">
    <DiffuseMaterial.Brush>
      <ImageBrush ImageSource="start.jpg" />
    </DiffuseMaterial.Brush>
  </DiffuseMaterial>
</Window.Resources>
<Window.Triggers>
  <EventTrigger RoutedEvent="Loaded" SourceName="ScaleZ">
    <BeginStoryboard>
      <Storyboard
        Storyboard.TargetName="ScaleZ"
        Storyboard.TargetProperty="Tag"
        Duration="0:0:5.1"
      >
        <ObjectAnimationUsingKeyFrames>
          <DiscreteObjectKeyFrame KeyTime="0:0:5">
            <DiscreteObjectKeyFrame.Value> 1 </DiscreteObjectKeyFrame.Value>
          </DiscreteObjectKeyFrame>
        </ObjectAnimationUsingKeyFrames>
      </Storyboard>
    </BeginStoryboard>
    <BeginStoryboard Storyboard="{StaticResource sb}" />
  </EventTrigger>
</Window.Triggers>
<Grid>
  <Grid.RowDefinitions>
    <RowDefinition />
    <RowDefinition Height="auto" />
    <RowDefinition Height="auto" />
    <RowDefinition Height="auto" />
    <RowDefinition Height="auto" />
    <RowDefinition Height="auto" />
    <RowDefinition Height="auto" />
  </Grid.RowDefinitions>
  <Viewport3D x:Name="View3D_1">
    <Viewport3D.Style>
      <style TargetType="Viewport3D">
        <Style.Triggers>
            <DataTrigger Binding="{Binding ElementName=ScaleZ,Path=Value}" Value="1">
                <DataTrigger.EnterActions>
                    <BeginStoryboard >
                        <Storyboard>
                            <DoubleAnimationUsingKeyFrames  RepeatBehavior="Forever" Storyboard.TargetProperty="Opacity"  BeginTime="0:0:0"  Duration="0:0:10">
                                <LinearDoubleKeyFrame KeyTime="0:0:0" Value="0"/>
                                <LinearDoubleKeyFrame KeyTime="0:0:5" Value="1"/>
                                <LinearDoubleKeyFrame KeyTime="0:0:8" Value="1"/>
                                <LinearDoubleKeyFrame KeyTime="0:0:10" Value="0"/>
                            </DoubleAnimationUsingKeyFrames>
                        </Storyboard>
                    </BeginStoryboard>
                </DataTrigger.EnterActions>
            </DataTrigger>
        </Style.Triggers>
      </style>
    </Viewport3D.Style>
    <Viewport3D.Camera>
      <PerspectiveCamera
        FieldOfView="{Binding ElementName=FOV, Path=Value}"
        Position="0,0,100"
        LookDirection="0,0,-1"
      />
    </Viewport3D.Camera>
    <ModelVisual3D>
      <ModelVisual3D.Content>
        <Model3DGroup>
          <AmbientLight Color="White" />
          <GeometryModel3D
            Geometry="{StaticResource Rect3D_O}"
            Material="{StaticResource Img}"
            BackMaterial="{StaticResource Img}"
          >
            <GeometryModel3D.Transform>
              <Transform3DGroup>
                <RotateTransform3D CenterX="0" CenterY="1" CenterZ="0">
                  <RotateTransform3D.Rotation>
                    <AxisAngleRotation3D
                      Angle="{Binding ElementName=Left_Top_Z, Path=Value}"
                      Axis="0 1 0"
                    />
                  </RotateTransform3D.Rotation>
                </RotateTransform3D>
                <ScaleTransform3D
                  ScaleZ="{Binding  ElementName=ScaleZ, Path=Value}"
                />
              </Transform3DGroup>
            </GeometryModel3D.Transform>
          </GeometryModel3D>
          <GeometryModel3D
            Geometry="{StaticResource Rect3D_O}"
            Material="{StaticResource Img}"
            BackMaterial="{StaticResource Img}"
          >
            <GeometryModel3D.Transform>
              <Transform3DGroup>
                <RotateTransform3D CenterX="0" CenterY="1" CenterZ="0">
                  <RotateTransform3D.Rotation>
                    <AxisAngleRotation3D
                      Angle="{Binding ElementName=Left_Top_Z, Path=Value}"
                      Axis="1 0 0"
                    />
                  </RotateTransform3D.Rotation>
                </RotateTransform3D>
                <ScaleTransform3D
                  ScaleZ="{Binding  ElementName=ScaleZ, Path=Value}"
                />
              </Transform3DGroup>
            </GeometryModel3D.Transform>
          </GeometryModel3D>
          <GeometryModel3D
            Geometry="{StaticResource Rect3D_O}"
            Material="{StaticResource Img}"
            BackMaterial="{StaticResource Img}"
          >
            <GeometryModel3D.Transform>
              <Transform3DGroup>
                <RotateTransform3D CenterX="0" CenterY="1" CenterZ="0">
                  <RotateTransform3D.Rotation>
                    <AxisAngleRotation3D
                      Angle="{Binding ElementName=Right_Bottom_Z, Path=Value}"
                      Axis="0 1 0"
                    />
                  </RotateTransform3D.Rotation>
                </RotateTransform3D>
                <ScaleTransform3D
                  ScaleZ="{Binding  ElementName=ScaleZ, Path=Value}"
                />
              </Transform3DGroup>
            </GeometryModel3D.Transform>
          </GeometryModel3D>
          <GeometryModel3D
            Geometry="{StaticResource Rect3D_O}"
            Material="{StaticResource Img}"
            BackMaterial="{StaticResource Img}"
          >
            <GeometryModel3D.Transform>
              <Transform3DGroup>
                <RotateTransform3D CenterX="0" CenterY="1" CenterZ="0">
                  <RotateTransform3D.Rotation>
                    <AxisAngleRotation3D
                      Angle="{Binding ElementName=Right_Bottom_Z, Path=Value}"
                      Axis="1 0 0"
                    />
                  </RotateTransform3D.Rotation>
                </RotateTransform3D>
                <ScaleTransform3D
                  ScaleZ="{Binding  ElementName=ScaleZ, Path=Value}"
                />
              </Transform3DGroup>
            </GeometryModel3D.Transform>
          </GeometryModel3D>
        </Model3DGroup>
      </ModelVisual3D.Content>
    </ModelVisual3D>
  </Viewport3D>
  <Viewport3D x:Name="View3D_2">
    <Viewport3D.Camera>
      <PerspectiveCamera
        FieldOfView="{Binding ElementName=FOV, Path=Value}"
        Position="0,0,100"
        LookDirection="0,0,-1"
      />
    </Viewport3D.Camera>
    <ModelVisual3D>
      <ModelVisual3D.Content>
        <Model3DGroup>
          <AmbientLight Color="White" />
          <GeometryModel3D
            Geometry="{StaticResource Rect3D_O}"
            Material="{StaticResource Img}"
            BackMaterial="{StaticResource Img}"
          >
            <GeometryModel3D.Transform>
              <Transform3DGroup>
                <RotateTransform3D CenterX="0" CenterY="1" CenterZ="0">
                  <RotateTransform3D.Rotation>
                    <AxisAngleRotation3D
                      Angle="{Binding ElementName=Left_Top_Z, Path=Value}"
                      Axis="0 1 0"
                    />
                  </RotateTransform3D.Rotation>
                </RotateTransform3D>
                <ScaleTransform3D
                  ScaleZ="{Binding  ElementName=ScaleZ_2, Path=Value}"
                />
              </Transform3DGroup>
            </GeometryModel3D.Transform>
          </GeometryModel3D>
          <GeometryModel3D
            Geometry="{StaticResource Rect3D_O}"
            Material="{StaticResource Img}"
            BackMaterial="{StaticResource Img}"
          >
            <GeometryModel3D.Transform>
              <Transform3DGroup>
                <RotateTransform3D CenterX="0" CenterY="1" CenterZ="0">
                  <RotateTransform3D.Rotation>
                    <AxisAngleRotation3D
                      Angle="{Binding ElementName=Left_Top_Z, Path=Value}"
                      Axis="1 0 0"
                    />
                  </RotateTransform3D.Rotation>
                </RotateTransform3D>
                <ScaleTransform3D
                  ScaleZ="{Binding  ElementName=ScaleZ_2, Path=Value}"
                />
              </Transform3DGroup>
            </GeometryModel3D.Transform>
          </GeometryModel3D>
          <GeometryModel3D
            Geometry="{StaticResource Rect3D_O}"
            Material="{StaticResource Img}"
            BackMaterial="{StaticResource Img}"
          >
            <GeometryModel3D.Transform>
              <Transform3DGroup>
                <RotateTransform3D CenterX="0" CenterY="1" CenterZ="0">
                  <RotateTransform3D.Rotation>
                    <AxisAngleRotation3D
                      Angle="{Binding ElementName=Right_Bottom_Z, Path=Value}"
                      Axis="0 1 0"
                    />
                  </RotateTransform3D.Rotation>
                </RotateTransform3D>
                <ScaleTransform3D
                  ScaleZ="{Binding  ElementName=ScaleZ_2, Path=Value}"
                />
              </Transform3DGroup>
            </GeometryModel3D.Transform>
          </GeometryModel3D>
          <GeometryModel3D
            Geometry="{StaticResource Rect3D_O}"
            Material="{StaticResource Img}"
            BackMaterial="{StaticResource Img}"
          >
            <GeometryModel3D.Transform>
              <Transform3DGroup>
                <RotateTransform3D CenterX="0" CenterY="1" CenterZ="0">
                  <RotateTransform3D.Rotation>
                    <AxisAngleRotation3D
                      Angle="{Binding ElementName=Right_Bottom_Z, Path=Value}"
                      Axis="1 0 0"
                    />
                  </RotateTransform3D.Rotation>
                </RotateTransform3D>
                <ScaleTransform3D
                  ScaleZ="{Binding  ElementName=ScaleZ_2, Path=Value}"
                />
              </Transform3DGroup>
            </GeometryModel3D.Transform>
          </GeometryModel3D>
        </Model3DGroup>
      </ModelVisual3D.Content>
    </ModelVisual3D>
  </Viewport3D>

  <Slider
    Grid.Row="1"
    x:Name="Left_Top_Z"
    Minimum="-90"
    Value="12"
    Maximum="90"
    ToolTip="{Binding  RelativeSource={RelativeSource Mode=Self}, Path=Value}"
  />
  <Slider
    Grid.Row="2"
    x:Name="Right_Bottom_Z"
    Minimum="-90"
    Value="-12"
    Maximum="0"
    ToolTip="{Binding  RelativeSource={RelativeSource Mode=Self}, Path=Value}"
  />
  <Slider
    Grid.Row="3"
    x:Name="ScaleZ"
    Background="Red"
    Minimum="10"
    Maximum="100"
    ToolTip="{Binding  RelativeSource={RelativeSource Mode=Self}, Path=Value}"
  >
    <Slider.Style>
      <style TargetType="Slider">
        <Style.Triggers>
            <Trigger Property="Tag" Value="1">
                <Trigger.EnterActions>
                    <BeginStoryboard >
                        <Storyboard>
                            <DoubleAnimation  RepeatBehavior="Forever"  Storyboard.TargetProperty="Value"   From="11" To="20" BeginTime="0:0:0"   Duration="0:0:10" />
                        </Storyboard>
                    </BeginStoryboard>
                </Trigger.EnterActions>
            </Trigger>
        </Style.Triggers>
      </style>
    </Slider.Style>
  </Slider>
  <Slider
    Grid.Row="4"
    x:Name="FOV"
    Minimum="0"
    Maximum="180"
    Value="176"
    ToolTip="{Binding  RelativeSource={RelativeSource Mode=Self}, Path=Value}"
  />
  <Slider
    Grid.Row="5"
    x:Name="ScaleZ_2"
    Background="Black"
    Minimum="10"
    Maximum="100"
    ToolTip="{Binding  RelativeSource={RelativeSource Mode=Self}, Path=Value}"
  />
  <StackPanel Grid.Row="6" Orientation="Vertical">
    <TextBlock>
      <Run Text=" View3D_1 透明度" />
      <Run Text="{Binding ElementName=View3D_1, Path=Opacity}" />
      <Run Text=" View3D_1 value" />
      <Run Text="{Binding ElementName=ScaleZ, Path=Value}" />
      <Run Text=" Tag value" />
      <Run Text="{Binding ElementName=ScaleZ, Path=Tag}" />
      <Run Text=" Zindex value" />
      <Run Text="{Binding ElementName=View3D_1, Path=(Panel.ZIndex)}" />
    </TextBlock>
    <TextBlock>
      <Run Text=" View3D_2 透明度" />
      <Run Text="{Binding ElementName=View3D_2, Path=Opacity}" />
      <Run Text=" View3D_2 value" />
      <Run Text="{Binding ElementName=ScaleZ_2, Path=Value}" />
      <Run Text=" Zindex value" />
      <Run Text="{Binding ElementName=View3D_2, Path=(Panel.ZIndex)}" />
    </TextBlock>
  </StackPanel>
</Grid>
这样呢,我们就不用任何 C#代码来完成这个效果了。

必须承认,在开头 0 秒时做的不是很好,略有重影,所以还有很多地方需要学习。