
想象一下,您正在填写世界上最长的表格。您已经花了 30 分钟时间输入详细信息,从地址到您的生日,再到最近访问过的七个国家/地区的列表。您单击“提交”按钮,将立即获得“连接已丢失”消息。不用担心,对吧?只需单击“后退”按钮,… 哦,不!表格是空的。这看起来很野蛮,并且你保证不再再次访问该站点了。
这不是您希望网站访问者获得的体验。因此,了解如何在 Blazor 应用程序中管理状态非常重要。在管理状态的同时尽量减少管理状态所必须编写的代码量?“是的,求你了!”
观看相关视频:Blazor Apps 中的状态管理
1 Blazor 状态的定义
首先,让我们弄清楚 Blazor 应用中的“状态”是什么意思。为了获得最佳的用户体验,当最终用户的连接暂时中断,刷新或导航回到页面时,为最终用户提供一致的体验非常重要。经验的组成部分包括:
- 表示用户界面(UI)的 HTML 文档对象模型(DOM)
- 表示页面上正在输入和/或输出的数据的字段和属性
- 作为页面代码的一部分运行的注册服务的状态
在没有任何特殊代码的情况下,根据Blazor 托管模型,将状态保存在两个位置。对于 Blazor WebAssembly(客户端)应用程序,状态保持在浏览器内存中,直到用户刷新或导航离开页面为止。在 Blazor Server 应用程序中,状态保存在分配给每个称为电路的每个客户端会话的特殊“存储桶”中。这些电路在断开连接后超时时可能会丢失状态,甚至在服务器处于内存压力下的活动连接过程中也可能消失。
2. 参考应用程序
为了说明状态的细微差别,我从Blazor Health App开始:
从 Angular 到 Blazor:The Health App
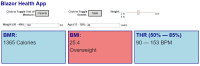
在 Blazor 中构建示例应用程序,Blazor 是基于.NET 的框架,用于构建可在浏览器中运行的 Web 应用程序,并利用 C#和 Razor 模板生成跨平台的,兼容 HTML5 的 WebAssembly 代码。
我将其扩展为包括两个页面,以说明导航的一些细微差别。在相关的 GitHub 存储库中:
有几个示例项目。问题在 Blazor WebAssembly 和 Blazor Server 项目中的体现是不同的。
3. Blazor WebAssembly 中的状态
在 Blazor WebAssembly(客户端项目)中,状态保存在内存中。这意味着刷新或强制导航将破坏状态。要查看实际效果:
- 设置
BlazorState.Wasm为启动项目并运行它。 - 更新表单信息。
- 导航到“结果”并验证是否存在相同的结果。
- 导航回“主页”并强制刷新(通常为
CTRL+F5)。请注意该窗体还原为默认值。 - 更新表单信息,然后通过添加
/results到浏览器中的 URL 栏来手动导航,然后按ENTER。请注意,它也使用默认值。
不好的经历!与 Blazor Server 相比,它略有不同。
4. Blazor 服务器中的状态
将启动项目更改为BlazorState.Server并运行该项目。请尝试执行与客户端版本相同的步骤,并注意保持了状态,因为该状态保存在服务器内存中。打开应用程序后,停止并重新启动 Web 服务器。您应该看到一个断开连接消息。服务器重新启动后,单击“重新加载”选项,请注意,尽管应用程序已恢复,但它会丢失所有状态。
现在我们有一个问题。让我们来研究解决方案!
5. 解决方案架构
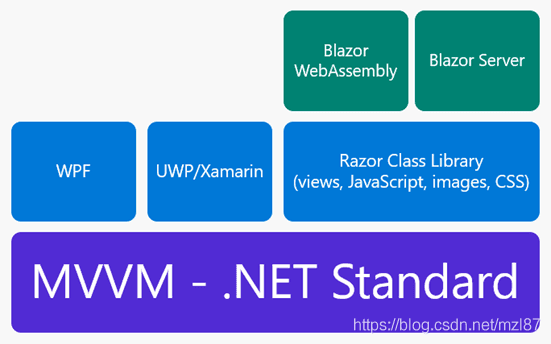
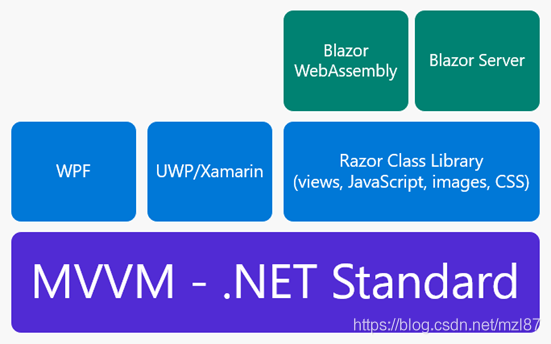
以下解决方案使用一种旨在最大化重用性的体系结构方法。Blazor.ViewModel 项目托管该应用程序的界面、属性和业务逻辑。它是Model-View-ViewModel(MVVM)模式的.NET Standard 库实现,可以从 WPF,Xamarin 甚至 Blazor 的任何类型的.NET Core 项目轻松引用。最大程度的重用!
对于 UI 和用户体验逻辑,以及可共享资产(例如图像,样式表,JavaScript 代码甚至 Razor 视图组件),Blazor.Shared都利用Razor类库。该解决方案实现了 HealthModelBase 避免重复的 MVVM 代码的功能。它还将此处描述的所有状态管理解决方案实现为可轻松应用于 Blazor WebAssembly 和 Blazor Server 项目的服务和/或组件。由于“宿主”项目仅提供一些结构来引用共享组件和资源,因此这进一步使代码重用最大化。
现在,我已经解决了问题和解决方案的方法,让我们继续在 Blazor 应用程序中管理状态!
6. 服务注册
第一步可能并不那么明显,但是为了全面起见,我想介绍服务。要查看实际效果,请创建一个新的 Blazor 客户端应用程序并运行它。内置模板为几个页面提供了简单的导航。导航到Counter页面并增加计数器。现在,离开页面浏览并返回。计数器重置为零!这是因为计数器的状态保留在组件中,因此每次初始化组件时都会将其重置:
<h1>Counter</h1>
<p>Current count: @currentCount</p>
<button class="btn btn-primary" @onclick="IncrementCount">Click me</button>
private int currentCount = 0;
private void IncrementCount()
{
    currentCount++;
}
要维持“内存中”(或 Blazor 服务器“电路中”)状态,可以创建计数器“服务”:
public class CounterService
{
    public int Count { get; private set; }
    public void Increment()
    {
        Count += 1;
    }
}
在Startup.cs以下位置注册服务:
public void ConfigureServices(IServiceCollection services)
{
    services.AddSingleton<CounterService, CounterService>();
}
…然后删除@code块中的代码Counter.razor,注入计数器服务并直接进行数据绑定:
@inject CounterService Svc
<h1>Counter</h1>
<p>Current count: @Svc.Count</p>
<button class="btn btn-primary" @onclick="Svc.Increment">Click me</button>
当组件被销毁/重新创建时,该服务将保留在内存中,即使在导航时也保持一致的计数。这是维持状态的第一步。参考应用程序以此方式注册主视图模型。
7. 浏览器缓存
维护状态的一种方法是使用HTML5 Web Storage来利用浏览器缓存。该 API 非常简单。BlazorState.Shared中的stateManagement.js文件定义了一个简单的,可全局访问的界面。它使用localStorage JavaScript API,但您可以选择使用sessionStorage。
window.stateManager = {
    save: function (key, str) {
        localStorage[key] = str;
    },
    load: function (key) {
        return localStorage[key];
    }
};
它包含在 Blazor WebAssembly 项目的index.html和 Blazor Server 项目的_Host.cshtml的根目录中。包括共享资产(shared assets)就像使用路径一样简单:
<script src="_content/BlazorState.Shared/stateManagement.js"></script>
Blazor 的组件模型使创建用于管理状态更改的“包装器”组件变得简单。这是在StorageHelper.razor中实现的。首先,using 语句引用视图模型,JavaScript 互操作性和 JSON 序列化程序。实现被注入。
@using Microsoft.JSInterop; @using System.Text.Json; @inject IJSRuntime
JsRuntime @inject IHealthModel Model
模板只是包装子组件,并在加载状态时呈现它们。
@if (hasLoaded) { @ChildContent } else {
<p>Loading...</p>
}
初始化组件后,代码尝试从缓存中加载视图模型:
string vm;
try
{
    vm = await JsRuntime.InvokeAsync<string>("stateManager.load", nameof(HealthModel));
}
catch(InvalidOperationException)
{
    return;
}
在 Blazor 服务器中,组件已在服务器上预渲染。JavaScript 不可用,因此 interop 调用将抛出InvalidOperationException。这是第一次被发现。第二个调用是从客户端进行的,并且如果缓存了 viewmodel,它将成功。从高速缓存加载视图模型的 JSON 后,将对其进行反序列化,并将属性移至全局视图模型实例。
var viewModel = JsonSerializer.Deserialize<HealthModel>(vm);
if (viewModel != null)
{
    isDeserializing = true;
    Model.AgeYears = viewModel.AgeYears;
    Model.HeightInches = viewModel.HeightInches;
    Model.IsFemale = viewModel.IsFemale;
    Model.IsImperial = viewModel.IsImperial;
    Model.WeightPounds = viewModel.WeightPounds;
    isDeserializing = false;
}
isDeserializing标志对于避免无限循环很重要,正如您在下一个注册属性更改通知的代码中所看到的:
Model.PropertyChanged += async (o, e) =>
{
    if (isDeserializing)
    {
        return;
    }
    var vmStr = JsonSerializer.Serialize(((HealthModel)Model));
    await JsRuntime.InvokeAsync<object>(
        "stateManager.save", nameof(HealthModel), vmStr);
};
hasLoaded = true;
如果视图模型上的属性发生更改,则视图模型将被序列化并存储在缓存中。当由于初始加载而触发了属性更改时,将跳过此操作(因此会出现该isDeserializing标志,否则它将在尝试反序列化时进行序列化)。现在该组件可以使用了!Blazor.ServerLocal和Blazor.WasmLocal都是的帮助类,它在App.razor中的实现方式相同:
<BlazorState.Shared.StorageHelper>
  <Router AppAssembly="@typeof(Program).Assembly">
    <Found Context="routeData">
      <RouteView RouteData="@routeData" DefaultLayout="@typeof(MainLayout)" />
    </Found>
    <NotFound>
      <LayoutView Layout="@typeof(MainLayout)">
        <p>Sorry, there's nothing at this address.</p>
      </LayoutView>
    </NotFound>
  </Router>
</BlazorState.Shared.StorageHelper>
通过包装路由器,状态管理无需编写其他代码即可处理应用程序中的所有页面和组件。您可以打开浏览器开发人员工具并导航到应用程序“本地存储”,以观察值在更新表单时的变化。
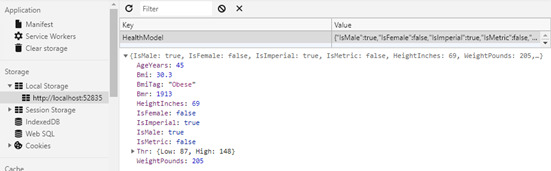
重要的是要注意,用户可以访问其本地缓存,因此,如果您要存储敏感值,则应对它们进行加密。Microsoft.ASpNetCore.ProtectedBrowserStorage包提供了一个示例。
8. 服务器端管理
处理状态的另一种方法是调用 API 并将其持久保存在服务器上。它的持久性取决于您:选择范围从 SQL,NoSQL 到简单的缓存(例如 Redis)。BlazorState.WasmRemote.Server是 ASP.NET 托管的 Blazor WebAssembly 应用程序。该StateController公开一个 API,它存储和检索使用的远程 IP 地址作为密钥对视图模型。这样做是为了保持演示简单。具有身份验证的生产应用程序可能会锁定用户和/或会话。
Blazor.Shared中的StateService处理 API 调用。构造函数接受全局 viewmodel 实例,提供 API 端点 URL 的IStateServiceConfig实例和HttpClient的实例。注入HttpClient而不是创建新实例非常重要,因为 Blazor WebAssembly 需要专门配置为在浏览器沙箱中运行的版本。构造函数从视图模型注册属性更改通知。
在初始化期间由页面组件调用InitAsync以加载视图模型状态。
public async Task InitAsync()
{
    _initializing = true;
    var vmJson = await _client.GetStringAsync(_config.Url);
    var vm = JsonSerializer.Deserialize<HealthModel>(vmJson, _options);
    _model.AgeYears = vm.AgeYears;
    _model.HeightInches = vm.HeightInches;
    _model.IsFemale = vm.IsFemale;
    _model.IsMetric = vm.IsMetric;
    _model.WeightPounds = vm.WeightPounds;
    _initializing = false;
}
该代码与客户端缓存方法非常相似,但是从 API 调用而不是本地缓存中检索模型。属性更改处理程序序列化模型并将模型发布到服务器:
private async void Model_PropertyChanged(object sender,
    System.ComponentModel.PropertyChangedEventArgs e)
{
    if (_initializing || _config == null)
    {
        return;
    }
    var vm = JsonSerializer.Serialize(_model);
    var content = new StringContent(vm);
    content.Headers.ContentType = new MediaTypeHeaderValue("application/json");
    await _client.PostAsync(_config.Url, content);
}
设置BlazorState.WasmRemote.Server为启动项目并运行它以查看实际效果。您可能需要更新在.Client项目中IStateServiceConfig的Startup.cs实现中的正确 URL(因为端口可能不同)。在运行解决方案的情况下,打开“网络”选项卡,并在更新表单时记下调用。
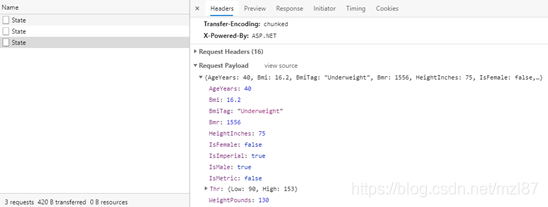
该服务已针对 Blazor WebAssembly 进行了演示,但与 Blazor Server 相同。
9. 结论
Blazor 对您如何管理状态没有意见。服务和组件模型使实现项目范围的解决方案变得容易。这篇文章着重于 Model-View-ViewModel 模式的实现,并注册了属性更改通知以处理本地或通过 API 的序列化状态。如果您使用诸如Redux之类的不同方法,则相同的方法将起作用。重要的步骤是在属性发生变化时更新商店,并在组件初始化时从状态管理解决方案加载。剩下的就是浏览器的历史记录!
查看有关ASP.NET Core Blazor 状态管理的官方文档。