
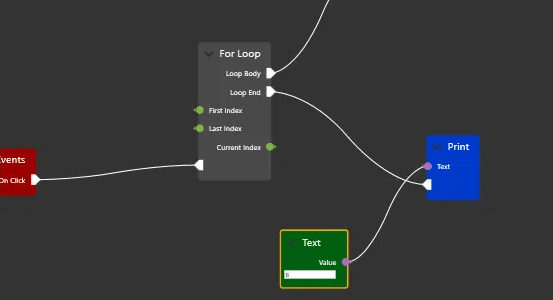
大家好,我是沙漠尽头的狼,今天介绍一个WPF开源项目-NodeNetwork,它可以帮助我们快速构建和定制网络拓扑图。
一、前言
在现代软件开发中,数据可视化和可交互性越来越受到关注。为了实现这一点,通常需要使用各种图表、表格、网络拓扑图等控件。然而,对于某些特殊的场景,这些控件可能无法满足需求,此时我们需要一种自定义的方式来展示和处理数据。NodeNetwork就是一种这样的自定义方式,它是一个基于C# WPF的开源项目,可以帮助我们快速构建和定制网络拓扑图。
NodeNetwork的代码托管在GitHub上,是由荷兰的一位开发者Wouterdek所创建和维护的。在本文中,我们将对NodeNetwork进行介绍和分析,希望读者能够通过本文了解到NodeNetwork的核心概念、应用场景和使用方法,同时也能够掌握一些开发NodeNetwork的技巧和经验。
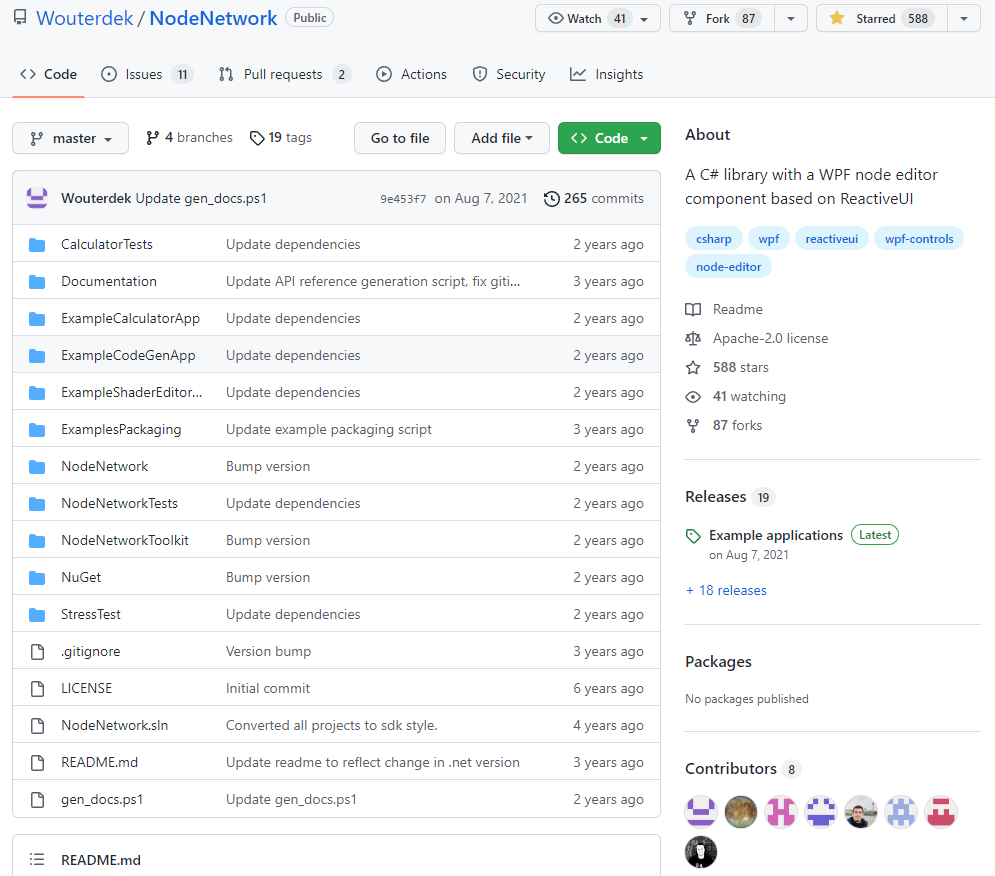
仓库地址:https://github.com/Wouterdek/NodeNetwork
仓库截图:
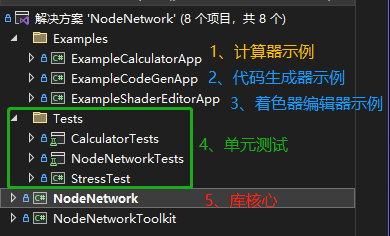
仓库源码结构:
二、示例
1. 计算器示例
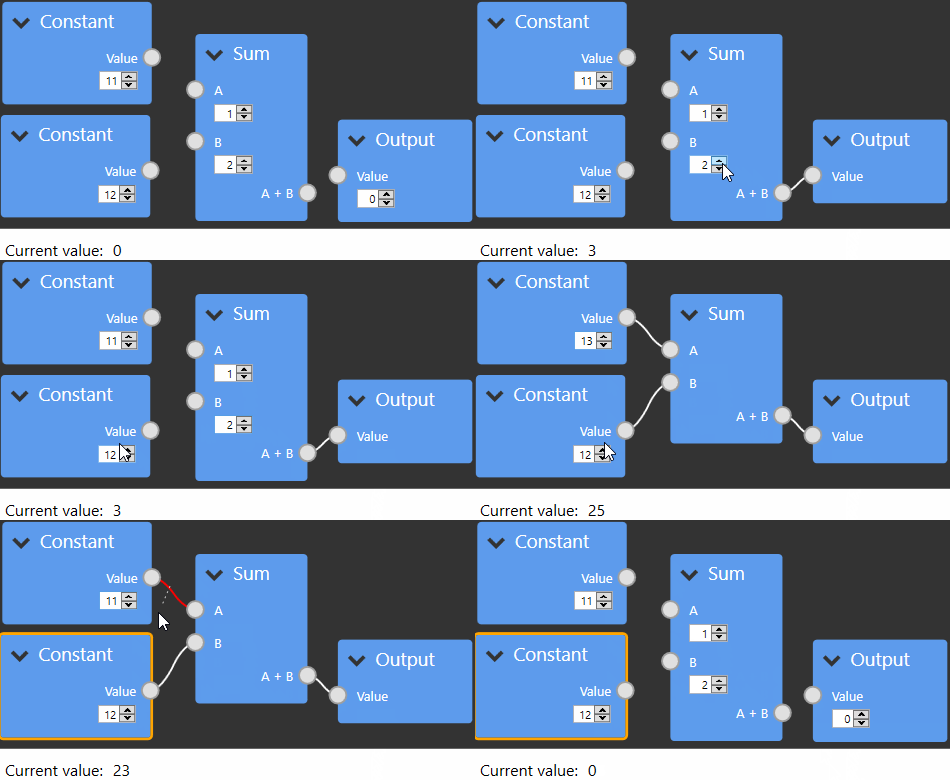
此示例允许用户使用节点编辑器创建数学表达式。 修改节点时,将自动计算和更新结果值。 此应用程序包含节点验证,自定义节点子类,值输入/输出,自定义输入编辑器,节点列表,...
下面是计算器示例应用程序的演示:
2. 代码生成器示例
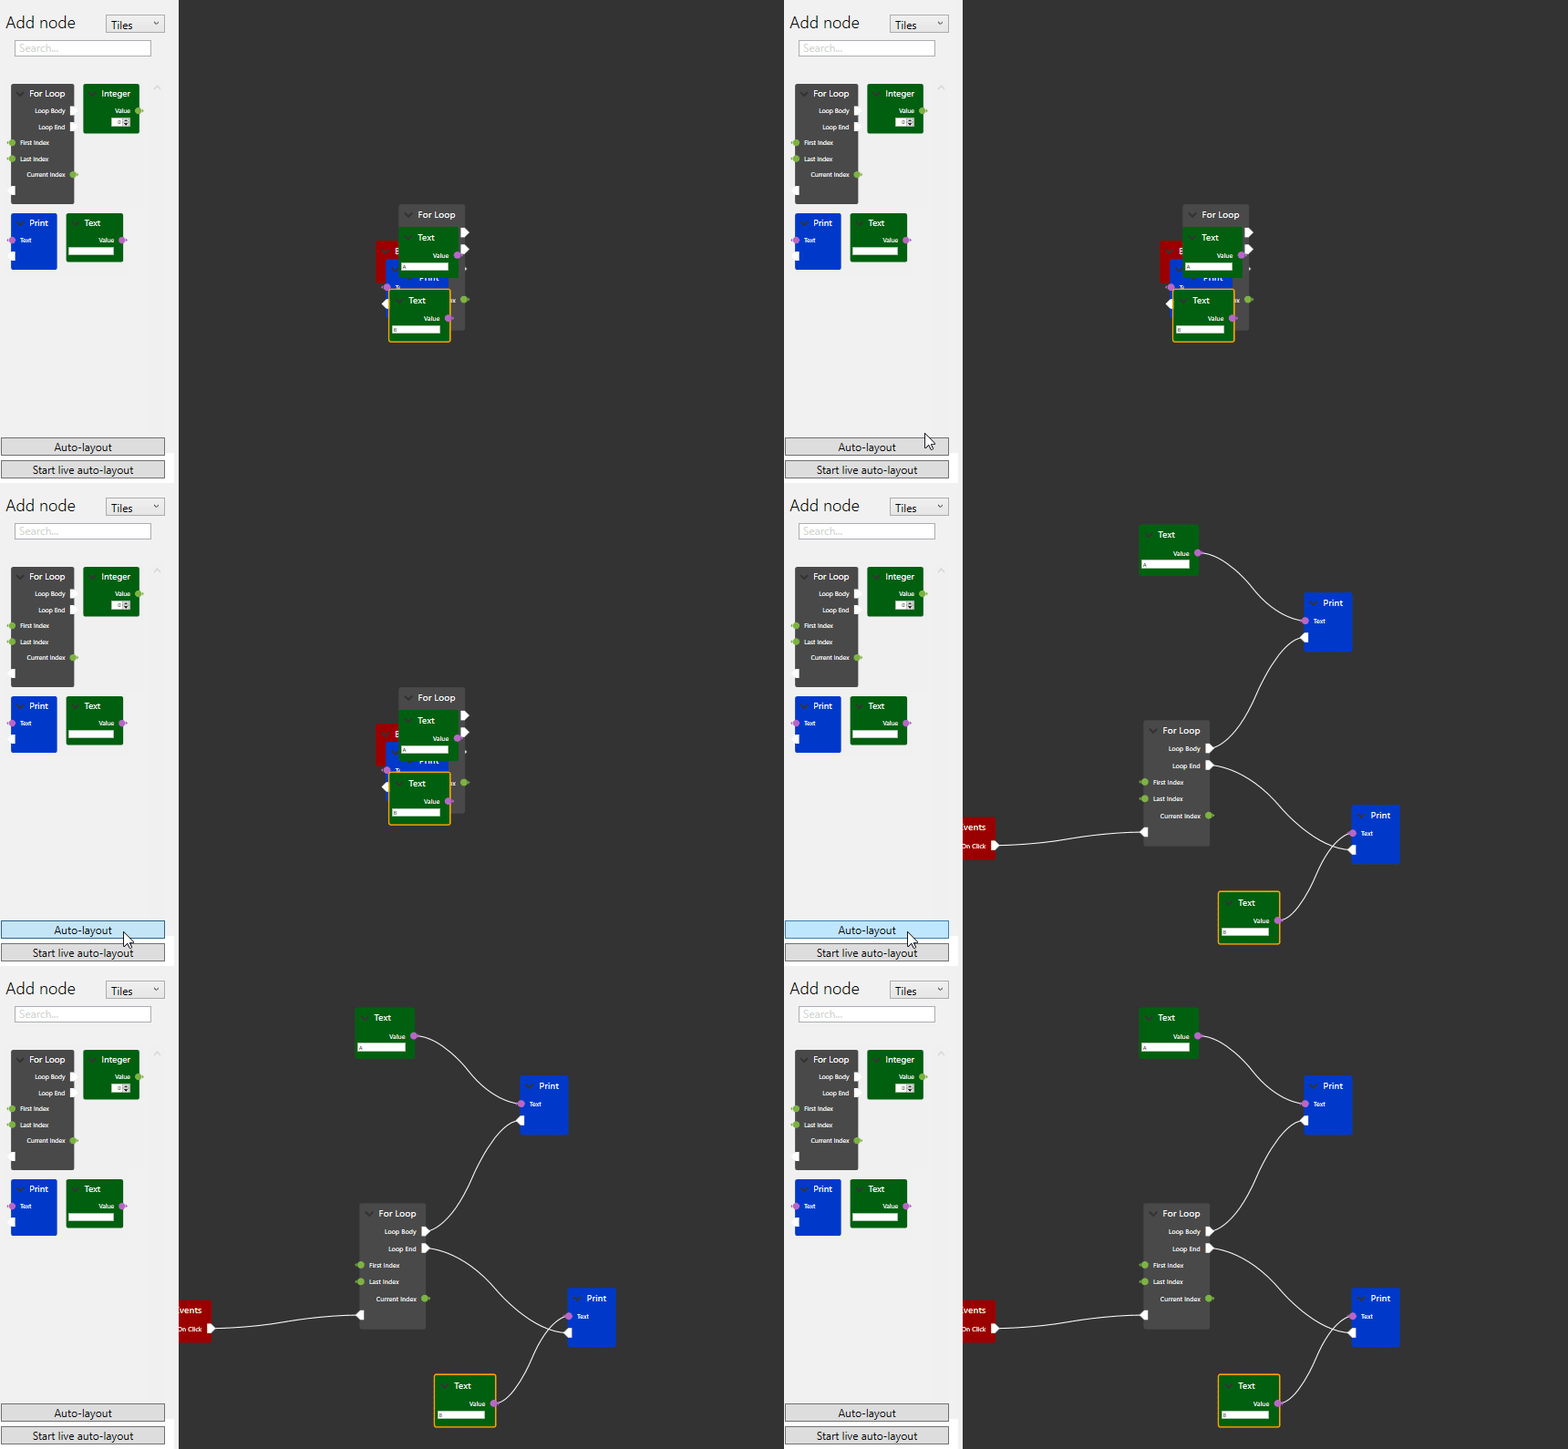
在此示例中,用户可以创建 LUA 代码。与虚幻引擎中的蓝图类似,编辑器具有执行流程和数据流。 自定义输入/输出端口、节点编辑器提供了更直观的体验。
下面是代码生成器应用程序的截图:
3. 着色器编辑器示例
此库更实用的示例可能是着色器编辑器。
下面是使用 NodeNetwork 制作的着色器编辑器示例的演示:
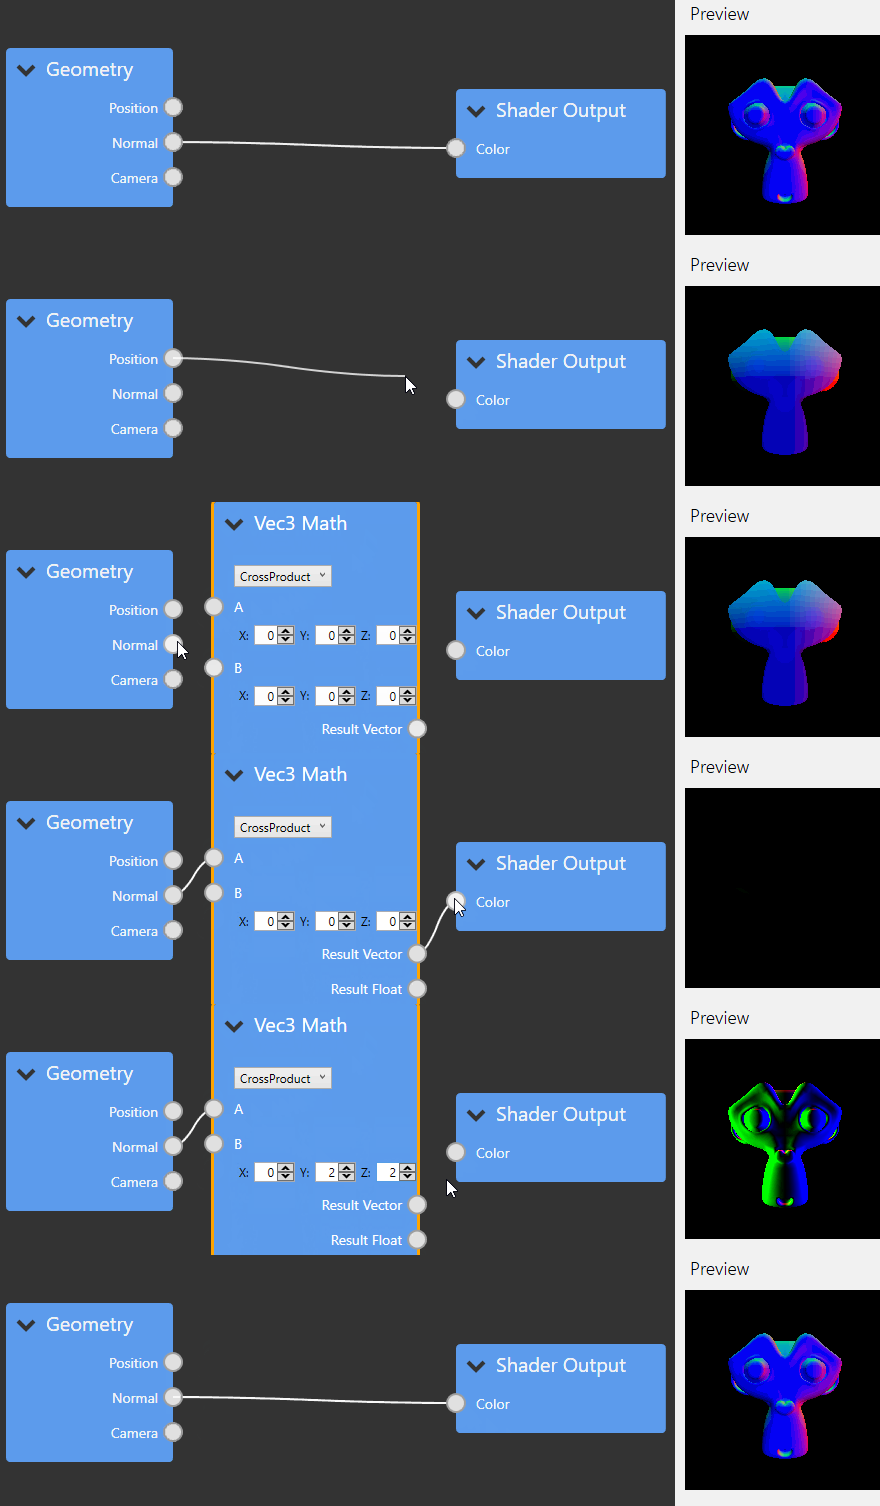
这些示例应用程序可在此处下载,其源代码包含在存储库中,库的二进制版本在 NuGet 上可用。
三、特征
- 专为 .NET Framework 4.7.2 和 .NET Core 3.1 或更高版本构建。
- 开放、宽松的许可证-Apache-2.0 license。
- 使用现代反应式 MVVM 代码构建的交互式、可靠的控件。
- 顺滑的平移、缩放控件。
- 自动布局系统。
- 高度可定制,但默认情况下易于使用。
- 强大的节点和连接验证支持。
- 大量的单元测试提供支持。
- ...
四、NodeNetwork的核心概念
以下内容可参考仓库组件说明页。
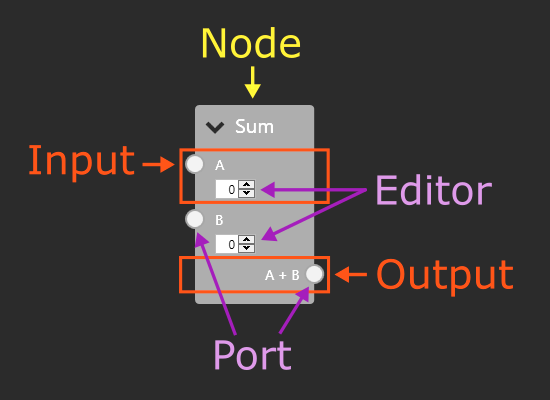
1. 节点(Node)
节点是NodeNetwork中的最基本元素,可以表示任何一个数据源或处理单元。每个节点可以包含一个或多个输入端口和输出端口,分别表示节点接收和输出的数据。NodeNetwork中内置了几种常用的节点类型,如常量节点、计算节点、输入输出节点等,同时也支持自定义节点类型。
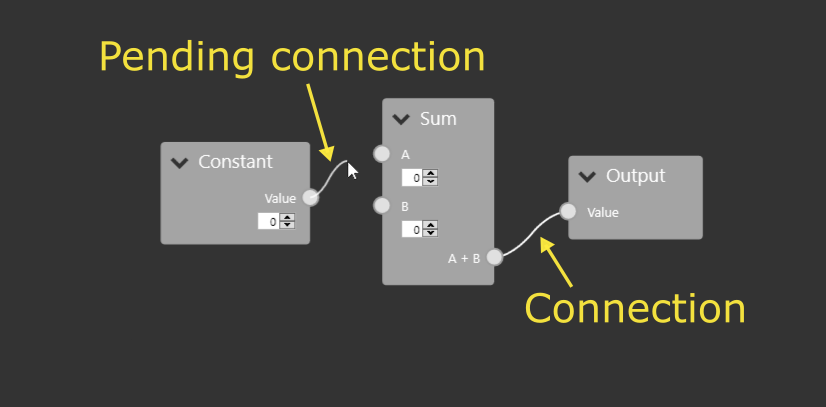
2. 连接(Connection)
连接是NodeNetwork中的一个核心概念,用于表示节点之间的数据传输关系。每个连接都有一个源端口和目标端口,源端口表示数据的来源,目标端口表示数据的目标。连接还可以携带一些元数据(metadata),用于描述连接的一些附加信息,如颜色、线宽等。
3. 端口(Port)
端口是节点的输入或输出端点,用于与其他节点进行连接。每个端口都有一个类型,表示该端口所能接收或输出的数据类型。端口还可以有一些其他属性,如标签、描述等,用于描述端口的功能和作用。
4. 图形界面(GUI)
NodeNetwork是基于WPF框架实现的,因此它具有一套强大的图形界面(GUI)系统。在NodeNetwork中,每个节点和连接都可以显示为一个图形化的元素,用户可以通过拖拽、缩放等方式对这些元素进行操作。
5. 布局(Layout)
布局是NodeNetwork的另一个重要概念,用于控制节点和连接的位置和大小。NodeNetwork中提供了多种不同的布局方式,如自由布局、栅格布局、力导向布局等。用户可以根据具体的需求选择不同的布局方式,并且可以通过代码或图形界面进行布局的定制和调整。
6. 序列化和反序列化(Serialization and Deserialization)
在实际的应用中,我们需要将节点和连接保存到文件或数据库中,或者从文件或数据库中读取节点和连接。为了实现这一点,NodeNetwork提供了序列化和反序列化功能。序列化是将节点和连接转换成一个数据流的过程,反序列化则是将数据流转换成节点和连接的过程。NodeNetwork支持多种不同的序列化格式,如XML、JSON、二进制等,用户可以根据具体需求选择不同的格式。
五、NodeNetwork的应用场景
NodeNetwork具有广泛的应用场景,下面介绍其中的几个:
1. 数据处理和分析
NodeNetwork可以帮助我们快速构建数据处理和分析的工具。例如,我们可以创建一个图形化的工作流,将不同的数据处理节点连接起来,从而实现数据的预处理、转换和分析。
2. 图形化编辑器
NodeNetwork可以帮助我们快速构建图形化的编辑器。例如,我们可以创建一个图形化的界面,用于编辑和配置某些参数或选项,这些参数或选项可以通过节点和连接的方式进行交互和传递。
3. 可视化和交互式展示
NodeNetwork可以帮助我们快速构建可视化和交互式的展示工具。例如,我们可以创建一个图形化的网络拓扑图,用于展示某些设备或系统的连接关系和状态。用户可以通过节点和连接的方式进行交互和控制,例如添加、删除、修改节点和连接等。
六、NodeNetwork的使用方法
NodeNetwork的使用方法非常简单,下面介绍其中的几个步骤(参考不到30行代码的Hello world)。
首先,使用 Dotnet 8创建WPF项目,项目命名为NodeNetworkTest,您可以使用 .NET Framework 4.7.2 以上或 .NET CORE 3.x 以上,站长使用 .NET 8只是8预览版2刚出来试试而已。
1. 安装NodeNetwork
NodeNetwork可以通过NuGet包管理器进行安装。在Visual Studio中,打开“包管理器控制台”,输入以下命令即可安装NodeNetwork:
Install-Package NodeNetwork
2. 注册NodeNetwork视图
MVVM在整个NodeNetwork库中都在贯彻使用。有关MVVM的介绍请点击这里查看。使用库中的元素,您需要创建合适的视图,并为其提供相应的ViewModel实例。
在使用库之前,请在App.xaml.cs文件的OnStartup方法内使用NNViewRegistrar.RegisterSplat()方法将NodeNetwork的视图和相应的ViewModel进行注册关联。
using System.Windows;
using NodeNetwork;

namespace NodeNetworkTest;

public partial class App : Application
{
    protected override void OnStartup(StartupEventArgs e)
    {
        base.OnStartup(e);
        NNViewRegistrar.RegisterSplat();
    }
}
3. 创建视图
打开MainWindow.xaml,添加NodeNetwork命名空间xmlns:nodenetwork="clr-namespace:NodeNetwork.Views;assembly=NodeNetwork",并添加NetworkView视图<nodenetwork:NetworkView x:Name="networkView" />,NetworkView表示整个网络拓扑图:
<Window x:Class="NodeNetworkTest.MainWindow"
        xmlns="http://schemas.microsoft.com/winfx/2006/xaml/presentation"
        xmlns:d="http://schemas.microsoft.com/expression/blend/2008"
        xmlns:x="http://schemas.microsoft.com/winfx/2006/xaml"
        xmlns:mc="http://schemas.openxmlformats.org/markup-compatibility/2006"
        xmlns:nodenetwork="clr-namespace:NodeNetwork.Views;assembly=NodeNetwork"
        mc:Ignorable="d"
        Title="MainWindow" Height="450" Width="800">
    <Grid>
        <nodenetwork:NetworkView x:Name="networkView" />
    </Grid>
</Window>
4. 创建节点和连接
在NodeNetwork中,创建节点和连接非常简单。首先,我们需要创建NetworkViewModel,它是NetworkView视图的ViewModel,可以通过以下代码创建:
var network = new NetworkViewModel();
networkView.ViewModel = network;
然后通过以下代码创建第一个节点:
var node1 = new NodeViewModel();
node1.Name = "节点1";
network.Nodes.Add(node1);
并给第一个节点创建一个输入端口:
var node1Input = new NodeInputViewModel();
node1Input.Name = "节点1输入";
node1.Inputs.Add(node1Input);
创建第二个节点,并以同样的方式给此节点创建一个输出端口:
var node2 = new NodeViewModel();
node2.Name = "节点2";
network.Nodes.Add(node2);

var node2Output = new NodeOutputViewModel();
node2Output.Name = "节点2输出";
node2.Outputs.Add(node2Output);
最后,我们可以通过以下代码将节点1的输入端口和节点2的输出端口连接到一起:
var connection = new ConnectionViewModel(network, node1Input, node2Output);
network.Connections.Add(connection);
完整代码如下:
using DynamicData;
using NodeNetwork.ViewModels;
using System.Windows;

namespace NodeNetworkTest;

public partial class MainWindow : Window
{
    public MainWindow()
    {
        InitializeComponent();

        // 创建NetworkView视图的ViewModel实例
        var network = new NetworkViewModel();

        // 给视图(networkView)赋值viewmodel(network)
        networkView.ViewModel = network;

        // 创建第一个节点ViewModel,设置它的名称并将此节点加入到network
        var node1 = new NodeViewModel();
        node1.Name = "节点1";
        network.Nodes.Add(node1);

        // 创建第一个节点的输入端口ViewModel,设置它的名称并加入第一个节点
        var node1Input = new NodeInputViewModel();
        node1Input.Name = "节点1输入";
        node1.Inputs.Add(node1Input);

        // 创建第二个节点ViewModel,设置它的名称并将此节点加入到network, 并以同样的方式给此节点添加一个输出Create the second node viewmodel, set its name, add it to the network and add an output in a similar fashion.
        var node2 = new NodeViewModel();
        node2.Name = "节点2";
        network.Nodes.Add(node2);

        var node2Output = new NodeOutputViewModel();
        node2Output.Name = "节点2输出";
        node2.Outputs.Add(node2Output);

        // 将节点1的输入端口和节点2的输出端口连接到一起
        var connection = new ConnectionViewModel(network, node1Input, node2Output);
        network.Connections.Add(connection);
    }
}
运行程序看效果:
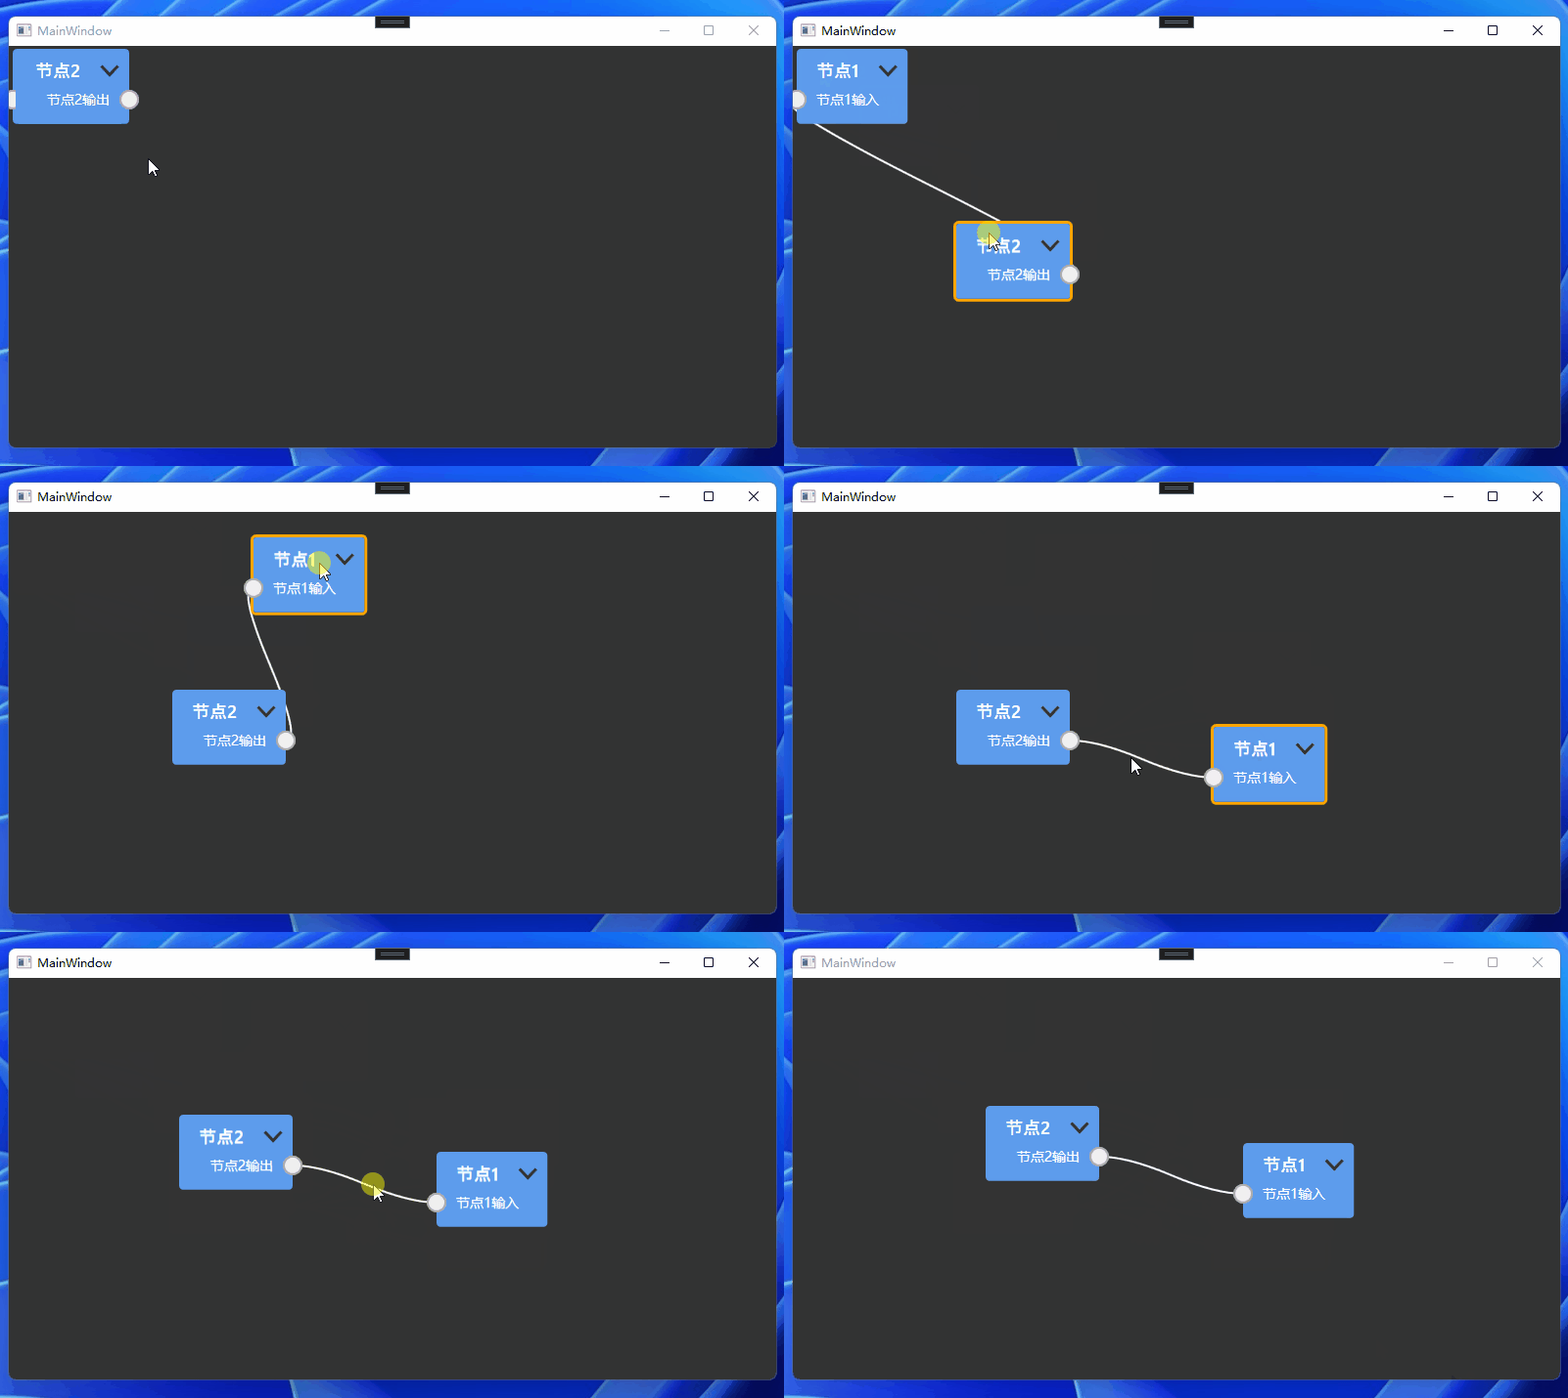
示例代码已经全部给了,你也可以戳这克隆。
5. 布局
在NodeNetwork中,布局非常灵活和自由。我们可以通过代码或图形界面进行布局。例如,我们可以通过以下代码将节点放置在指定的位置:
node.Position = new Point(100, 100);
通过以下代码调整整个网络拓扑图的布局(参考布局文档):
ForceDirectedLayouter layouter = new ForceDirectedLayouter();
var config = new Configuration
{
    Network = yourNetwork,
};
layouter.Layout(config, 10000);
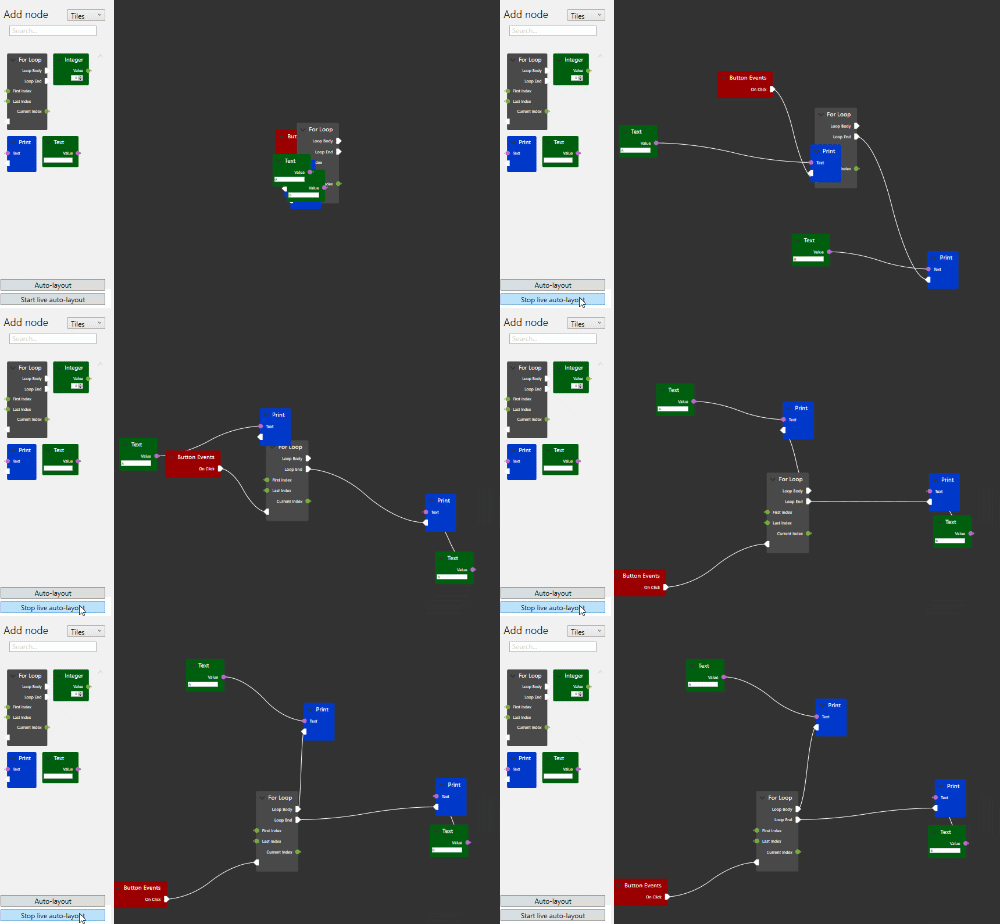
6. 序列化和反序列化
在NodeNetwork中,序列化和反序列化非常简单。我们可以通过以下代码将节点和连接序列化为XML格式:
var serializer = new XmlSerializer(typeof(NodeNetworkViewModel));
var writer = new StringWriter();
serializer.Serialize(writer, nodeNetwork);
然后,我们可以将XML字符串保存到文件或数据库中。反序列化也非常简单。我们可以通过以下代码从XML字符串中反序列化节点和连接:
var serializer = new XmlSerializer(typeof(NodeNetworkViewModel));
var reader = new StringReader(xmlString);
var nodeNetwork = (NodeNetworkViewModel)serializer.Deserialize(reader);
七、总结
NodeNetwork是一个非常实用和灵活的C# WPF开源项目,它可以帮助我们快速构建图形化的网络拓扑图,实现节点和连接的交互和传递。NodeNetwork提供了丰富的功能和特性,例如节点和连接的自定义、布局和调整、序列化和反序列化等,可以满足各种不同的应用需求。NodeNetwork的应用场景非常广泛,例如数据处理和分析、图形化编辑器、可视化和交互式展示等。NodeNetwork的使用方法非常简单,我们只需要安装NodeNetwork、创建节点和连接、布局和调整、序列化和反序列化即可。
- 入门指南
有关使用此库的简单快速入门指南,请参阅此页面上的说明书章节。 该文档包括设置信息、说明书章节、示例和 API 参考。
- 许可证
该库在 Apache 许可证 2.0 下获得许可。(见 choosealicense.com/licenses/apache-2.0 简要介绍)此许可证的副本包含在 LICENSE 下的存储库中。
- 文档
文档可在此处获得。如果要对文档进行更改,可以通过向 gh-pages 分支发出拉取请求来实现。
- 贡献
这些操作在 GitHub 页面上非常受欢迎:错误报告、补丁、功能请求、拉取请求...
- 微信技术交流群:添加微信(codewf)备注“入群”
- QQ技术交流群:771992300。