

大家好,我是沙漠尽头的狼!
AvaloniaUI是一个强大的跨平台.NET客户端开发框架,让开发者能够针对Windows、Linux、macOS、Android和iOS等多个平台构建应用程序。在构建复杂的应用程序时,模块化和组件间的通信变得尤为重要。Prism框架提供了模块化的开发方式,支持插件的热拔插,而MediatR则是一个实现了中介者(Mediator)模式的事件订阅发布框架,非常适合用于模块之间以及模块与主程序之间的通信。
本文重点是介绍MediatR,它 是 .NET 中的开源简单中介者模式实现。它通过一种进程内消息传递机制(无其他外部依赖),进行请求/响应、命令、查询、通知和事件的消息传递,并通过泛型来支持消息的智能调度。开源库地址是 https://github.com/jbogard/MediatR。
本文将详细介绍如何在Avalonia项目中使用MediatR和Microsoft的依赖注入(MS.DI)库来实现事件驱动的通信。

0. 基础知识准备-MediatR的基本用法
MediatR中有两种消息传递的方式:
Request/Response,用于一个单独的Handler。Notification,用于多个Handler。
Request/Response
Request/Response 有点类似于 HTTP 的 Request/Response,发出一个 Request 会得到一个 Response。
Request 消息在 MediatR 中,有两种类型:
IRequest<T>返回一个T类型的值。IRequest不返回值。
对于每个 request 类型,都有相应的 handler 接口:
IRequestHandler<T, U>实现该接口并返回Task<U>RequestHandler<T, U>继承该类并返回UIRequestHandler<T>实现该接口并返回Task<Unit>AsyncRequestHandler<T>继承该类并返回TaskRequestHandler<T>继承该类不返回
Notification
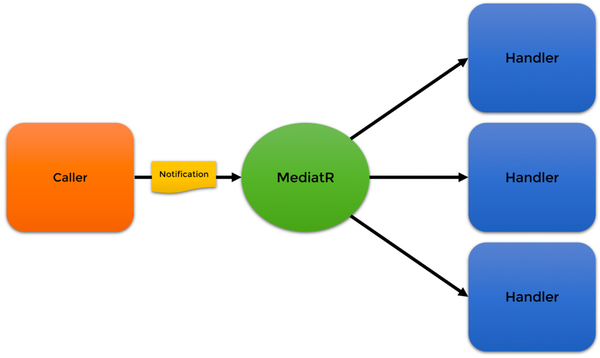
Notification 就是通知,调用者发出一次,然后可以有多个处理者参与处理。
1. 准备工作
首先,确保你的Avalonia项目中已经安装了必要的NuGet包。你将需要Prism.DryIoc.Avalonia作为依赖注入容器,以及MediatR来处理事件的发布和订阅。此外,为了将MediatR集成到DryIoc容器中,你还需要DryIoc.Microsoft.DependencyInjection包(这里感谢网友寒提供的技术解答)。
在项目的.csproj文件或NuGet包管理器中添加以下引用:
<PackageReference Include="Prism.DryIoc.Avalonia" Version="8.1.97.11072" />
<PackageReference Include="MediatR" Version="12.2.0" />
<PackageReference Include="DryIoc.Microsoft.DependencyInjection" Version="8.0.0-preview-01" />
2. 配置容器和注册服务
在Avalonia项目中,你需要配置DryIoc容器以使用Microsoft的DI扩展,并注册MediatR服务。这通常在你的主启动类(如App.axaml.cs)中完成。
以下是配置容器和注册服务的示例代码:
namespace CodeWF.Tools.Desktop;

public class App : PrismApplication
{
    // 省略了模块注入等和主题无关的代码,有兴趣源码在文末可查

    /// <summary>
    /// 1、DryIoc.Microsoft.DependencyInjection低版本可不要这个方法(5.1.0及以下)
    /// 2、高版本必须,否则会抛出异常:System.MissingMethodException:“Method not found: 'DryIoc.Rules DryIoc.Rules.WithoutFastExpressionCompiler()'.”
    /// 参考issues:https://github.com/dadhi/DryIoc/issues/529
    /// </summary>
    /// <returns></returns>
    protected override Rules CreateContainerRules()
    {
        return Rules.Default.WithConcreteTypeDynamicRegistrations(reuse: Reuse.Transient)
            .With(Made.Of(FactoryMethod.ConstructorWithResolvableArguments))
            .WithFuncAndLazyWithoutRegistration()
            .WithTrackingDisposableTransients()
            //.WithoutFastExpressionCompiler()
            .WithFactorySelector(Rules.SelectLastRegisteredFactory());
    }

    protected override IContainerExtension CreateContainerExtension()
    {
        IContainer container = new Container(CreateContainerRules());
        container.WithDependencyInjectionAdapter();

        return new DryIocContainerExtension(container);
    }

    protected override void RegisterRequiredTypes(IContainerRegistry containerRegistry)
    {
        base.RegisterRequiredTypes(containerRegistry);

        IServiceCollection services = ConfigureServices();

        IContainer container = ((IContainerExtension<IContainer>)containerRegistry).Instance;

        container.Populate(services);
    }

    private static ServiceCollection ConfigureServices()
    {
        var services = new ServiceCollection();

        // 注入MediatR
        var assemblies = AppDomain.CurrentDomain.GetAssemblies().ToList();

        // 添加模块注入,未显示调用模块类型前,模块程序集是未加载到当前程序域`AppDomain.CurrentDomain`的
        var assembly = typeof(SlugifyStringModule).GetAssembly();
        assemblies.Add(assembly);
        services.AddMediatR(configure =>
        {
            configure.RegisterServicesFromAssemblies(assemblies.ToArray());
        });

        return services;
    }
}
在上面的代码中,我们重写了CreateContainerRules、CreateContainerExtension和RegisterRequiredTypes方法以配置DryIoc容器,并注册了MediatR服务和相关处理程序。
注意,在注册MediatR服务时,我们从当前已加载的程序集列表中查找并注册处理程序。如果模块是按需加载的,请确保在注册处理程序之前已加载了相应的模块。
此外,我们还演示了如何手动添加模块程序集到列表中以便注册处理程序。这通常在你需要显式控制哪些模块和处理程序被注册时很有用。但是,请注意,在大多数情况下,你可能希望使用更自动化的方式来加载和注册模块及处理程序(例如,通过扫描特定目录或使用约定等)。这取决于你的具体需求和项目结构。
另外,请注意代码中的注释和说明,它们提供了有关每个步骤和配置的额外信息。在实际项目中,你可能需要根据项目的实际情况和需求进行相应的调整和优化。例如,你可能需要处理循环依赖、配置作用域、使用拦截器或装饰器等高级功能。这些都可以在DryIoc和MediatR的文档中找到更详细的说明和示例。
3. MediatR2种传递方式
有了前面的基础知识准备,我们添加类库工程CodeWF.Tools.MediatR.Notifications,并添加请求定义(主工程及模块的响应处理程序需要实现):
public class TestRequest : IRequest<string>
{
    public string? Args { get; set; }
}
添加通知定义:
public class TestNotification : INotification
{
    public string? Args { get; set; }
}
请求和通知定义结构一样(实现接口不同),只有一个字符串属性。
4. 添加处理程序
示例工程结构如下,因为该开源项目(文末链接)写在站长的AvaloniaUI桌面工具工程,本文只关注如下图3个工程即可:
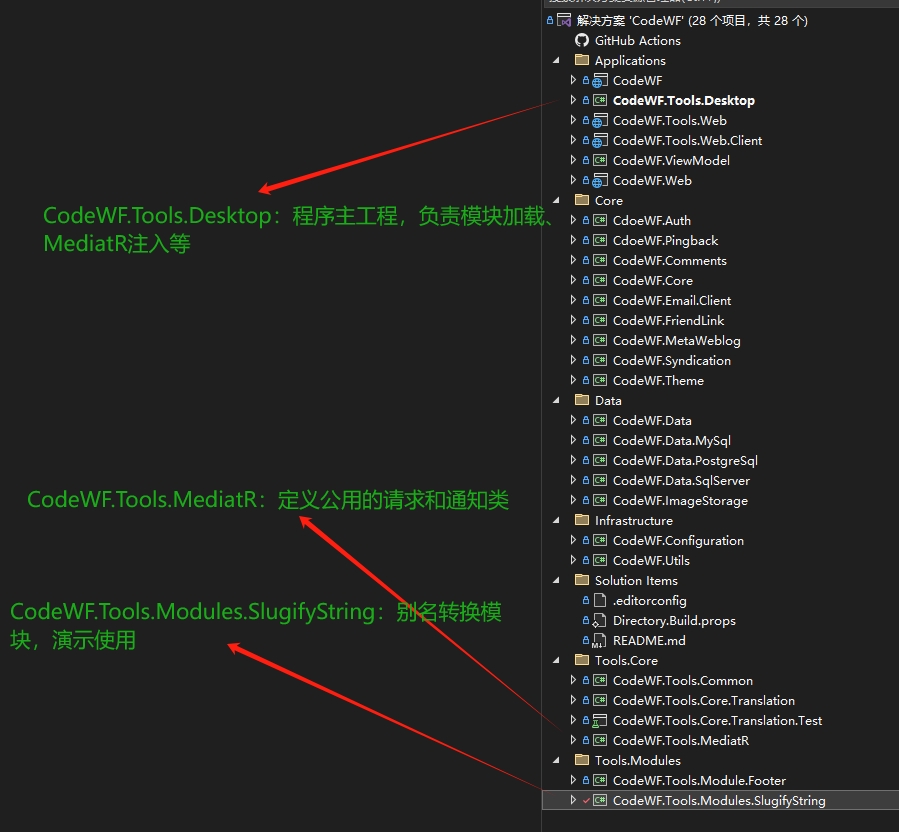
在AvaloniaUI主工程(CodeWF.Tools.Desktop)添加请求响应处理程序:
public class TestHandler : IRequestHandler<TestRequest, string>
{
    public async Task<string> Handle(TestRequest request, CancellationToken cancellationToken)
    {
        return await Task.FromResult($"主工程处理程序:Args = {request.Args}, Now = {DateTime.Now}");
    }
}
添加通知响应处理程序:
public class TestNotificationHandler(INotificationService notificationService) : INotificationHandler<TestNotification>
{
    public Task Handle(TestNotification notification, CancellationToken cancellationToken)
    {
        notificationService.Show("Notification",
            $"主工程Notification处理程序:Args = {notification.Args}, Now = {DateTime.Now}");
        return Task.CompletedTask;
    }
}
在模块【CodeWF.Tools.Modules.SlugifyString】中添加请求响应处理程序(因为顺序关系,不会触发,这里添加只是演示请求为一对一响应):
public class TestHandler : IRequestHandler<TestRequest, string>
{
    public async Task<string> Handle(TestRequest request, CancellationToken cancellationToken)
    {
        return await Task.FromResult($"模块【SlugifyString】Request处理程序:Args = {request.Args}, Now = {DateTime.Now}");
    }
}
添加通知响应处理程序(会和主工程通知响应处理程序一样被触发):
public class TestNotificationHandler(INotificationService notificationService) : INotificationHandler<TestNotification>
{
    public Task Handle(TestNotification notification, CancellationToken cancellationToken)
    {
        notificationService.Show("Notification",
            $"模块【SlugifyString】Notification处理程序:Args = {notification.Args}, Now = {DateTime.Now}");
        return Task.CompletedTask;
    }
}
几个响应处理程序类定义类似:收到请求时,返回格式化字符串;收到通知时,弹出提示表明当前是哪个位置收到的通知,便于演示效果。
5. 请求和通知演示
触发操作我们写在模块【CodeWF.Tools.Modules.SlugifyString】中,在模块的ViewModel类里通过依赖注入获取请求和通知的发送者实例ISender和IPublisher:
using Unit = System.Reactive.Unit;

namespace CodeWF.Tools.Modules.SlugifyString.ViewModels;

public class SlugifyViewModel : ViewModelBase
{
    // 省略别名转换相关逻辑代码,源码文末查看

    private readonly INotificationService _notificationService;
    private readonly IClipboardService? _clipboardService;
    private readonly ITranslationService? _translationService;

    public SlugifyViewModel(INotificationService notificationService, IClipboardService clipboardService,
        ITranslationService translationService, ISender sender, IPublisher publisher) : base(sender, publisher)
    {
        _notificationService = notificationService;
        _clipboardService = clipboardService;
        _translationService = translationService;
        KindChanged = ReactiveCommand.Create<TranslationKind>(OnKindChanged);
    }


    public async Task ExecuteMediatRRequestAsync()
    {
        var result = Sender.Send(new TestRequest() { Args = To });
        _notificationService.Show("MediatR", $"收到响应:{result.Result}");
    }

    public async Task ExecuteMediatRNotificationAsync()
    {
        await Publisher.Publish(new TestNotification() { Args = To });
    }

}
点击测试MediatR-Request按钮触发调用ISender.Send发出请求并得到响应,通过点击测试MediatR-Notification按钮触发调用IPublisher.Publish发出通知。
请求效果:
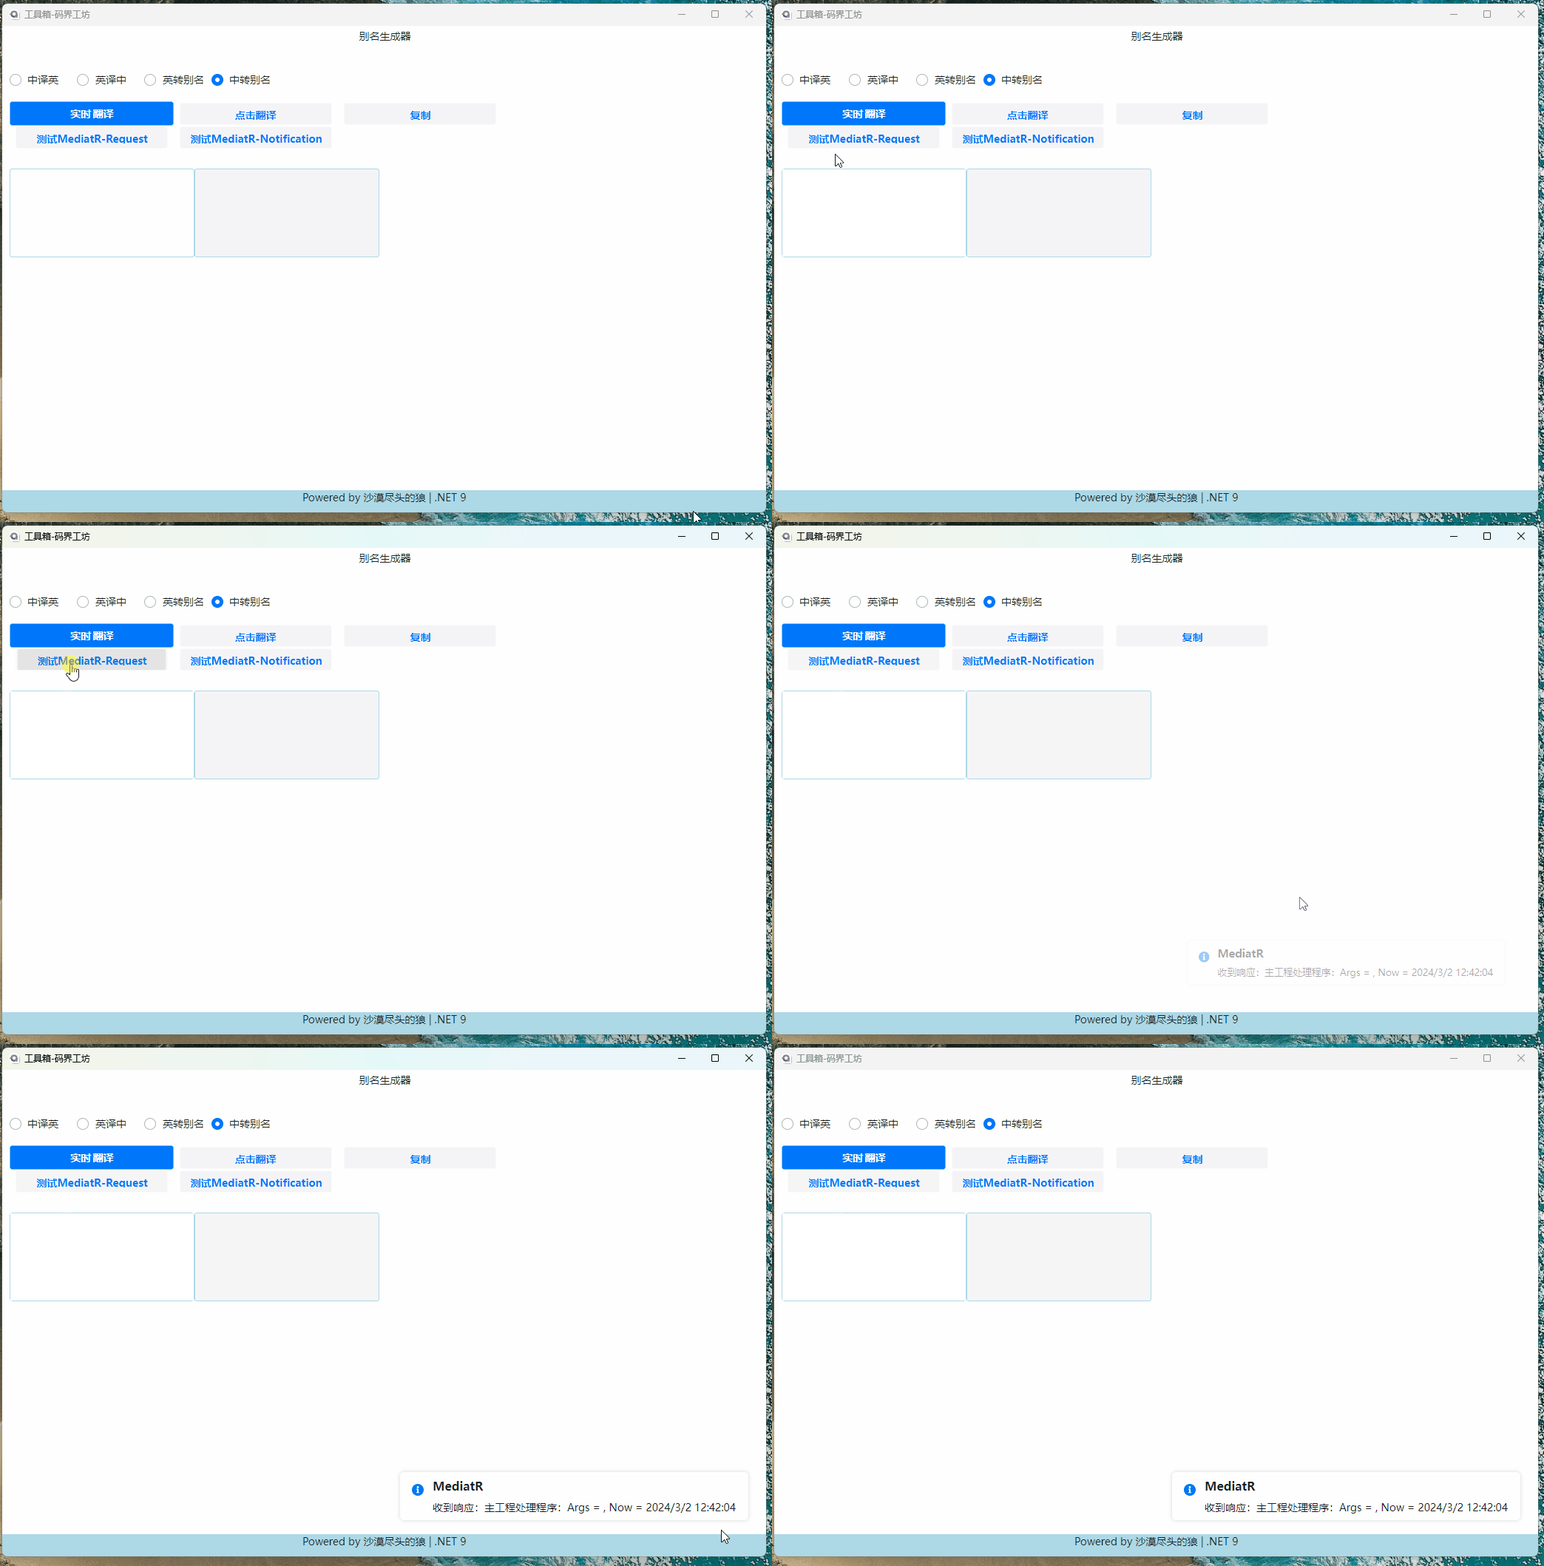
看上面的请求效果:虽然在主工程和模块工程都注册了一个响应,但只有主工程被触发。
通知效果:
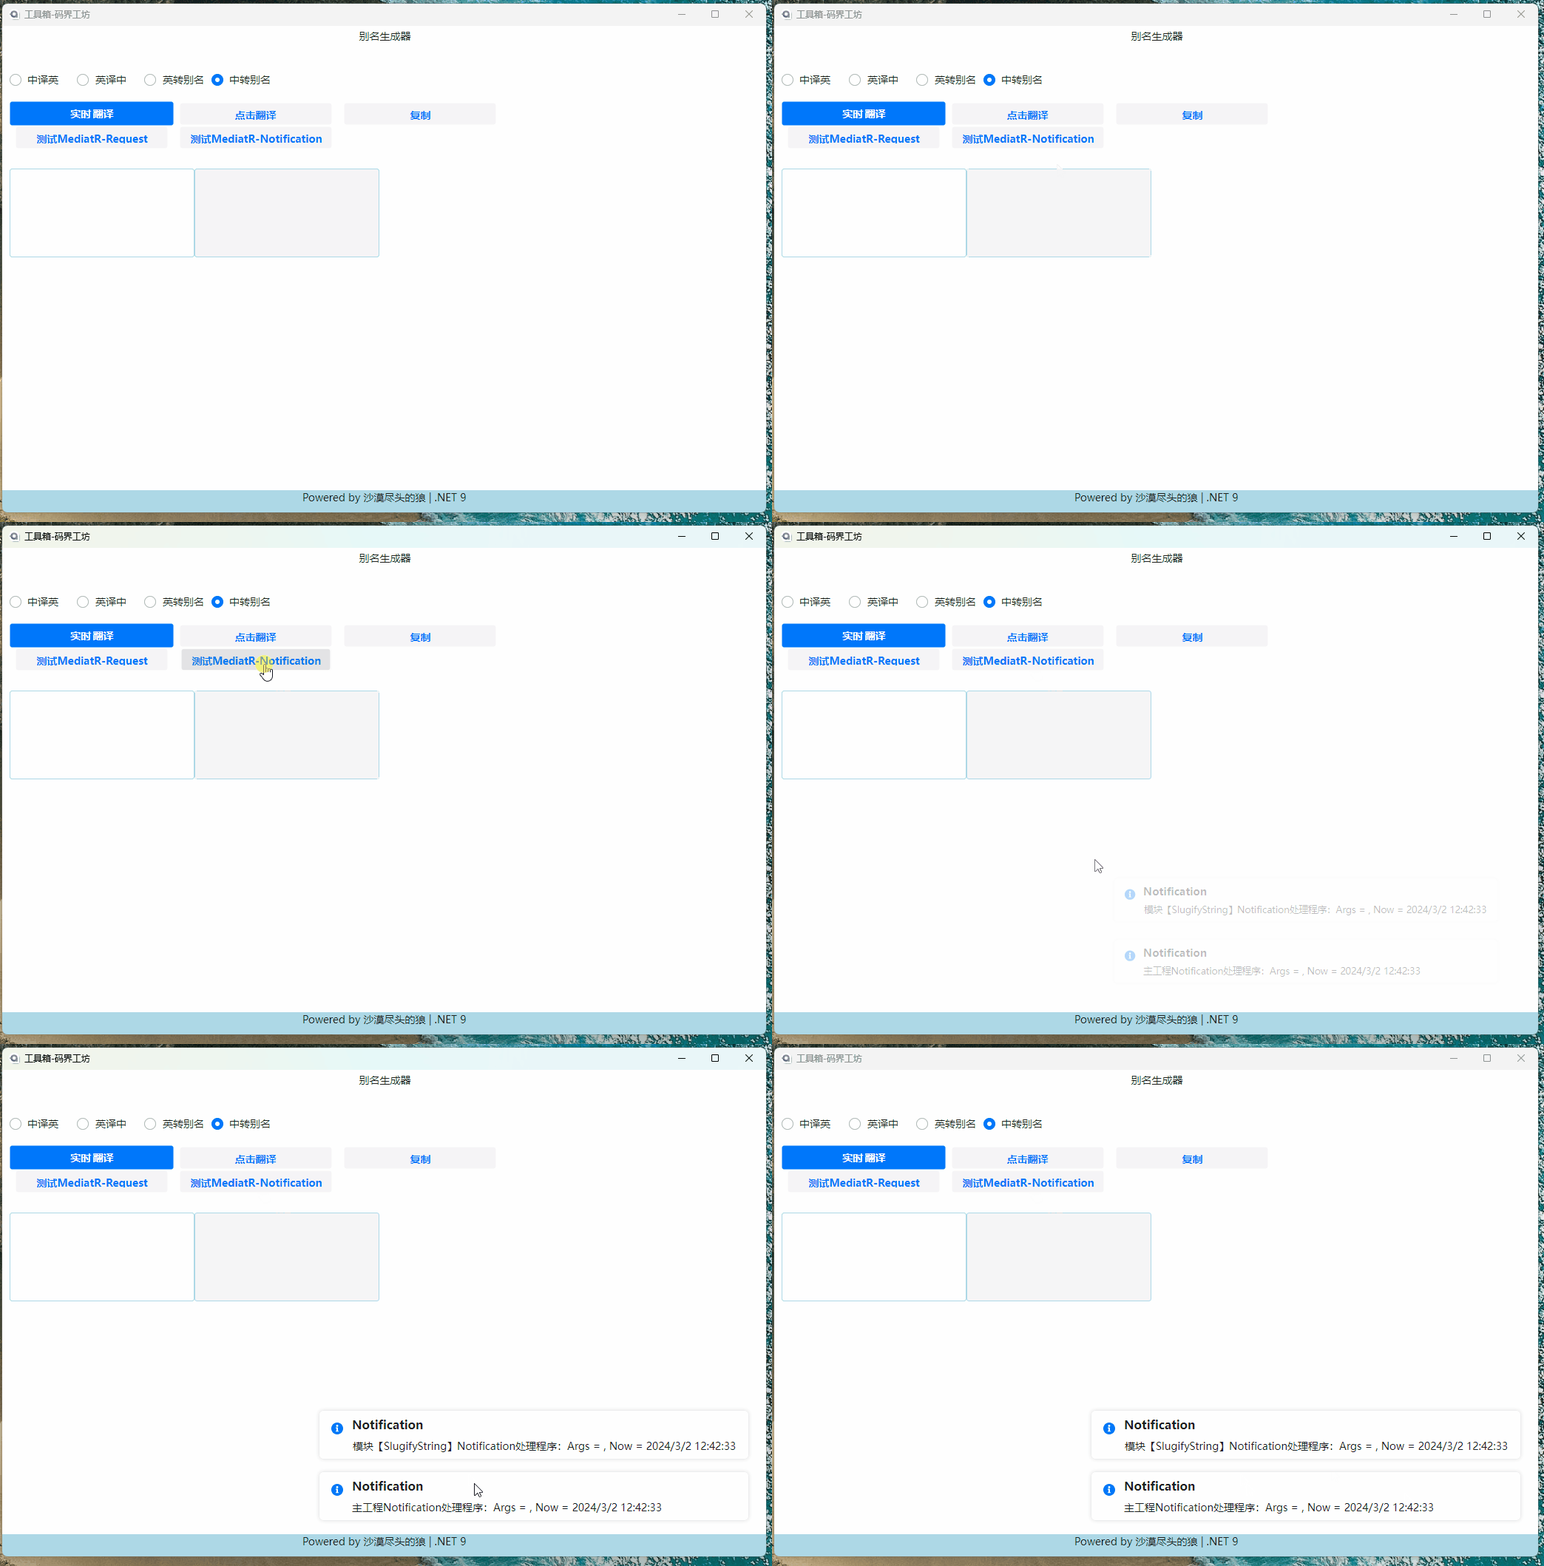
在主工程和模块工程都注册了一个通知响应,所以两个处理程序都弹出了提示。
6. 总结
为什么使用MediatR,而未使用Prism的事件聚合器?
站长开发工具做了在线版(https://blazor.dotnet9.com),也做了跨平台桌面版本(AvaloniaUI),两个版本使用MediatR可以复用大部分事件代码。
CQRS or DDD?
这节直接复制MediatR 在 .NET 应用中的实践 - 明志唯新 (yimingzhi.net),大家应该可以学到些什么:
软件开发发展到今天,模式和理念不断在架构中刷新:从分布式到微服务,再到云原生 ……。时代对一个程序员,尤其是服务端程序员,提出的要求越来越高。DDD(领域驱动设计)在微服务架构中一再被提及,甚至有人提出这是必须项!
实施一个完美的 DDD 还是有难度的,现实中奋战在一线的 CRUD 程序员还是不少。那么在 CRUD 和 DDD 之间我们是否还有缓冲区呢?MediatR 的作者曾经也撰文讨论过这个问题,我很认同他的基本观点:设计是为应用服务的,不能为了 DDD 而 DDD。
CQRS 的全称是:"Command and Query Responsibility Segregation",直译过来就是命令与查询责任分离,可以通俗的理解为 读写分离。
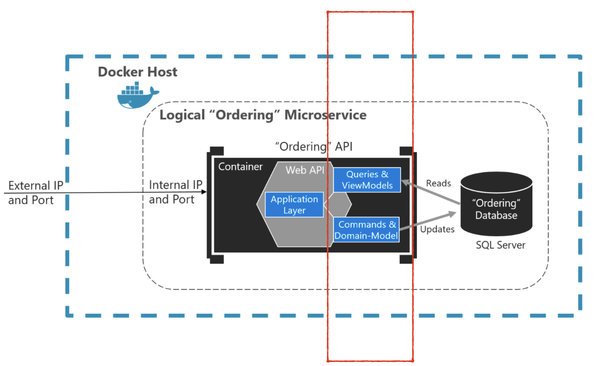
微软的官方文档中对此做过如下陈述:
CQRS 命令和查询责任分离数据存储的读取和更新操作分离的模式。 在应用程序中实现 CQRS 可以最大程度地提高其性能、可伸缩性和安全性。 通过迁移到 CQRS 而创建的灵活性使系统能够随着时间的推移更好地发展,并防止更新命令在域级别导致合并冲突。
微软也给出了相应的隔离模型解决方案:
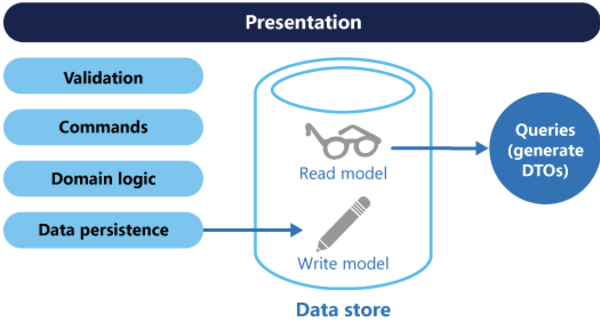
CQRS 使用命令来更新数据,使用查询来读取数据,将读取和写入 分离到不同的 模型中。
- 命令应基于任务,而不是以数据为中心。
- 命令可以放置在队列中进行异步处理,而不是同步处理。
- 查询从不修改数据库。 查询返回的 DTO 不封装任何域知识。
CQRS 的好处包括:
- 独立缩放: CQRS 允许读取和写入工作负载独立缩放,这可能会减少锁争用。
- 优化的数据架构: 读取端可使用针对查询优化的架构,写入端可使用针对更新优化的架构。
- 安全性: 更轻松地确保仅正确的域实体对数据执行写入操作。
- 关注点分离: 分离读取和写入端可使模型更易维护且更灵活。 大多数复杂的业务逻辑被分到写模型。 读模型会变得相对简单。
- 查询更简单: 通过将具体化视图存储在读取数据库中,应用程序可在查询时避免复杂联接。
有了 MediatR 我们可以在应用中轻松实现 CQRS:
IRequest<>的消息名称以Command为结尾的是命令,其对应的 Handler 执行写任务IRequest<>的消息名称以Query为结尾的是查询,其对应的 Handler 执行读数据
结束语
MediatR 是一个简单的中介者实现,可以极大降低我们的应用复杂度,也能够使得我们一路从 CRUD 到 CQRS 到 DDD 进行逐级演进。毕竟我们是生活在现实中的人,不能罔顾商业现实,纯粹一味追求技术。
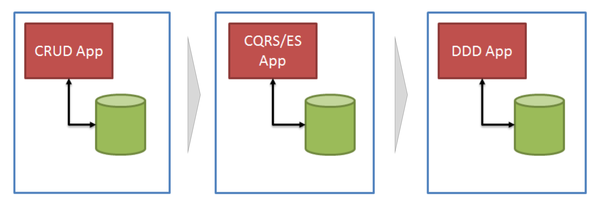
商业技术的演进,应该是一路持续的改革而不是来一场革命。疫情总有反复,但是我们得活着,相对轻松的活着!
参考
文中示例写了主要代码,但可能缺失部分细节,源码链接如下,欢迎留言交流。
本文源码:GitHub